5 Tips for Specifying PCB Hole Size Tolerance
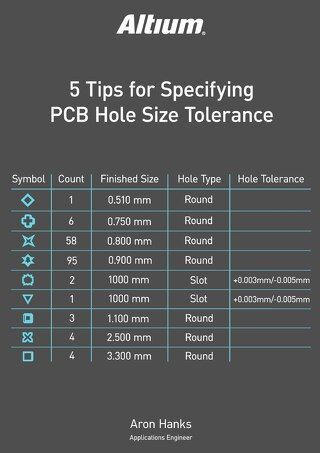
Table of Contents
Learn how to quickly add and clearly communicate hole size tolerance specifications to your fabricator to ensure your PCB design is manufactured properly.
One of the more forgotten topics in PCB design are the holes through which components are mounted. Specifying the tolerance of hole dimensions in PCB fabrication ensures proper fit of plated-through-hole (PTH) components. Just as important, those dimensions must be clearly communicated to the fabricator so that the boards are properly made.
Now, Altium DesignerPCB design software allows you to add hole tolerance attributes for your pads and vias that will be communicated to the fabricator by inclusion in the drill table. Here are five tips to help you with specifying pcb hole sizes tolerance.
TOLERANCES
Component datasheets list a tolerance with plus/minus to accommodate variations in aging, wear, temperature, plating, material, machining, and so forth. For example, the datasheet for a specific manufacturer of 1/4-watt resistors specifies lead diameter as 0.022 ±0.003. Therefore, the leads on the actual part can vary from 0.019 to 0.025.
Commonly Printed Circuit Board PCB manufacturers specify a hole tolerance of ±0.004. The lead, whether at the large or small end of the tolerance band must always fit in the hole. So, the minimum hole size must accommodate the largest resistor lead plus tolerance (0.022 resistor lead + 0.003 resistor lead tolerance), plus the 0.004 PCB hole tolerance. Thus, 0.022+0.003+0.004 =0.029 inches, which is the smallest hole allowable on the board.
As holes are drilled, drill bits wear and get smaller. Or, the drill may vibrate or wiggle slightly in a hole, causing a slightly larger hole. Mounting holes are then plated, and the plating may be thicker or thinner for each batch or position on the board. You also have to account for thermal expansion or shrinkage of the Printed Circuit Board PCB substrate as it is being processed.
So, hole tolerance is critical in the design process to ensure proper placement of PTH parts. A rule of thumb is that you should make a PCB hole 0.007 inches larger than the part lead hole diameter to accommodate all tolerance, drill wear or wobble, and plating variations.
There is no default hole tolerance value in Altium Designer. You can adjust hole tolerance attributes in the pad and via property dialogs. Hole tolerances and defaults can also be established in the Pad Via Library panel and the Footprint Library.
FIVE TIPS FOR SPECIFYING HOLE TOLERANCES
Hole tolerance in Altium Designer can be accessed and edited using several different methods, which we will examine below. In each method, you can set the minimum (-) and maximum (+) hole tolerance attributes.
Tip 1 — Setting Hole Tolerance Attributes for Specific Pads and Vias
You can quickly set the pad/via tolerances using the properties of each.
Right-click on the pad or via and select Properties. In the Pad Properties dialog (Figure 1), hole tolerance can be edited under the Hole Information section.
In the Via Properties dialog, hole tolerance can be edited using Tolerance, in the top left-hand corner of the dialog (Figure 2).

Figure 1: Hole tolerance can be specified in the Pad Properties dialogAlt Text: Hole tolerance can be specified in the Pad Properties dialog)

Tip 2 — Creating Hole Tolerance Attributes for a Pad or Via Template
You can also specify hole tolerances using a pad or via template.
Right-click in the Pad Via Library panel and select Add Via Template or Add Pad Template. Hole tolerance can be set under the Hole Information section.
Tip 3 — Setting Hole Tolerance Attributes for Multiple Pads or Vias at Once
Conveniently, you can set the hole tolerance for multiple pads or vias at the same time.
Open the PCB Inspector panel, shown in Figure 3. Select the pads or vias on the PCB that you wish to set and enter the necessary hole tolerance values in the panel, in the right-hand column under Object Specific.

Hole tolerance columns can also be added to and edited from the PCB panel, using the Hole Size Editor. Right-click under the Unique Holes header and select Columns » Hole Tolerance (+) and Hole Tolerance (-). By clicking in the hole tolerance columns, the tolerance attributes can be changed.

Tip 4 — Adding Hole Tolerance to Via Stitching/Via Shielding
Hole tolerances can be added for multiple stitching vias to save time.
Go to Tools » Via Stitching/Shielding » Add Stitching to Net. Hole tolerance information can be added under Tolerance in the Via Style section.

Tip 5 — Displaying Hole Tolerance in the Drill Table
You can view the tolerances in the drill size table in two ways: one or two columns to display tolerance attributes.
From the Drill Table Properties dialog, click Add Column. To view all tolerances attributes in one column, select Hole Tolerance. This column will display the minimum and maximum set attributes together. Alternatively, you can choose to show the minimum and maximum set hole tolerance attributes in separate columns. For the latter option, select Hole Tolerance (+) and Hole Tolerance (-). You can of course also choose to display only the minimum or maximum set hole tolerance independently.

You can also choose to group objects by their hole tolerance. From the Drill Symbols dialog (click Configure Drill Symbols in the Drill Table dialog), click Grouping and select Hole Tolerance.
Note that when adding hole tolerance information to pads and vias, unless all pads or vias grouped under the Count column have the same hole tolerance attributes, hole tolerance values will be displayed as an * (asterisk).
IMPORTANT: After adding columns to drill table, you must click OK to exit the Drill Table dialog or your changes will not be saved.
Mounting PCB Components
Ensuring proper hole tolerance is critical for your PTH parts to properly mount to your PCB. Altium Designer has made the documentation of your hole size tolerances simple so that your tolerance specifications can be easily communicated to your fabricator.
 Open as PDF


