








Hardware Verification vs Validation: What’s the Difference?

At a Glance
Learn the difference between verification and validation in hardware development. Explore V&V planning, the V-Model, and common mistakes to avoid.


Sometimes, a hardware design can look completely right on the test bench: the MCU runs at a stable 160 MHz, sensors communicate over I²C, and the power supply holds 12 V under full load. But a product that meets every requirement can still fall short once it reaches the user.
Verification and validation (V&V) address the gap between meeting the requirements and meeting the real-world need. Some hardware teams mix up these two terms. Teams that treat V&V as a single step, or skip one of them because the prototype seems to work, can find problems late: during an audit or once the product is in the field.
In this article, we explain what verification and validation mean in hardware development and how they differ. We also cover how V&V connect to requirements through the V-Model, how to create a V&V plan, and how to avoid common mistakes.
Key Takeaways
- Verification checks whether hardware meets defined technical requirements.
- Validation checks whether the complete product meets the needs it was designed for.
- V&V should start early and connect requirements to planned activities, acceptance criteria, results, and supporting evidence throughout hardware development.
What Is Verification?
Verification is the process of checking whether the hardware matches the defined requirements and engineering specifications. It answers the question: are we building the product right?
The purpose of verification is to replace assumptions with evidence. Instead of assuming a circuit works, the team compares the design or physical prototype against the defined requirements and captures evidence showing whether it meets them.
Verification can include activities such as:
- Requirements review: Check that requirements are clear, consistent, achievable, traceable, and verifiable.
- Design review: Compare schematics, PCB layouts, mechanical drawings, and interfaces against the defined requirements and design rules.
- Analysis and simulation: Use calculations or models to check parameters such as thermal margins, signal integrity, timing, or power consumption.
- Inspection: Check the physical hardware, dimensions, assembly, components, or connections against the design documentation.
- Testing and measurement: Measure the hardware and compare the results with the required limits or expected design behavior.
How It Looks in PracticeIn hardware development, verification starts long before you have a final product. Consider a requirement like: 'The 12 V input must stay within ±5% under full load.' It is verified in stages: first by checking component ratings on the schematic, then running a power simulation, and finally measuring the prototype on the bench. Each step adds to the evidence. |
What Is Validation?
Validation is the process of checking whether the hardware actually works for its intended use, users, and operating environment. It answers the question: are we building the right product?
The main purpose of validation is to provide evidence that the product actually addresses the problem it was designed to solve. A design may meet every technical requirement and still fall short if it doesn’t perform as expected in real operating conditions. Validation gives you confidence that the complete system is suitable for the job stakeholders actually need it to do.
Validation can include activities such as:
- Requirements validation: Check that the requirements capture stakeholder needs and the conditions the product will face in use.
- System-level testing: Evaluate the complete product to confirm that everything works together as intended.
- Use-case testing: Check whether the product can perform the tasks and scenarios it was designed for.
- Environmental testing: Evaluate the product under realistic temperature, humidity, vibration, load, or other operating conditions.
- Field testing: Operate the hardware in its intended environment to uncover problems that may not appear in the lab.
- User evaluation: Let representative users interact with the product and check whether it supports their actual workflow and needs.
How It Looks in PracticeSuppose a commercial drone passes all of its bench tests. To validate it, the drone is operated in the environment it was designed for. If you discover that high humidity causes sensor drift, or that direct sunlight makes the status LEDs impossible to read, the product may be verified against its technical requirements but still fail validation for its intended use. |
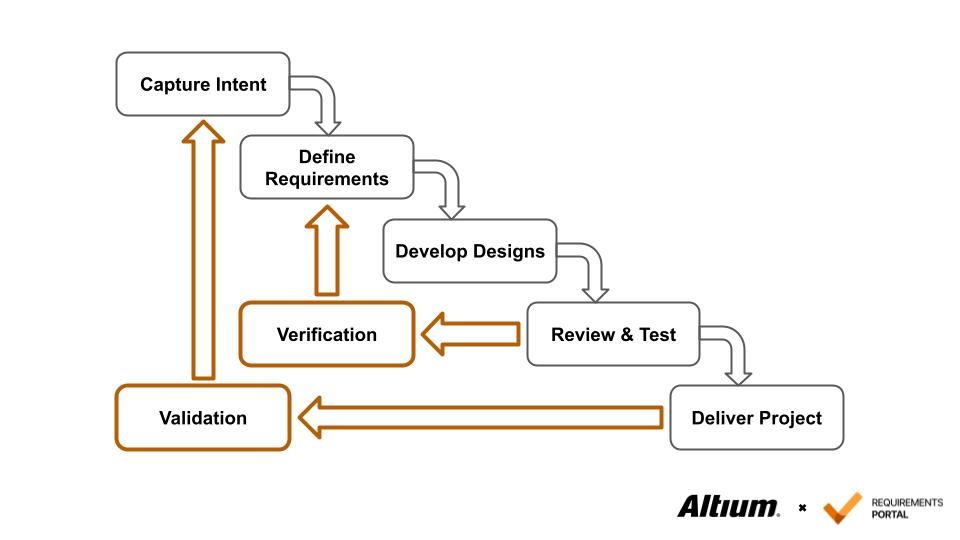
Verification and validation in the hardware development process.
Difference Between Verification and Validation
V&V often use the same engineering tools like tests, measurements, inspections, and analysis. The difference is what you are trying to prove with the result.
For example, a thermal chamber test can verify that a product operates across a specified −20 °C to 60 °C range. Validation asks whether that range matches the need. If the product is installed in a sun-exposed enclosure that reaches 75 °C, it can pass verification and still fail in use. The same chamber can support validation when it is run with the temperature profile the complete product is expected to face in the field.
Verification usually gives a more direct pass-or-fail result against a defined requirement and can be applied to individual requirements, designs, or hardware elements. Validation looks more broadly at the integrated system and whether its overall behavior is acceptable for the intended use.
In a requirements-driven process, verification builds evidence that individual technical requirements have been satisfied. Validation then checks whether the complete product meets the stakeholder need under real operating conditions, and it can show that a requirement was incomplete or wrong.
Aspect | Verification | Validation |
Question | Are we building the product right? | Are we building the right product? |
Compared Against | Requirements, specifications, and design characteristics | Intended use and stakeholder needs |
Focus | Individual requirements, design files, and technical characteristics, at each system level | The complete product in its context of intended use |
Timing | Starts early and continues throughout development | Starts with validating requirements and returns when the complete product takes shape |
Methods Used | Reviews, inspection, analysis, simulation, demonstration, and testing against defined requirements | Use-case testing, environmental testing, user evaluation, and field testing, supported by analysis |
Outcome | Evidence that the hardware meets its defined technical requirements | Evidence that the complete product meets the stakeholder need in its intended use |
How V&V Fit into the V-Model
The V-Model shows how to organize V&V across a hardware development project.
The V-Model lays out the system lifecycle as a V. The left side starts with stakeholder needs and expectations, turns them into system and subsystem requirements, and refines those into architecture and detailed design. The bottom of the V is implementation. The right side moves back up through integration, with testing at the component, subsystem, and complete product levels.
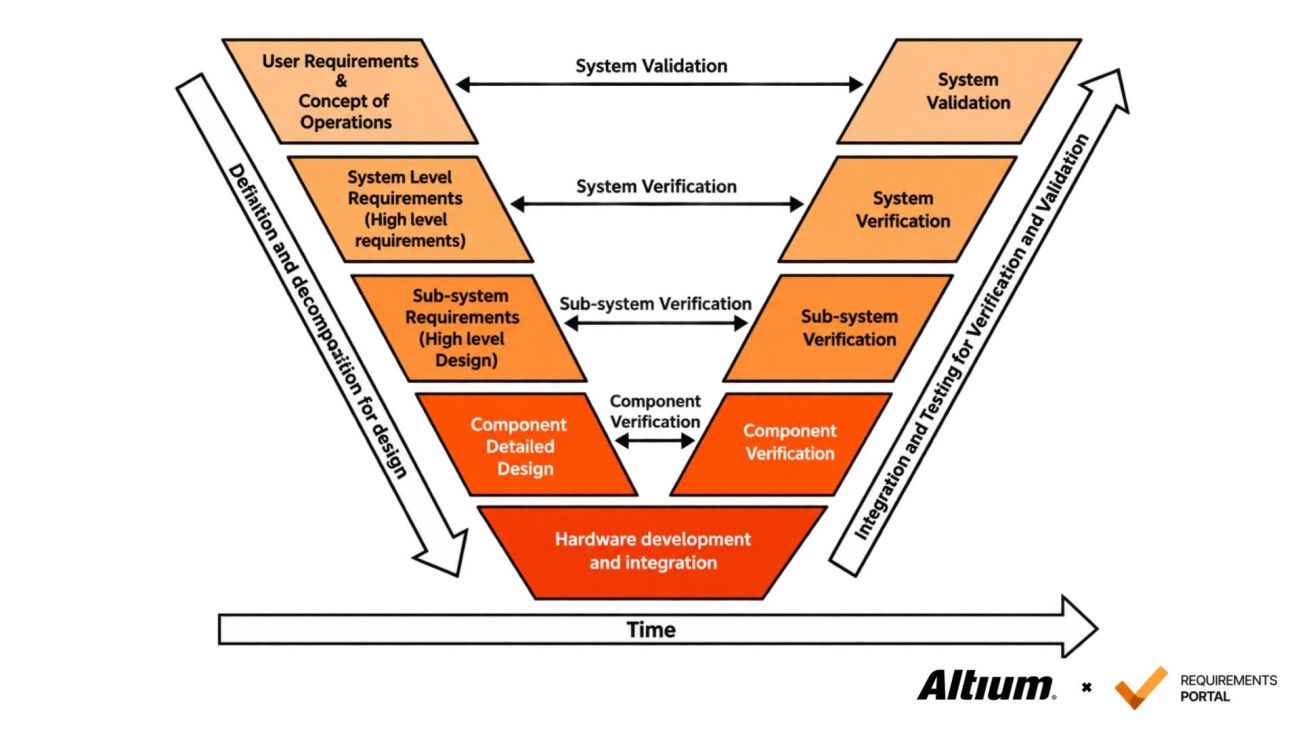
The V-Model of the systems engineering process.
Each level on the left pairs with a level of testing on the right, and those pairings create traceability. Each requirement connects to the V&V activity and evidence that checks it, and teams plan that activity while the design is still in progress.
For example, a requirement that the 12 V input must stay within ±5% under full load can be checked at several levels: component ratings against the schematic, a power simulation of the board, and a measurement on the assembled product.
Within this structure, V&V have different roles:
- Verification confirms, at each level, that what was built matches the corresponding requirements and design from the left side. Reviews, analysis, and simulation start on the left, and testing and measurement run up the right.
- Validation checks against the stakeholder needs at the top left. It starts with validating the requirements against those needs and returns at the top right as the system-level check: does the complete product satisfy the stakeholder needs and intended use?
How to Create a V&V Plan
By the time hardware reaches the testing phase, the team should already know what to check, which requirements it relates to, how the result will be judged, and what evidence must be captured. The V&V plan brings those decisions into one document.
A V&V plan typically covers six decisions:
- Define the scope: Decide which product, subsystems, or hardware functions the plan covers, what falls outside it, and where V&V effort goes first based on risk.
- Link V&V activities to requirements: Connect technical requirements to verification activities and stakeholder needs to validation activities. Each then has a clear path to evidence.
- Choose methods: Decide how each requirement will be verified, through inspection, analysis, demonstration, testing, or another suitable method, and how each stakeholder need will be validated, through use-case testing, environmental testing, user evaluation, or field testing.
- Define conditions and acceptance criteria: Specify the hardware configuration, operating conditions, equipment, and measurable result that determines whether the activity passes or fails.
- Plan who does what and when: Assign responsibilities, required resources, and timing, and align each activity with the appropriate stage of hardware development, such as the prototype, EVT, DVT, or PVT builds.
- Decide how results and evidence are captured: Define how each outcome is recorded and linked to supporting evidence, and which activities need to be repeated after the design changes.
Common Pitfalls and How to Avoid Them
While a software bug can often be fixed with an update, a problem in hardware design is easiest to fix before the boards are built. Many of these problems start in how requirements are written and how V&V is planned.
The table below highlights common V&V pitfalls and the good practices that help avoid them.
Common Pitfall | How to Avoid It |
Treating verification and validation as the same activity | Plan verification (against requirements) and validation (against stakeholder needs) as separate, distinct activities. |
Writing vague or untestable requirements | Review requirements for clarity and testability before design starts, and write acceptance criteria alongside the requirements. |
Postponing V&V planning until the hardware is designed and built | Plan V&V as soon as requirements are available and define how they will be verified before implementation is finished. |
Setting no clear priorities among V&V activities | Prioritize V&V activities based on safety-critical requirements, technical risk, and operating conditions. |
Relying only on physical hardware testing | Match each requirement to the most suitable method: reviews, inspection, analysis, simulation, demonstration, or testing. |
Leaving out relevant stakeholders’ input | Involve users and key stakeholders from initial requirements to final validation, and include design engineers during verification. |
Not documenting V&V results and evidence | Keep the records and evidence for each V&V activity, ensuring full traceability back to the relevant requirement. |
Benefits of V&V
Hardware changes late in development tend to cost more than software changes. A board respin, a tooling change, or a failed certification run takes real time and budget, and the hardware in a shipped unit is difficult to patch. This is why verification and validation carry particular weight in hardware development. Used together, they give teams four main benefits:
- Earlier problem detection: Reviews, simulation, and early prototypes expose requirement gaps, design errors, and oversights. At that stage, the fix is usually a change to a specification or schematic.
- Evidence for each requirement: Verification links every requirement to a result, so the team can show what was checked, how, and with what outcome. This evidence also supports compliance, and regulated hardware such as medical devices typically requires it as part of design controls.
- Fit with real use: Validation tests the complete product against its environment, users, and tasks. This covers issues a requirement-by-requirement check can miss, such as sensor drift or display glare in sunlight.
- Input for the next cycle: Measured margins and failure findings guide design changes, future revisions, and later product generations. They also show where a requirement needs tightening or relaxing.
Software Tools to Manage Verification & Validation
Hardware development involves many requirements and test results, and tracking them manually across a project can be challenging. Teams can end up with a mix of scattered files and disconnected tools, such as:
- Spreadsheets and docs: Practical for small projects with limited requirements and test cases. As V&V scope expands, maintaining traceability and audit readiness can require manual upkeep, and records can drift out of sync.
- Issue trackers (e.g., Jira, GitHub): These tools can be adapted to organize V&V work and connect related items through links, fields, or tags. But maintaining requirements traceability and full V&V coverage usually takes additional setup and custom plugins.
- Dedicated requirements management tools: Built for structuring requirements and traceability. But depending on the tool, test planning and evidence capture can require separate modules or integrations with external testing tools.
For teams that want to plan and track V&V activities alongside requirements in a shared workspace, Requirements Portal connects requirements with verification plans, test runs, evidence, and change history. This way, teams can see what’s been verified and what still needs attention.
Conclusion & Next Steps
In short, verification proves that your hardware meets the spec, while validation proves it actually works for the user. To make this work, V&V cannot be a final checklist. It needs to be embedded into the product development process from day one.
If you want to deepen your understanding of V&V frameworks, these materials are useful to continue with:
- NASA Systems Engineering Handbook gives practical guidance on planning and executing space-grade hardware product V&V.
- Guide to the Systems Engineering Body of Knowledge (SEBoK) provides a broader systems engineering view of V&V.
- INCOSE V&V Across Product Lifecycle covers V&V across different lifecycle stages, the V-Model, V&V methods, test cases, and success criteria.
If you are ready to move from theory to practice, try Requirements Portal to link test cases to requirements and electronic designs, track coverage, and capture engineering evidence.
Frequently Asked Questions
Is Verification The Same as Validation?
No. Verification checks the hardware against defined requirements. Validation checks whether the requirements and the product reflect stakeholder needs in real use.
What Comes First, Verification or Validation?
Both should be planned early, and neither is a single phase. Verification starts with reviews, analysis, and simulation as the design develops. Validation starts by checking requirements against stakeholder needs and becomes more prominent as the integrated product takes shape.
What Are Common Types of V&V Methods?
Common V&V methods include reviews, inspections, analyses, simulations, demonstrations, and tests. The same method can support either verification or validation, depending on whether it checks a defined requirement or evaluates the product in the context of its intended use.

About Author
Related Resources
Related Technical Documentation
Table of Contents
- Key Takeaways
- What Is Verification?
- What Is Validation?
- Difference Between Verification and Validation
- How V&V Fit into the V-Model
- How to Create a V&V Plan
- Common Pitfalls and How to Avoid Them
- Benefits of V&V
- Software Tools to Manage Verification & Validation
- Conclusion & Next Steps
- Frequently Asked Questions
Better Requirements
Less Busywork
Build better hardware with AI agents that live and act in your requirements tool.
Learn More
Thank you, you are now subscribed to updates.