


How to Design a Thermal Prototype PCB

At a Glance
Thermal prototypes give you a chance to experiment with thermal loads on a variety of components. Here’s how to design these PCBs and what you can learn from them.


Thermal problems in PCBs often get overlooked and they may not be addressed until a design has gone through a round of prototyping. Obviously, prototyping is expensive and design teams cannot throw infinite dollars at prototype spins, but they can push some of the testing work onto lower cost prototype spins. One way to approach this from the thermal perspective is to run a thermal prototype.
These prototypes are not meant to be elaborate or expensive; they are inexpensive boards that feature just a few components, and they are specifically designed to evaluate thermal demands in certain circuits. They also serve multiple purposes in some cases, which may be related to environmental testing, mechanical testing, and basic functional testing.
What You Need in Your Thermal Prototype
A thermal prototype can be constructed as a small circuit board that contains a limited number of components. Specifically, it should contain only the main components you want to test for thermal performance and reliability. The goal is to place only the circuits with unknown thermal profiles so that these can be measured directly.
When the thermal loading in a system is unknown, there are always some unanswered questions regarding the board construction. What copper weight should be used? Are planes needed on specific layers? Is an advanced high thermal conductivity material needed, or will generic FR4-grade materials work to spec? Thermal prototypes allow you to investigate these points and much more.
- Duplicates of thermal test circuits with variant components
- Plenty of test points on unused pins, important power components, etc.
- Connectors or headers to access any required configuration signals and interfaces
- Any supporting components that can also create excessive heat
- For passives or inductive components, select parts with common packaging for easy swapping while testing
The PCB layout for your test circuit should closely match the intended board construction but with as little risk as possible. Most thermal test boards for ASICs can be done during the front-end engineering phase, so for simplicity consider building the application circuit from the datasheet rather than your custom solution. For power management ASICs, make sure to place your intended inductors, transformers, chokes, etc. as these can also be large generators of heat.
Once designed, the thermal prototype can be placed into production in a low-cost fab & assembly facility overseas. Usually, you’re not designing something with sensitive IP, and the number of component placements during assembly should be low. Through major simplification of the PCB layout and BOM, you can get the build cost as low as possible.
Measurements in Thermal Prototyping
Once designed and produced, your thermal prototype needs to be tested and the temperature needs to be measured. What’s the best way to do this?
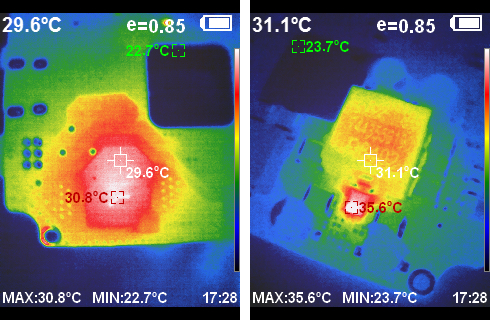
The method that will give the most accurate readings on and around the circuit under test is temperature measurement with an infrared camera. There is a huge range of infrared cameras available with various levels of resolution and detection range. There are small modules that can plug into your smartphone and there are larger handheld imagers that can give high resolution real-time temperature maps (such as the images shown below).
Thermal images supplied by Mark Harris in this article.
For more elaborate thermal prototype boards, such as ASICs with digital interfaces, some live configuration may need to be performed. This is where you will need to include connections to a data logger or DAQ, or a serial connection to an interface in the PCB. This will allow you to control the serial interface and monitor I/O states as you test the device.
What About Dev Boards and Eval Boards?
Thermal prototyping is where dev boards and eval boards have a chance to shine!
Development (dev) boards are most often used as development prototypes for microcontrollers or FPGAs, where the user can build firmware and applications around a specific component. Evaluation (eval) boards are modular and can be hooked up into an ad hoc assembly with wires, so you can test how different sets of components can work together in a system.
Whether it’s a dev board or an eval board, the product can also be used as a thermal prototype. These boards can be tested at high power, or in high temperature environments, while interfacing with other equipment or running an application. For example, you could:
- Run the board in an environmental chamber
- Run the board near its power or temperature limits
- Place the board in an enclosure with a running DC fan
- Experiment with heat sinks and thermal interface materials
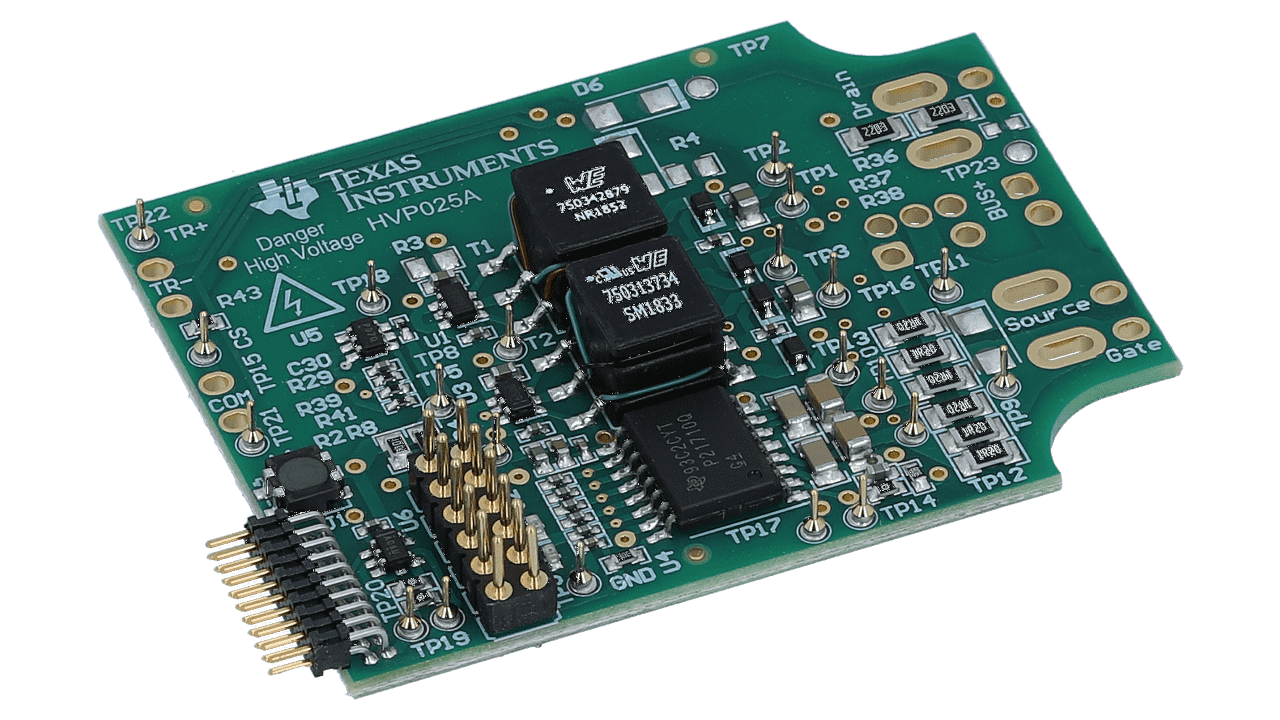
Eval boards and dev boards aren’t always a perfect reflection of your intended circuit, but sometimes they come close enough that you get reasonable data on the thermal profile for the component under test. For example, in the gate drive eval board shown below, you could get excellent thermal data for an SiC-based power system.
The Texas Instruments UCC21710QDWEVM-025 eval board for driving SiC transistors and power modules.
Not all components are available with dev boards or eval boards, but when these boards are available they can be purchased from many distributors. Check out Octopart and search for “eval board” to see what’s available. You can also look at component manufacturer sites to find their reference design materials and eval board options.
Whether you need to build reliable power electronics or advanced digital systems, use the complete set of PCB design features and world-class CAD tools in Altium Designer®. To implement collaboration in today’s cross-disciplinary environment, innovative companies are using the Altium 365™ to easily share design data and put projects into manufacturing.
We have only scratched the surface of what’s possible with Altium Designer on Altium 365. Start your free trial of Altium Designer + Altium 365 today.
About Author
Related Resources
Related Technical Documentation
Table of Contents
Design to Release, Without the Friction
- Keep reviews tied to the right version
- Reduce handoff confusion and rework
- Spot sourcing and release risk earlier
- Work solo, share when needed
Get Started
Thank you, you are now subscribed to updates.

