


Low Cost Solutions for Hardware in the Loop Testing Automation

At a Glance
A project overview demonstrating low-cost solutions for automated hardware in the loop testing using the Pytest framework


In today’s fast-paced world where iterations of electronics are spun at lightning speeds, we often forget one of the most critical aspects of development: testing. It’s always easy to overlook testing simply because it’s the last stage that prevents us from releasing our product. In product development, we constantly find ourselves in the camp of “good enough” versus “exhaustively tested.” This situation usually happens because we don’t have time to test, re-test, and then test some more.
In the best of situations, we would have hired a full-on testing team who is equipped to run exhaustive tests. Even if we have that fancy test team, are we really able to utilize them for every modification, every small and insignificant change that we make to our prototypes? In most cases, the answer is no, and in this article, I would like to approach the problem with a solution where you can have your cake and eat it too. In this article, we will review a very low cost, yet highly effective and quite exhaustive test system that will get you that bang for your buck that you’ve been looking for.
Manual Testing vs. Automated Testing
It’s quite common in the industry to have an automated test setup (mainly for production-level testing). For product development, however, it’s not common practice. As mentioned above, the cost and development time to set up sophisticated automated test equipment requires a high level of effort. This type of cost and effort is only warranted for production in mass volumes or low volumes with very sophisticated test configurations (e.g., low volume spacecraft systems to be environmentally tested many times over). For the rest of the world, we resort to basic, tedious manual testing. This kind of testing can range from ADC/DAC validation, protocol checks, power consumption tests, etc. Regardless of the test type, the hope is that it only needs to be done once or twice, and then it can be thrown over the wall to the testing group.
Unintended Consequences and Automation
The reality is that during our development, either at the hardware design/respin phases or embedded software development, we unintentionally cause something to break. Some examples could be a solder bridge across pads or driver code bleeding over into other driver codes could cause something to break. Regardless of the outcome, it’s clear that testing doesn’t just happen once or twice. Issues come up, and exhaustive testing is usually too exhausting to perform after the tenth time of reworking aboard. The obvious answer to the problem is to have automated systems perform exhaustive regression testing. But what is the solution for the embedded engineer who has little money and time to develop an exhaustive automated test system?
The Cheap Solution
For embedded systems, there lies a low cost yet very scalable and practical automated test solution. While it’s not perfect, it will provide the design engineer with the highest return on investment. The concept is to use a simple device that can drive analog signals, read analog signals, generate various protocol serial streams, and analyze waveforms. An example of a low-cost device that possesses such specs is the Analog Discovery 2. While this is a 5V device, it still packs quite a punch. I consider it my swiss army knife for embedded systems development. There are other comparable products out there, but I found this device to work particularly well for my applications. This device can run off your desktop computer or even a Raspberry Pi. It has a Python library as well that enables the user to quickly throw test executives together. For convenience, I have dockerized the full configuration and built it for all architectures.
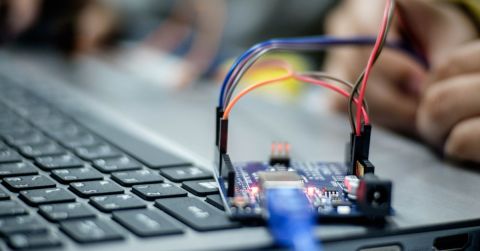
Running Example
Let us consider a real example that can be found in this repository. For the sake of simplicity, our embedded target will be an Arduino Duo. Below is what our full test setup looks like:


The idea here is to demonstrate:
- Host computer commands the Analog Discovery 2 to drive analog signals to the Arduino
- Arduino reads and stores the ADC values
- The host computer receives the ADC values via UART (USB)
- The host computer validates that what was sent out via the Analog Discovery 2 matches the telemetry sent by the Arduino
Why would we want to automate something like this? Let’s assume we rework a board near the ADC, or someone changes the drivers that interface with the ADC. Are we 100% confident that a simple manual ADC read with a few knobs turned on a power supply is sufficient to test our hardware/software? If not, why not let the automation cover every permutation and every corner case, so we don’t have to? And just for good measure, why not run the same thing 100 times...just because we can! This can get much more sophisticated and complicated (e.g., protocol testing, ADC filtering tests, etc.), but this article will stick with just the basics.
The test script is fairly basic. Assuming your Arduino (i.e., embedded device under test) has been loaded with the proper programming files and everything has been hooked up properly, you would run the test script on your computer like so:
python -m pytest test_arduino_hil.py
This will trigger the Analog Discovery 2 to sweep through the voltage range of the Arduino’s ADC and validate that the input voltage matches the output voltage read off the ADC. Rather than manually sweeping with a benchtop supply, the script did it for you with a single command. For a trivial example like this, it seems unnecessary, but this process pays dividends when combining tests in a regression-like fashion.
Coupling this with our CI/CD system, we can see the following stages running and passing:

The above-pictured stages are:
- docker_build: Build the environment. In this case, we are using docker images on Linux PCs and ARM-based devices such as Raspberry Pis
- arduino_load_test: Compile and load the Arduino code and validate everything worked.
- arduino_hil_test: Run the hardware in the loop test on a physical Arduino.
If we take a closer look at the Tests section, we can see that these tests were captured and parsed by Gitlab:


We now have a software setup that allows us to test our design locally and remotely (using our CI/CD system). This enables the design engineer to continue focusing on designing instead of testing and debugging down the road.
Conclusion
In this article, we reviewed the concept of using automated tests to validate a design concurrently and post-facto. Whether it’s a minor rework or a monumental design change, having automated regression tests pays dividends when ruling out unintended consequences (i.e., fix one thing, break another). The encouraged process is to write these test scripts alongside the design development process (similar to Test Driven Development). Coupling these automated tests with a CI/CD system adds an extra bonus to demonstrate our boards are working on a remote target and can be tested by anyone, anywhere, at any time.
Would you like to find out more about how Altium can help you with your next PCB design? Talk to an expert at Altium or discover more about the top DFM problems and their solutions. You can download a free trial of Altium Designer here.
About Author
Related Resources
Related Technical Documentation
Table of Contents
Design to Release, Without the Friction
- Keep reviews tied to the right version
- Reduce handoff confusion and rework
- Spot sourcing and release risk earlier
- Work solo, share when needed
Get Started
Thank you, you are now subscribed to updates.


