


Getting Started with the Kria KV260 Vision AI Starter Kit

At a Glance
In this article Ari Mahpour unboxes and configures the Xilinx Kria KV260 Vision AI Starter for the first time.


If you’re not familiar with the Zynq UltraScale+ MPSoC from XIlinx and you’re in the Embedded + FPGA space, now is the time to get acquainted with it. It comes packed with an ARM Cortex-A53 Quad core, 2 ARM Cortex-R5 cores, and an FPGA fabric all on a single system on a chip (SoC). When it first came out the barrier to entry was quite steep. Over time several companies started to introduce System on Modules (SoM) that came with board support packages (BSP) and made it a little bit easier to get started with projects using lightweight Linux distros (i.e. operating systems) such as PetaLinux. Recently the Kria KV260 starter kit came out at an exceptionally low price and has also been paired with a fully functional distro of Ubuntu. This, essentially, turns your Zynq UltraScale development board into a more “capable” Raspberry Pi with an FPGA and two ARM Cortex-R5s onboard as well. It’s powerful, compact, and lots of fun to play with. In this article we’re going to unbox the development kit and walk through all the necessities to get Ubuntu 22.04 up and running in no time.
Flashing the SD Card
The Kria KV260 development kit does not come pre-loaded with an operating system like a desktop computer does. The same goes with a Raspberry Pi or most other embedded devices. The expectation is that the user flashes the operating system onto a microSD card and then runs the operating system directly off the microSD card (versus onboard memory).
To get started you will, ideally, want a fast microSD card. I, personally, picked out the SanDisk extreme with a capacity of 256 GB. At the time of writing this cost me between $20-30. You could definitely go with a smaller capacity (i.e. 64 GB or even less) but I like having the extra space and the price differential was negligible.
Throughout this article we will be following the official guide from Xilinx but there are a few gotchas that I will be pointing out throughout the process. At the time of writing this article the Kria KV260 starter kit did not ship with the latest firmware. In order to run Ubuntu 22.04 I needed to upgrade the firmware first according to this doc. Navigate to this webpage to Download Ubuntu 20.04 and then follow the instructions here to flash your SD card using Balena Etcher.
Powering on for the First Time
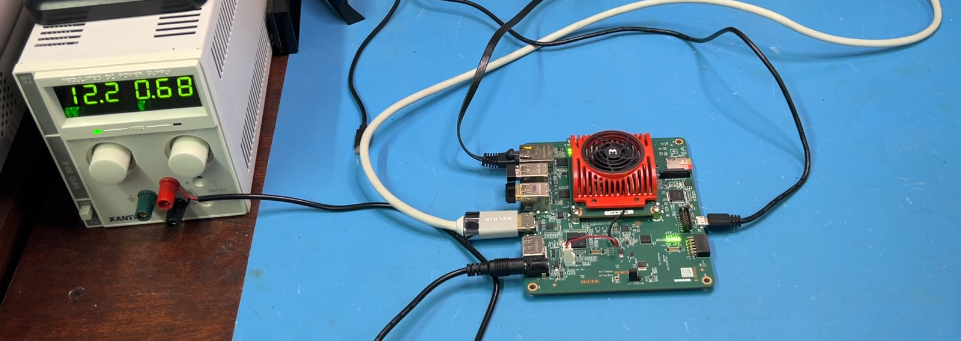
Before powering on the board there are a few things we need to do to get started. If you haven’t purchased the accessory pack for the development kit you’ll need a power supply. This board requires a 12V power source with a max current source of 3A. Most AC adapters that you’ll find laying around come with a 2.1mm barrel plug. The Kria KV260 development kit, however, uses a 2.5mm barrel plug. Rather than swap out the 2.5mm barrel jack I bought a 2.5mm male to female cable, cut it in half, stripped the ends, and hooked it up to my power supply. As you can see below the initial turn on consumed 0.68A.
Figure 1: Initial turn on and power consumption
As mentioned in the instructions, if you run a USB to micro USB cable from your computer to the board you can watch the bootloader starting the operating system via your favorite serial terminal (e.g. TeraTerm or Putty). You’ll also want to make sure to insert your microSD Card, video cable (DisplayPort or HDMI), keyboard, and mouse to get the full experience. Power on the device and wait for GNOME to load up on your monitor.
Figure 2: Login screen after GNOME starts (Ubuntu 20.04)
Once GNOME starts up you’ll be asked to enter your username and password. The default login credentials are:
username: ubuntu
password: ubuntu
Running the Firmware Upgrade Utility
Now that Ubuntu 20.04 is running we can run the firmware upgrade utility. You’ll need to download the Xilinx download - 2022.1_update3_BOOT.BIN file from the firmware update page either directly on the device or through some other transfer mechanism (i.e. USB flash drive). I found it easiest to open up Firefox on the device itself and download the flash file. Keep in mind that you’ll need an AMD Xilinx account (which is free) in order to download this file.
To run the firmware update you’ll first need to install the update utility as documented here. Open up a terminal (clicking on the bottom left corner 9 dots, typing in Terminal in the search bar, and clicking on the Terminal icon). Run the following command:
sudo snap install xlnx-config --classic --channel=1.x
Once the utility has been installed we can run the firmware upgrade script:
sudo xlnx-config --xmutil bootfw_update -i <path to boot.bin>
Since I used firefox to download the bin file my full command is:
sudo xlnx-config --xmutil bootfw_update -i ~/Downloads/BOOT_xilinx-k26-starterkit-v2022.1-09152304_update3.BIN
The firmware update process should start and report back once it has completed. After it has completed you can shut down the device (power button in the top right corner), turn it off, and remove your SD card in preparation for flashing it with Ubuntu 22.04.
Installing and Running Ubuntu 22.04
We now go back to Balena Etcher and flash our microSD card with Ubuntu 22.04. The process is exactly the same as with Ubuntu 22.04 but the login screen just has a slightly different look.
Figure 3: Login screen after GNOME starts (Ubuntu 22.04)
It’s the same deal, however. You just need to enter “ubuntu” as the username/password and, voila, you’re done! It will take a minute or two to load completely but after that you are ready to start playing around with your Kria KV260 development kit.
Conclusion
In this article we unboxed and set up the Kria KV260 Vision AI Starter Kit from Xilinx. We reviewed some important aspects of the hardware, learned how to flash the microSD card with different versions of Ubuntu, and poured over the details on how to properly upgrade the SoMs firmware. At this point you should be set up with Ubuntu 22.04 and dive into some examples including the Smart Camera Application and other resources.
About Author
Related Resources
Related Technical Documentation
Table of Contents
Design to Release, Without the Friction
- Keep reviews tied to the right version
- Reduce handoff confusion and rework
- Spot sourcing and release risk earlier
- Work solo, share when needed
Get Started
Thank you, you are now subscribed to updates.