Implementing Touch Sensors

Learn how to design a reliable alternative to traditional mechanical switches with capacitive touch sensor technology in Altium Designer.
Capacitive touch sensor technology offers an inexpensive and highly reliable alternative to the traditional mechanical switches that are used in electronics control interfaces. Manually creating or resizing a touch sensor’s complex vendor/technology- specific patterns can be both difficult and time-consuming. Fortunately, there is an automated solution, which enables the easy creation and modification of intricate touch sensor shapes.
CAPACITIVE TOUCH SENSORS
Capacitive touch sensor switches and controls offer several advantages over the mechanical switches traditionally used in electronic products. For one thing, touch sensors are implemented directly into the copper on a PCB. There are no moving parts that can malfunction or wear out over time. Capacitive touch sensors are also meant to function through a variety of coverings, including plastic, glass, plexiglass, solder mask, cardboard, and wood, as well as many other materials. Their surface covering makes them resistant to substances which could be damaging to a manual switch, such as water, moisture, dust, dirt, grime, harsh chemicals, and cleaning agents.
Given these benefits of capacitive sensors, the question becomes, how can you implement them into your electronic devices? Touch switches and controls used in electronic products can be inexpensively fabricated and can come in different versions, like touch pins and on breakout boards. The products they go into are often more intuitive than traditional mechanical components, are easier to maintain, and yield an overall higher quality and long-term reliability.
Examples of practical capacitive touch sensor applications can be found in everything from home appliances and consumer electronics to industrial controls and marine equipment, to mobile devices and PCs and peripherals, to medical devices, and many others.
CAPACITIVE TOUCH TECHNOLOGY
For this capacitive touch sensor tutorial, capacitive touch sensing is defined as activating when a human finger approaches a copper-etched capacitive touch sensor electrode on a PCB. This causes the capacitance of the sensor electrode to change. This change in capacitance is sensed on either a general purpose microcontroller input, or a dedicated touch control device input, connected to the sensor electrode. The microcontroller or touch control device will then update the state of one or more digital output control pin signals in a specific programmed response to the capacitive sensing change recognized by a specific sensor electrode.
There are two different types of capacitive sensing. They are referred to as Self-Capacitance Sensing and Mutual-Capacitance Sensing.
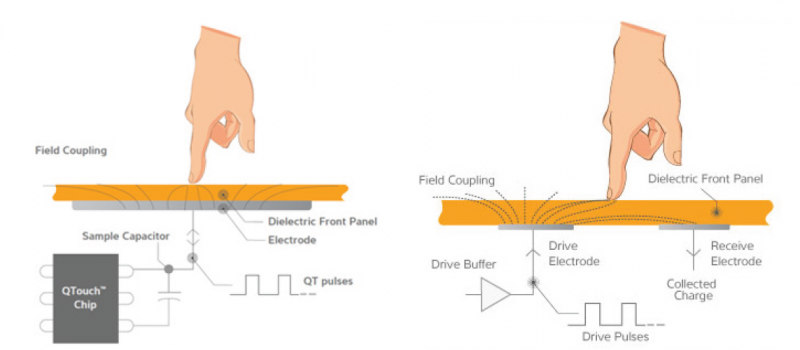
Self-Capacitance Sensing is when the presence of a human finger increases the capacitance of a single sensor electrode. This increase in capacitance is then processed as described above.
Mutual-Capacitance Sensing occurs when the presence of a human finger decreases the mutual coupling between two sensor electrodes paired together. When this drop in capacitance (on the receive electrode) is sensed, it’s then processed as described above.

Figure 1 - Self-Capacitance Sensing left and Mutual-Capacitance Sensing right
TOUCH SENSOR SHAPES
Touch sensors consist mainly of three general types: Buttons, Sliders, and Wheels.
Buttons enable a toggle control from a single capacitive touch sensing contact point. For example, if you touch a certain button sensor once, a lighting circuit toggles on. If you touch same the Button sensor again, the lighting circuit toggles off.
Sliders enable a level control from a minimum point to a maximum point. For example, if you touch a certain slider at its minimum point, the connected lighting circuit will be set to its dimmest light level. Now drag your finger from that initial point across the slider sensor toward the maximum point, and the lighting circuit gradually increases in brightness.
For Wheel sensors, perhaps the most common example is volume control. Touch and drag your finger clockwise along the wheel to increase the volume of your device’s audio. Touch and drag your finger counter-clockwise around the wheel sensor, and the volume level decreases. Between Buttons, Sliders, and Wheels, you can control virtually any device with just a simple touch.
Now that we have a basic understanding of how touch sensors work, let’s take a look at how they can be implemented in a capacitive sensing PCB layout. In the figure below, a Button, Slider, and Wheel are all shown implemented as Self-Capacitance type sensors on Top Copper layer. Below that is another example set of a Button, Slider, and Wheel, this time implemented as Mutual- Capacitance type sensors on both the Top and Bottom Copper layer (Mutual-Capacitance sensors are configured as pairs of sensor electrodes).

Figure 2 - Button, Slider, and Wheel implemented as Self Capacitance Sensors top and Mutual Capacitance Sensors bottom
Touch sensor electrodes, especially the wheel sensor, have very complicated shapes. Manually creating such shapes in your PCB Design software is a tremendously challenging and time-consuming task, even for the most experienced PCB designers. Now think about resizing or modifying the details of existing sensors, if needed. Without an easy, automated way to create or modify capacitive touch sensor electrodes, it might be tough even to consider implementing capacitive sensors, despite their numerous advantages. Fortunately, there is an easy, automated way to do it. Let’s take a look at one method of easily creating and modifying the complex shapes and physical configurations of touch sensor electrodes.
CONFIGURE TOUCH SENSOR LIBRARIES
These shapes may seem to be complicated at first, but you can easily size and configure them to meet your needs. Altium Designer includes special, configurable, touch sensor-specific libraries for Atmel, Cypress, and Microchip touch technology. Each library is configurable to the detailed, vendor-specific requirements for shape, size, and layout of each type of sensor and technology.
These capabilities and vendor-specific libraries must be enabled within the Altium Designer Extensions and the Update Configure Platform panel. Vendor-specific Touch Sensor support is easy to enable, by going to DXP » Extension and Updates » Installed (tab) » Configure (link) and enabling the Touch Sensor Support options: Atmel QTouch, Cypress CapSense, and Microchip mTouch, as shown in the figure below.

Figure 3 - Enabling the Touch Sensor Support options for the Atmel, Cypress, and Microchip
After enabling these capabilities, restart Altium Designer (enabling requires no additional license). The vendor-specific touch sensor libraries can now be found in the /Libraries public folder within the Altium Designer installation, and are ready to add to the Libraries panel. The figure below shows the ‘Atmel QTouch.IntLib’, ‘Cypress CapSense.IntLib’, and ‘Microchip mTouch.IntLib’ integrated libraries, installed and available within the Libraries panel. Configurable, touch-specific schematic symbols can now easily be placed and configured.

Figure 4 - Available Touch Sensor Libraries
Each of these vendor-specific touch sensor libraries contains a set of schematic symbols, representing each possible type of vendor specific sensor Button, Slider, or Wheel sensor electrode layout. The symbols are placed in the schematic and wired up to their respective touch controller circuitry, exactly the same way as any other component would be placed and wired. However, what is unique about these symbols is the Configure button in the lower left corner of their properties panel. This button allows you to configure the type and precise physical dimensions of the sensor electrode layout. A configurable touch sensor symbol is of type ‘Standard (No BOM),’ as it represents a shape to be etched directly in copper, rather than a physical populated component.
CONFIGURING A TOUCH SENSOR SYMBOL
Symbols placed from the vendor-specific touch sensor libraries must be configured to a specific type and specific physical dimensions, as per electrical and mechanical design requirements. In the properties panel of a placed touch sensor symbol, the Model section is completely empty, as there is no footprint model associated with the symbol. This is because the user configuration settings specified within the symbol are used to generate the layout automatically when an Update to Printed Circuit Board PCB ECO is executed.

Figure 5 - Configuring the Height, Width, and Gap of an Atmel QTouch Slider sensor
The figure above shows a medium-sized Atmel QTouch Slider symbol’s Configure dialog, where the Height, Width, and Gap Thickness dimensions of the Slider sensor are specified. If any invalid values are entered, they will not be accepted, and a message will display the range of acceptable values. After an Update to PCB ECO is executed, the resulting footprint of the sensor can be placed on any signal layer, positioned, moved, or rotated, just like a regular component footprint.
As with any standard component, a component link has been established within the project, associating the capacitive touch sensor footprint in the PCB document with its symbol in the schematic document. In the properties of a capacitive sensor footprint, there is also a Configure dialog identical to that of the symbol. This means that the placed touch sensor footprint can be reconfigured dynamically in the PCB document. The resulting configuration setting can then be synchronized back to the touch sensor symbol in the schematic by performing an Update to Schematic ECO.
EXAMPLE TOUCH SENSOR DESIGN
Once all of the sensors are placed, they can then be routed to their controller circuitry. Each vendor provides guidelines and best practices for sensor placement and routing. Also available are vendor-specific guidelines and best practices for designing the required touch sensor controller circuitry. Vendor-specific microcontroller or dedicated purpose touch controller Datasheets will detail exactly what is required in terms of the supporting active and passive components necessary for controlling the individual touch sensor channels.
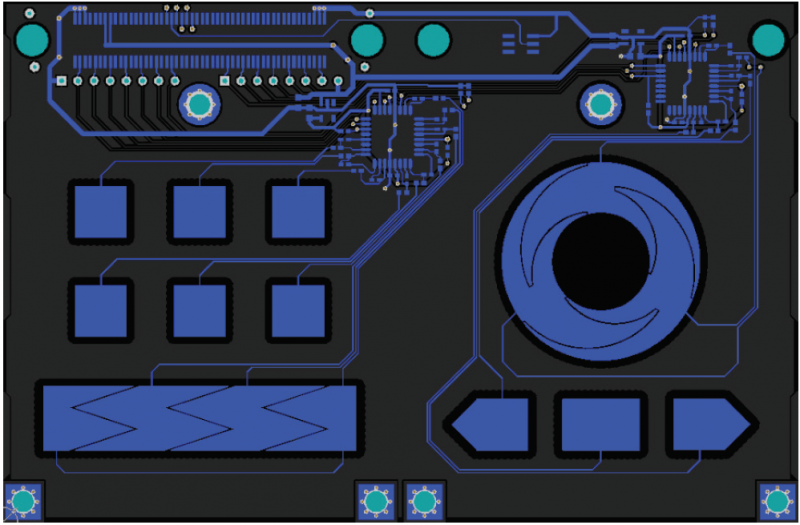
The figure below shows a completed capacitive touch sensor design, consisting of nine Buttons, one Slider, and one Wheel. It also has two dedicated purpose touch sensor controller devices. The design was based on two Atmel QTouch AT42QT2100 devices, and the touch sensor footprints were created using the ‘Atmel QTouch.IntLib’ and associated Touch Sensor Support sensor generation capability within Altium Designer.
The Wheel and Slider were resized several times for mechanical considerations during the board layout. Many hours were saved using the automatic sensor footprint generation, which created and subsequently modified these intricate complex copper shapes.

Figure 6 - Touch Panel with 9 Buttons, 1 Slider, and 1 Wheel controlled by 2 Atmel AT42QT2100 devices
CONCLUSION
Touch sensor technology offers tremendous benefits over the mechanical switch components traditionally used in interface controls. Manually creating or modifying the complex, intricately shaped touch sensor electrodes in a PCB design can be an arduous task. However, using an automated approach when creating or modifying capacitive touch sensor electrodes in a design saves time and predictably yields accurate results, in accordance with vendor specific requirements. Touch Sensor Support in Altium Designer makes creating and modifying the capacitive touch sensor tutorial layouts easy, predictable, and accurate to vendor specifications.
USEFUL LINKS
Atmel QTouch and QMatrix
- 8-bit AVR or 32-bit microcontrollers
- QTouch and QMatrix dedicated controller devices
- CapSense dedicated controller devices
- 8, 16, or 32-bit PIC Microcontrollers
- mTouch dedicated controller devices


