


Vibe Coding with AI and Arduino for Embedded Development

At a Glance
Chat with AI to code and debug Arduino projects hands-free. Learn how vibe coding bridges embedded systems and intelligent agent workflows.


Vibe coding has become a popular buzzword in the AI space and it’s taken on many different meanings lately. In this article, we’re going to show you how vibe coding with AI and Arduinos works with real hardware hooked up to your AI Agent. In order to avoid confusion, we’ll define vibe coding as “chatting back and forth with your AI agent in order to achieve a certain desired result.”
Normally this is done strictly in voice, but for the purposes of this article, we’ll print out the “spoken” prompt given to the large language model (LLM). This AI-assisted embedded development approach allows us to streamline the Arduino Uno R4 coding workflow by offloading the syntax and compilation checks to the machine. We’ll be using Visual Studio Code with Copilot in Agent mode to explore this LLM agent hardware interaction and plug an Arduino Uno R4 into the USB port of our computer (attached to a MacBook in this case).
Getting Started with AI-Assisted Embedded Development on Arduino
Just like any human starting a project, it’s important to start off our AI agent with the proper context to ensure a smooth vibe coding with AI and Arduinos session. In this screenshot, you’ll notice that I have Visual Studio Code running with my Copilot right in the center of the screen.
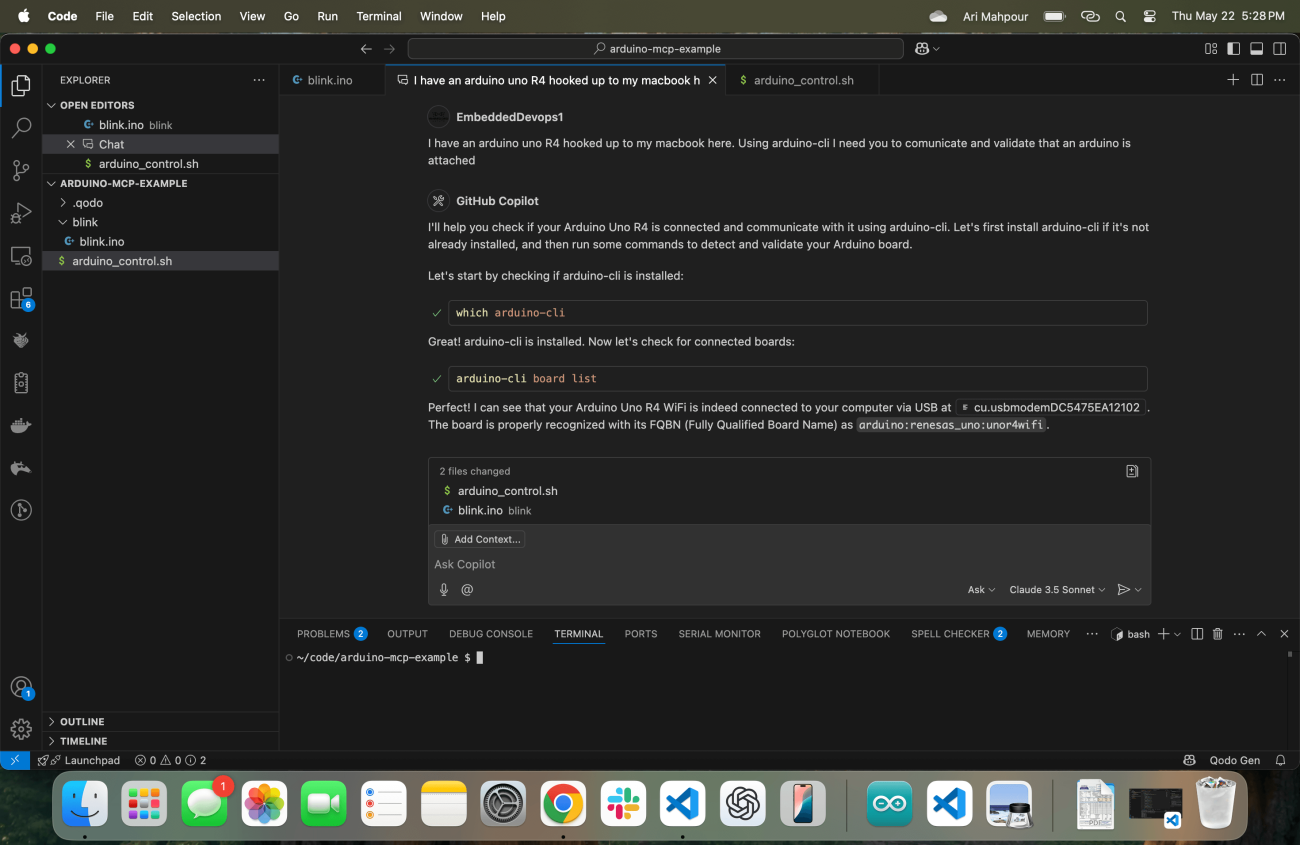
Notice the initial prompt: “I have an Arduino Uno R4 hooked up to my MacBook here. Using arduino-cli I need you to communicate and validate that an Arduino is attached.” I’ve bolded some important keywords that are worth noting. Let’s break it down into two parts.
I have an Arduino Uno R4 hooked up to my MacBook here: I’m first starting off by telling the LLM exactly what device I am using, that it’s hooked up “here,” and that I am using a MacBook. Maybe it already knows that I’m running on MacOS, but giving it the extra context never hurts. Even if it can pull that context from the environment, it would likely require another lookup—something that can be avoided. These are important pieces of information to initiate a successful LLM agent hardware interaction.
Using arduino-cli I need you to communicate and validate that an Arduino is attached: I’m giving it explicit instructions on what tool/command to use (arduino-cli package installed using brew). This, again, creates a shortcut avoiding at least (if not many) lookups/calls to figure out what tool to use, effectively streamlining the Arduino Uno R4 coding workflow. I am also skeptical of whether the tool can configure itself correctly if given the full task, so I ask it to confirm it can communicate with the Arduino. This might seem trivial, but it’s extremely helpful for AI-assisted embedded development because it breaks apart the actual task so we can ensure we’re good to go once we start writing code.
Its response is to immediately run the arduino-cli command (by first looking for the location) to ensure everything with the Arduino tool and communication to the board is configured properly. Once I confirm that everything is in working order I’m ready to give it the next set of instructions but it preempts me by creating a basic sketch and ensuring it can upload a basic program to the device:
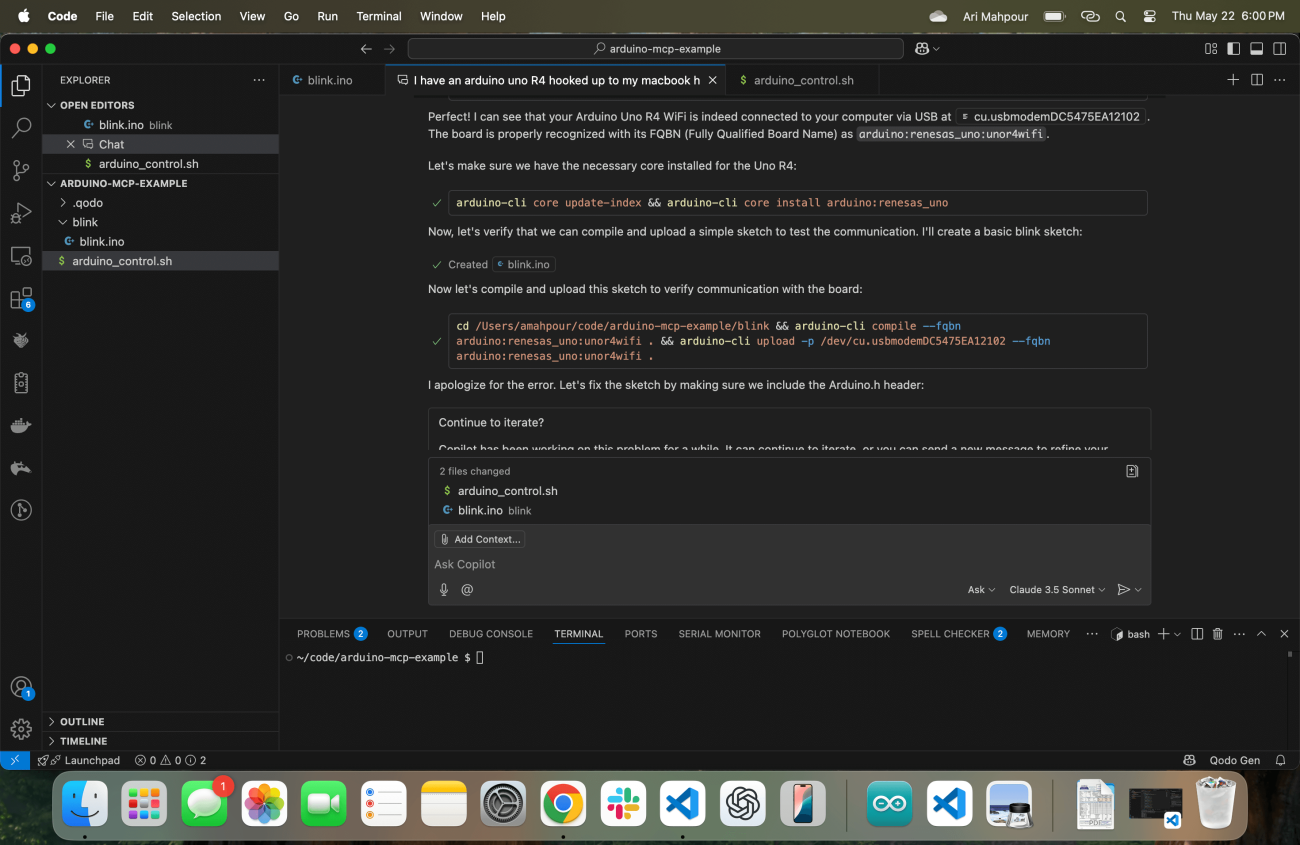
As you can see in the log there are some issues that the Copilot Agent runs into. No worries—one of the beautiful aspects of the agentic workflow is that it can “self heal” by looking at the error output and correct itself. Ultimately, it does and it uploads a compiled sketch successfully to the Arduino Uno R4 device.
Vibe Coding with Feedback: Improving Arduino Workflows with AI
When it comes to generic vibe coding of web applications, it’s fairly easy for the agent to get feedback. Assuming the agent has access to the command line (which it does in our case), it can have the application provide feedback after the script has completed. Take a trivial example where we ask our agent to write an application that reads in a CSV file, converts the contents into a markdown table, and then writes the contents to a .md file. There are a couple ways to validate that the script worked. The most common approach would be to write tests (something the agent can easily do) or the agent can just check for the existence of the new file and review the contents of the file. A web application with a front end could work in a similar way as well. The Agent can perform a curl operation on the web page and read out the HTML contents. In an example where we’ve only written a web backend, we can have the agent write tests or also perform curl requests and check for the response codes, body text, etc.
When it comes to Embedded Systems, the validation (especially upon board bring up) typically happens visually or through a series of manual checks. Consider the most primitive way of validating a blinky LED example by visually looking at the LED and verifying that it blinks. Driving signals into an ADC and looking at telemetry coming out is usually not scripted in an automated fashion from the onset—that usually comes later once we’ve written automated tests. When vibe coding with AI and Arduinos using an agentic workflow, we need to bake in telemetry as a feedback mechanism.
The agent won’t know if the code is working since it can’t look at the LED (at least not with today’s agentic technologies). This is where it’s important to stress that it generates something we can read via command line and validate it, which is a critical part of a robust Arduino Uno R4 coding workflow:
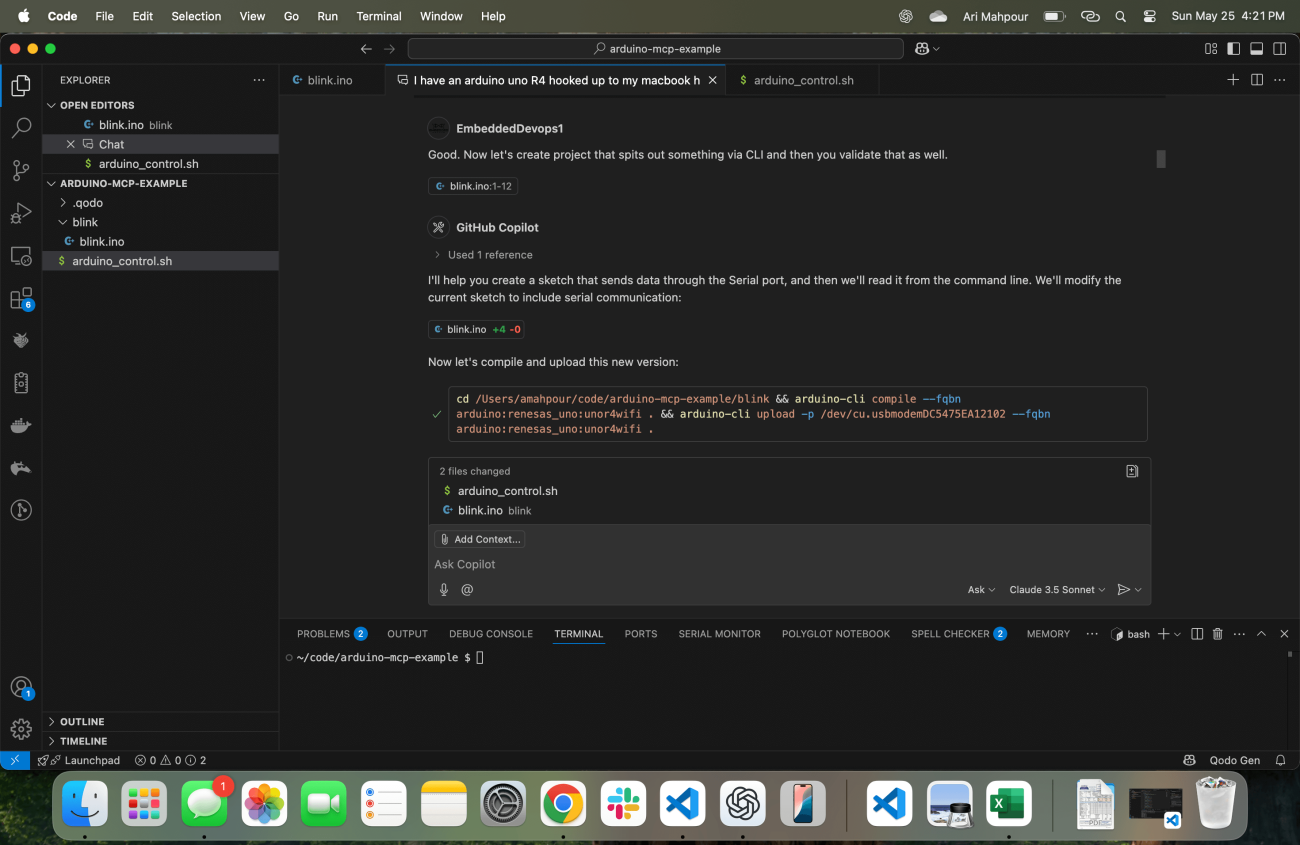
At this point, it creates an example that not only turns on the LED but also provides telemetry over the serial output stating “LED_ON” and “LED_OFF.” It automatically knows how to retrieve these responses as well:
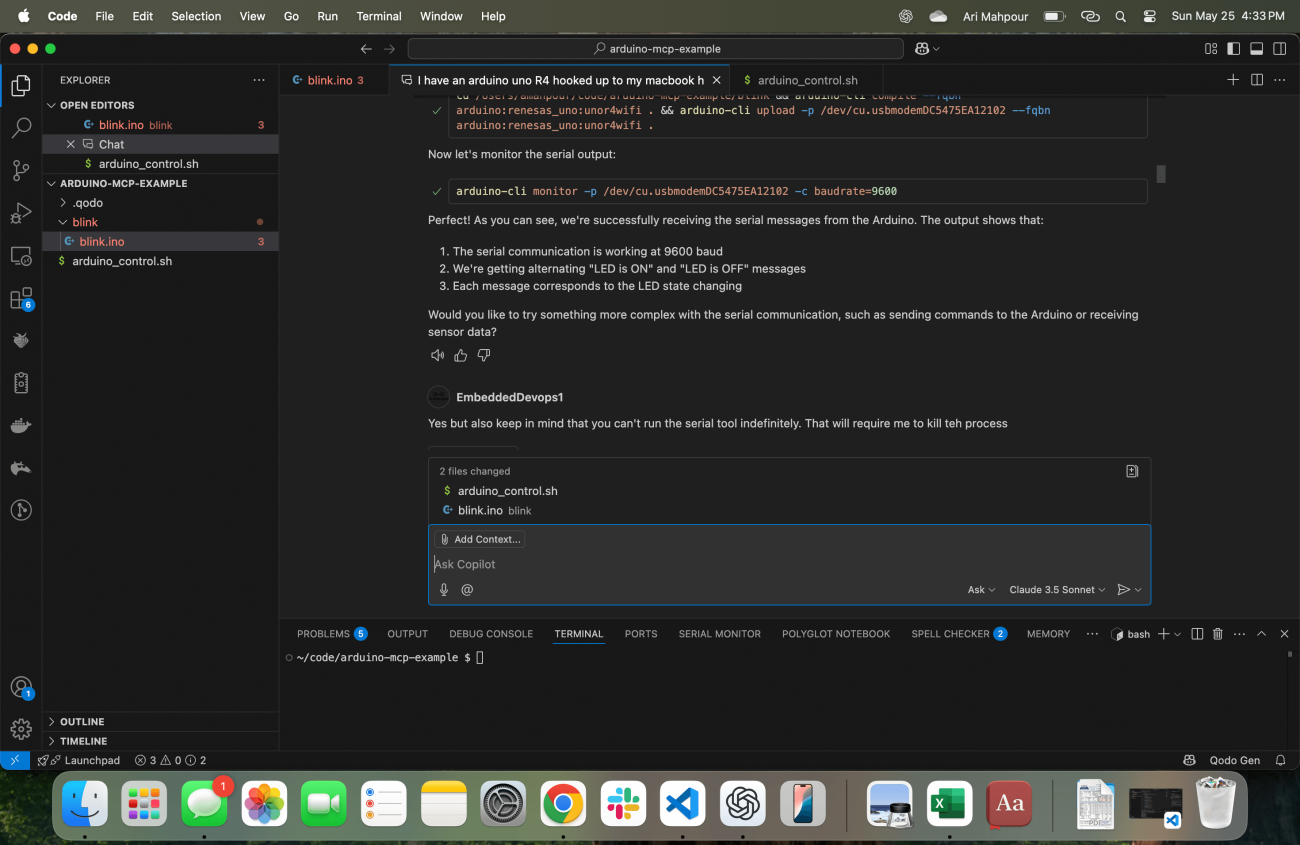
One common issue with this type of LLM agent hardware interaction (also found with “SSH” command requests) is that the process will never terminate after the agent issues the command within the terminal. The Arduino CLI monitor will run indefinitely, which means the agent will hang forever. It’s pretty logical to assume that some sort of timeout will be introduced into agents in future updates but in this example, with this workflow, that doesn't exist. I have to inform the agent that its terminal hung and it needs to account for that:
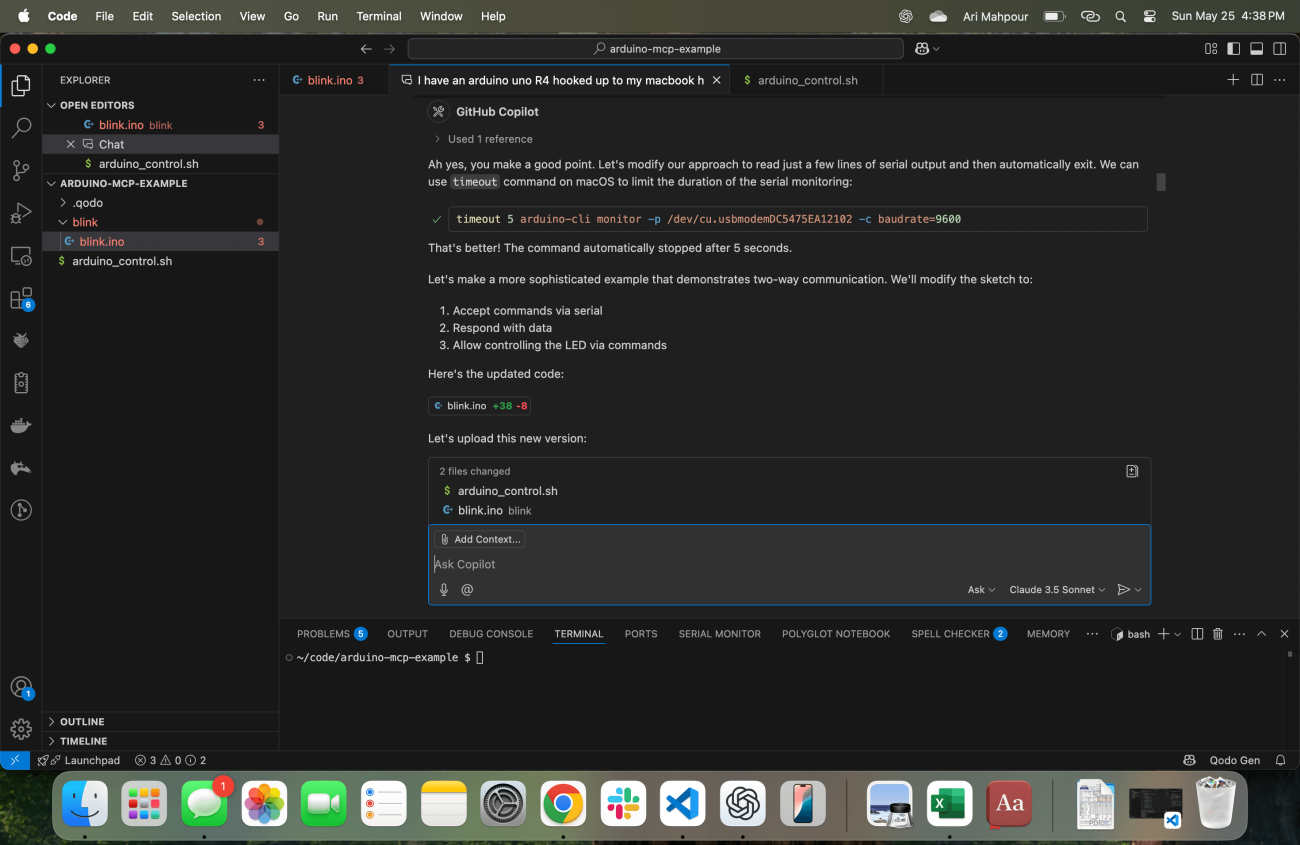
And with that the command is fixed and the agent can now continue to iterate on more sophisticated code examples. By this point we’ve established a way for the agent to not only get feedback on whether the code compiled and uploaded but also that it ran correctly on the target device, completing the cycle of AI-assisted embedded development.
Conclusion: The Future of AI-Driven Arduino Development
Getting started with vibe coding for an embedded system may seem unintuitive and sometimes even “black magic.” The key to a successful vibe coding with AI and Arduinos session is to ensure the agent always receives sufficient feedback. Not only does it need to know that the code compiles and uploads, but also that it functions correctly on the target device as well.
While some of these examples were a bit rudimentary, they are the foundation for more complex, sophisticated AI-assisted embedded development and hardware-in-the-loop workflows. By refining your Arduino Uno R4 coding workflow and mastering LLM agent hardware interaction, you can bridge the gap between high-level intent and low-level execution. Armed with these examples and walkthroughs, you should now be able to start writing, compiling, and running AI-generated embedded code without even lifting a finger.
About Author
Related Resources
Related Technical Documentation
Table of Contents
Design to Release, Without the Friction
- Keep reviews tied to the right version
- Reduce handoff confusion and rework
- Spot sourcing and release risk earlier
- Work solo, share when needed
Get Started
Thank you, you are now subscribed to updates.