Temperature Sensor Project: Digital Temperature Sensor ICs
Digital temperature sensors offer the simplest way to measure and input a highly accurate temperature reading into a microcontroller or other logic device. In the last article in this temperature sensor series, we looked at analog temperature sensors. While these might seem easier to implement by just taking a simple ADC reading, to get the most accurate measurement, you’ll need to calibrate each device’s ADC during production, which isn’t always feasible. In this article, we’re diving into several different digital temperature sensor options. Digital temperature sensors will typically be more expensive than a simple analog temperature sensor. However, the ease and convenience of production using these devices often make the additional cost worthwhile where high levels of measurement precision are required.
Digital temperature sensors are the fifth type of sensor that we’re looking at in this series. We conclude this series with the final article, which will be pitting all the sensors we’ve tested against each other in a head to head contest over a wide range of environmental conditions to allow us to compare their functionality, accuracy, and behavior. We began the series with an introductory article in which we built a set of templates for standard temperature sensor cards. Both the analog and digital versions can be stacked through the use of mezzanine connectors or read independently from their edge connectors. We’ll be building host boards for all these sensors later in the series, which will allow us to read data from a single sensor to validate its functionality or to read the whole stack of boards so we can log the data from all of them together.
In this series, we’re going to be taking a look at a wide range of temperature sensors, talking about their advantages and disadvantages, as well as some typical topologies for their implementation. The series will be covering the following sensor types:
- Negative Temperature Coefficient (NTC) thermistors
- Positive Temperature Coefficient (PTC) thermistors
- Resistance Temperature Detectors (RTD)
- Analog Temperature Sensor ICs
- Digital Temperature Sensor ICs
- Thermocouples
As with my projects, you can find the details of the project, the schematics, and the board files on GitHub along with the other temperature sensor implementations. The project is released under the open-source MIT license, which allows you to use the designs or any part of them for personal or commercial purposes, as you wish.
Digital Temperature Sensor ICs
Suppose you are only interested in reading the output from a temperature sensor using a microcontroller or other logic device. In that case, a digital temperature sensor is electrically the most straightforward option to implement. Digital temperature sensors can offer excellent levels of accuracy as all of the sensing, compensation, and conversion is done on-chip. There is no need to calibrate your microcontroller’s ADC (or external ADC). Also, you do not need to worry about electromagnetic interference from nearby traces or other devices fitted to the connections between the analog temperature sensor and the microcontroller that could unintentionally influence the temperature reading.
In this project, we’ll be implementing four different digital temperature sensors options of varying resolutions and sensing ranges.
|
Name |
MAX31826MUA+T |
STS-30-DIS |
EMC1833T |
SI7051-A20-IMR |
|
Type |
Digital |
Digital |
Digital |
Digital |
|
Sensing Temp Min (°C) |
-55°C |
0°C |
-40°C |
-40°C |
|
Sensing Temp Max (°C) |
+125°C |
+60°C |
+125°C |
+125°C |
|
Sensing Range |
Local |
Local |
Remote |
Local |
|
Resolution (Bits) |
12 |
16 |
|
14 |
|
Accuracy (°C) |
±0.5°C (+10°C to +85°C) ±2°C (-55°C to 125°C) |
±0.2°C |
±1°C (-20°C to +105°C) |
±0.1°C |
|
Operating Temp (°C) |
-55°C to +125°C |
-40°C to +125°C |
-40°C to +125°C |
-40°C to +125°C |
|
Functions |
1 Wire Bus, Parasitic Power |
I²C |
I²C, SMBus |
I²C |
|
Min Supply Voltage |
3 V |
2.15 V |
1.62 V |
1.9 V |
|
Max Supply Voltage (V) |
3.7 V |
5.5 V |
3.6 V |
3.6 V |
|
Current Consumption (uA) |
4 mA (when reading low logic level) |
45 uA idle |
700 uA in conversion, |
195 nA |
|
Manufacturer |
Maxim Integrated |
Sensirion AG |
Microchip |
Silicon Labs |
|
Package |
8-MSOP |
8-VFDFN |
8-VDFN |
6-DFN |
I have included the EMC1833T because, to me, it’s a fascinating sensor. It’s a remote temperature sensing device, meaning that it does not use a sensor located inside of the component. Instead, it senses temperature by converting the output of an external sensor, which in this case is a transistor, to a digital signal. I’m not sure that it necessarily belongs in this “digital temperature sensor” category as it doesn’t quite fit with the other sensors we’re looking at. Still, transistors are not typically well-known as being used as temperature sensors, so I had no idea where to put it. What fascinates me about this sensor is that it can measure temperature using almost any transistor. If you are designing an ASIC, then you could easily include an extra transistor onto the die for this purpose. You can then use this transistor, which can be read by a sensor such as the EMC1833T, to take an external measurement of the die temperature without needing to add any additional complexity to your silicon. Another way to look at this is that you can monitor the temperature of your die without incurring any engineering risk associated with designing and building a bespoke digital temperature sensor into the silicon.
Digital Sensor Implementation: MAX31826MUA+T
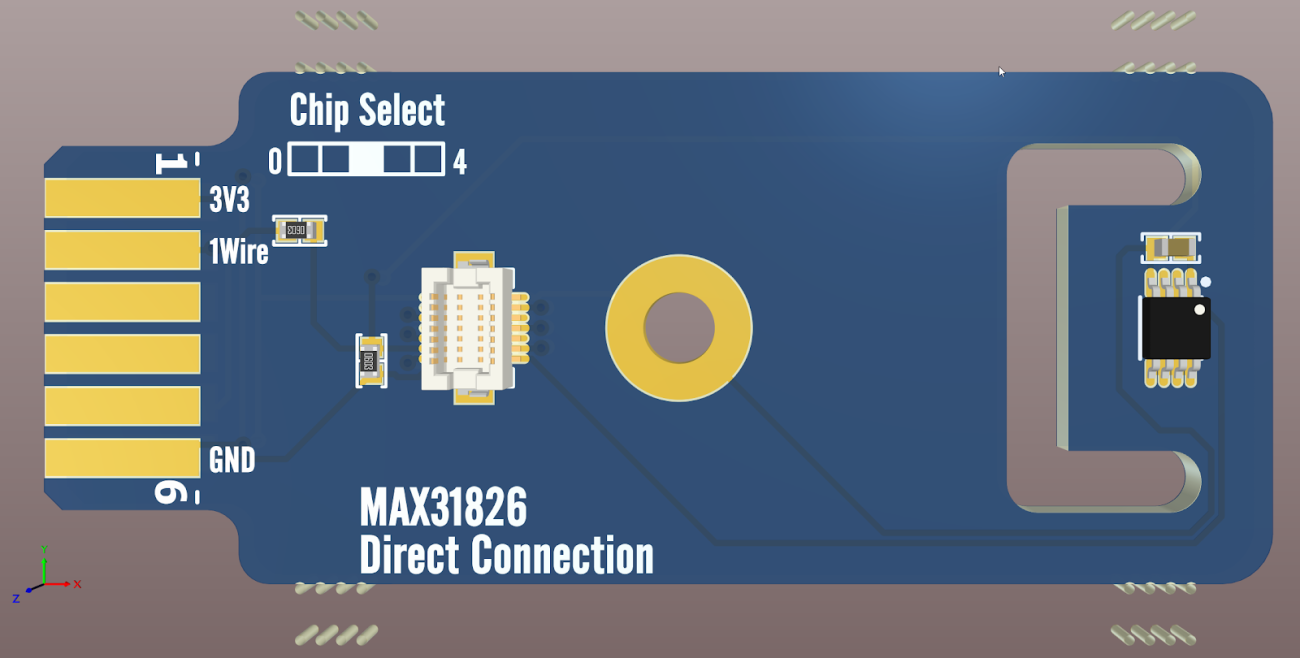
The first sensor we’ll be implementing is the MAX31826 produced by Maxim Integrated. This sensor runs on a 1-Wire bus rather than the more typical I2C or SPI bus. One potential issue is that 1-Wire is unlikely to be offered as a communications protocol by the microcontroller that your project is based around. However, it is a simple protocol to bit-bang and has a considerable advantage over the more popular choices in that it just needs two wires to operate the sensor. Including the supply of power, I2C requires four wires, and SPI needs five wires. By contrast, 1-Wire only requires a ground and a data line for most applications, as it can power itself off the data line using a parasitic power technique. Integrated within the sensor is a capacitor that can sustain the power supply for the IC during the periods when the data line is in the low state, which removes the need for a dedicated voltage supply under most normal operating conditions. This can be a very convenient solution for boards that have extremely limited space available.
Another interesting feature of the sensor and its 1-Wire bus is the capability to set a 4-byte address for the device using manually selectable pins installed on the device package. This allows the installation of up to 16 temperature sensors on a single 1-Wire data bus by giving each device a unique address. This can be a highly convenient option if you are short on microcontroller pins and, at the same time, require sensing capabilities using a large number of temperature sensors.
In comparison to the sensors we’ve looked at in the previous articles in this series, the MAX31826 is not only highly accurate but also delivers high-resolution data. The sensor offers +/- 0.5°C accuracy between -10°C and +85°C, with +/- 2°C accuracy over its full temperature range of -55°C to +125°C. All the sensor readings are delivered as 12-bit values, which is a higher resolution than most microcontrollers offer.
As a temperature sensor, the MAX31826 has a lot to offer, but it is also fitted with an onboard 1 kB EEPROM as a bonus feature. I guess they had some spare room left on the die. If your microcontroller does not have an integrated EEPROM and you need to store some configuration data for your application, this temperature sensor has you covered. If you need additional non-volatile storage, this temperature sensor will reduce your component count and save board space.
The datasheet recommends directly powering the device rather than using parasitic bus power when temperatures might exceed 100°C. While most typical applications won’t need to reach these temperature levels, the tests we’ll be putting the sensor through will exceed 100°C. Therefore, for this exercise, we’ll follow the recommendation of directly powering the device rather than exploring the fascinating parasitic power option.

The board shape and general layout come from the project template we created in the introduction to this series. As we are not using either of the usual communication busses, I’ve removed the associated nets and their components from the board. Still, I have left the connections on the stacking connector to ensure that this doesn’t cause any issues for other stacked sensors. With the 1-Wire bus, we only need to use the chip select pin to communicate back to the host microcontroller.

Digital Sensor Implementation: STS-30-DIS
I’ve used the STS-30-DIS produced by Sensirion in a past project because of its incredible precision and calibrated indications that are traceable to NIST. This was needed as the instrumentation was developed for a food service company, required to collect data for government reporting purposes. With a small footprint, wide voltage range, incredible accuracy, and linearized 16-bit digital output, there’s a lot to love about this device if you only require positive temperature sensing. If you need to sense temperatures below freezing, the STS-30A-DIS variant is automotive qualified and has a sensing range of -40°C to 125°C. However, this increased sensing range comes at a slight cost to the overall accuracy.
In the previous analog temperature sensors article, I talked about how great analog temperature sensors are for applications such as process monitoring, for switching a fan on and off, or for other thermal management systems that can work without intervention from a microcontroller. The STS-30 offers an ALERT pin that can be used to fulfill a similar function. It’s intended for connection to an interrupt pin of a microcontroller; however, it also has a full application note dedicated to it, and it can be used for switching loads automatically. The ability to interface to the microcontroller’s interrupt function can be crucial. It allows the sensor to immediately notify the microcontroller with a high priority signal that something needs to be immediately done, rather than relying on infrequent microcontroller polling of the sensor and response to the read data. If the ALERT output is connected to a transistor to enable it to drive a load, the sensor could be used for both monitoring/logging purposes as well as having an autonomous thermal management function. Compared to the analog solutions, this set-up might well make the digital STS-30 a cheaper option. A separate comparator will not be required, and the threshold for the ALERT pin can be configured by the user through a microcontroller/HMI without the requirement for it being factory set.
The STS-30 series devices all use an I2C bus for communications. The schematic we are implementing for this article does not include any of the pull-up resistors that are generally required for the communications bus to function correctly. These pull-up resistors will instead be fitted on the host boards. As we only need one set of pull-up resistors per bus, adding resistors to each sensor would add multiple pull-up resistors to the bus and could result in its malfunction. Besides, all the resistors connected in parallel would reduce their overall resistance.
The ADDR pin allows us to choose between two different addresses for the device, allowing us to connect two STS-30 components to the same I2C bus. While this may not be as impressive as the capabilities of the MAX31826 device on the 1-Wire bus, it is still convenient in that it allows us to use more than one device. I’m pulling the ADDR pin to logic low (GND) as this sets the default address to be 0x4A, with logic pulled to the high state, this sets it to the alternate address of 0x4B.

I like the package on the STS-30 as it’s compact, but still not too crazy, so you can hand-assemble your board if you’re using a stencil. The sensor package plus an 0603 decoupling capacitor are together about the same size as the MAX31826 we looked at above. With a smaller capacitor, it would fit onto a high-density board very well. The large ground pad under the IC provides an excellent path for transferring heat from a ground plane to the temperature sensing junction inside the IC. This makes it a perfect choice for placing next to any device, such as a large MOSFET or a regulator, which uses the ground plane to dump excess heat into the board. Placing the IC in close proximity to the heat source will give more accurate temperature sensing results.

Digital Sensor Implementation: EMC1833T
As I previously mentioned, I find the EMC1883 device produced by Microchip fascinating not only because it has a range of fantastic features, but that it can read the temperature sensed by a transistor junction. The STS-30 we looked at above had an alert interrupt pin triggered by an absolute value; however, the EMC1883 can be configured to also generate an alert based on the rate of change of the sensed temperature. This rate of change alert can allow intelligent thermal management solutions to be switched on automatically in anticipation of their need rather than after the event. This has the potential to improve device reliability as a whole by the careful management of its operating temperature. As with the STS-30, it’s fully software configurable, which offers considerable advantages over any factory set option that you’d likely need to implement if you were using a fully analog thermostat to achieve the same results.
The specific model of the EMC8xx series that we’re testing will only support the sensing of a single junction. However, there are other models in the series that can provide sensing for up to five junctions.
Like the STS-30, this is an I2C based sensor that accommodates installing multiple sensors on a single I2C bus. One distinction is that the implementation of the EMC1833T ADDR pin is different from the binary on/off nature of the STS-30 device. This device enables you to set up to six separate addresses by using different pull-up resistor values. The ADDR pin also functions as one of the interrupt pins, acting as the Thermal Warning Pin (along with the thermal ALERT/Warning 2 Pin). Like the previous device installation, I won’t be implementing pull-up resistors on the I2C lines on the temperature sensor board. However, they are required to be fitted somewhere within your circuit to enable the sensor communications bus to function correctly.
The datasheet recommends using a 2N3904 bipolar junction transistor as the remote sensing element since I do not have an available CPU transistor to use for measurements. I’m using the surface mount variant of a 2N3904 for sensing the temperature on this board. The MMBT3904 is available from virtually every silicon fabrication company that deals with BJTs - in this case, I chose to use an ON Semiconductor part as it was the best stocked. There were several million available when I last looked at Octopart.

As I’ve done in previous articles in this series, I’ve placed the temperature sensing element, our transistor, within the thermal break. I’ve placed the non-sensing elements behind the thermal break. This prevents the EMC1833T from being able to adversely influence the temperature reading due to any heat that it may generate itself.

Digital Sensor Implementation: Si7051-A20-IMR
Finally, we have the Silicon Labs Si7051-A20. It’s the results from this device that I’m most excited to see in this whole series. The MAX31826 is quite a precise sensor; however, the Si7051-A20 offers an impressive +/- 0.1°C precision with an incredibly low power consumption of just 195 nA when sampling. The power consumption is at least an order of magnitude less than all the other digital temperature sensors and substantially less than the analog temperature sensors we looked at in the previous article.
Where many sensors have very high advertised accuracies, the figures usually only apply for a limited portion of the overall sensing range. In contrast, the Si7051-A12 offers the reported accuracy across its full -40°C to +125°C sensing range. What’s more is that the 0.1°C error is a worst-case scenario accuracy, not the average or minimum. With its 14-bit resolution selected, the Si7051-A20 provides a repeatable reading of 0.01°C - I love accurate and repeatable sensors!
As with the last two sensors, the Si7051-A20 is an I2C compatible sensor. However, it does not offer an address pin, which means you can only have one single unit connected to the I2C bus unless you either add an I2C switch or switch the power between different units connected on the same bus. This would require additional IO pins and add circuit complexity, making the Si7051-A20 less ideal for sensing multiple locations across your circuit board. The device also does not have any alert/interrupt pins, intended to be used purely as a digital temperature sensor. Generally, if you’re looking to automate thermal management on your circuit board, a less accurate and lower cost sensor will be more than sufficient for such an application.
One of the features I really liked about the STS-20 when I last used it was the NIST certified calibration applied to each device, as my client required that feature. While the Si7051-A20 does not make any mention of this in its datasheet, it has a certificate of calibration available. I was also able to find another more specific certificate of calibration; however, this is not on the Silicon Labs website and, therefore, may only apply to the particular units this company purchased. If so, it does set a precedence for Silicon Labs issuing specific certificates for its customers.

Like the other I2C implementations we’ve covered in this article, the I2C lines for this card do not have pull-up resistors fitted on the data/clock lines. You will need to include a pull-up resistor on each line somewhere within your circuit to enable the Si7051-A20 to communicate successfully.
The 6-pin DFN package is also the easiest to hand prototype out of all the leadless options we’ve covered in this article. Using a stencil or a paste deposition tool like the Voltera V-One, this sensor would be incredibly easy to hand place and reflow using basic tools, making it perfect for prototyping in the home or office lab.

Conclusion
We’ve looked at four different digital temperature sensors in this article. However, there are hundreds of other digital temperature sensor options available that can meet the specific requirements of your project, which are well stocked and available. While analog temperature sensors are excellent at autonomous process monitoring or use with an analog to digital converter, the digital temperature sensors offer significant convenience when integrating into a product that has a microcontroller. As we’ve seen in this article, there are digital temperature sensors that can generate interrupts and alerts at configurable thresholds, which allows for exciting applications beyond a factory set comparator based thermostat as you would likely use with an analog temperature sensor. The precision and accuracy of modern digital temperature sensors can be exceptionally high; however, many options consume considerably more current than their analog counterparts, which may provide some temperature offset from self-heating.
The most popular and well-stocked digital temperature sensors typically use an I2C bus for communications; however, SPI and 1-Wire bus options are also readily available to meet the availability of alternate communications busses for your project.
As I mentioned at the start of the article, you can find details of each of these sensor boards and all the other temperature sensor implementations on GitHub. These designs are all released under the open-source MIT license, which allows you to do pretty much anything with the design for personal or commercial use.
Would you like to find out more about how Altium can help you with your next PCB design? Talk to an expert at Altium.


