


Building an MCP Server for Your Lab Equipment

At a Glance
Automate bench workflows with MCP. Wrap device libraries into tools. Add hard limits for voltage and current.


As demonstrated in Building a Model Context Protocol Server for Arduinos, MCP servers provide “toolboxes” for large language models (LLMs) to discover and safely execute a function (or series of functions). These functions can be as simple as echoing “Hello, World!” on the command line or as complex as running sequences that may take many seconds (or minutes) for the LLM to figure out on its own.
In this article, we’re going to demonstrate how to put together an MCP server that can control your lab instruments, giving an LLM the ability to autonomously control devices without running a single command in the terminal.
The Why
Why on earth would you want to build an MCP server for your power supply? Good question. Other than, “because it’s cool,” there are practical reasons why you’d want to do this.
At a very fundamental level, you can have AI become your lab assistant. Using voice-to-text or even writing a test procedure in plain English, you can have your favorite IDE or standalone LLM client (such as Claude Code) control all of your lab equipment for you. This has been possible for some time (see my tutorials on Custom GPT Actions using OpenAPI) but hasn’t been accessible to everyone. With the correct prompting and documentation, you can have a locally hosted LLM running your lab off-network. It goes without saying that proper precautions and guardrails need to be put in place—especially when you are working with high voltages and real hardware. Always exercise caution when providing AI access to real-world hardware.
Classifying Your Functions
As we’ve seen in previous MCP tutorials, two important aspects of creating an MCP server are clarity and brevity. For each tool we expose, we want to ensure the LLM clearly understands:
- What the tool does
- How it’s normally called (i.e. conditions or example)
- What’s an expected response
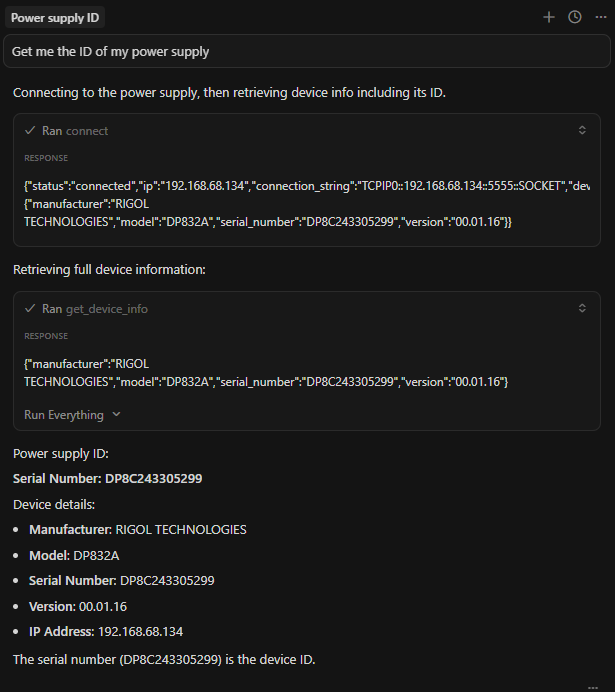
In our case we’re wrapping an MCP server around a Rigol power supply library. We can communicate this to the LLM just like we would with any user by using docstrings like so:
"""
Get information about the currently connected device.

Returns:
    Dict[str, Any]: Device information including manufacturer, model, serial number, and version

Raises:
    RuntimeError: If no device is currently connected
"""
As you can see, the docstring above is pretty vanilla because the routine is pretty vanilla. We’re doing some basic checking and then just getting the ID string from the device:
return current_ps.id()
As we start to implement MCP tool calls, we need to be more explicit with details (especially as operations become more complex):
"""
Discover Rigol DP832/DP821/DP712 devices on the network.

Scans the network for available Rigol power supplies and returns
information about each discovered device including IP address,
connection string, and device details.

Returns:
    List[Dict[str, Any]]: List of discovered devices with connection information.
        Each dict contains: 'ip', 'connection_string', 'device_info'

Example:
    Returns devices like:
    [
        {
            "ip": "192.168.1.100",
            "connection_string": "TCPIP0::192.168.1.100::5555::SOCKET",
            "device_info": {"manufacturer": "RIGOL TECHNOLOGIES", "model": "DP832", ...}
      }
    ]
"""
You’ll notice more detail in the docstring because there’s more to expect in the return statement and more to interpret. We try to keep things as concise as possible but also informative enough so the LLM knows what to do.
Function Wrapping and Tool Calling
Once you’ve completed writing your descriptive docstrings (and functions, of course), you’ll want to test out the functions individually in a manual (and automated) fashion to ensure everything is working. This includes unit testing (mocking out your instrument) and integration tests where you communicate with the instrument and either manually verify the tests or, when possible, verify in an automated fashion. Just like we did in Building a Model Context Protocol Server for Arduinos, we add a @mcp.tool() decorator to the beginning of our function (assuming you are using FastMCP) to indicate that it is a tool within the MCP server. It’s always good to have some basic tool calls in there such as a “heartbeat” to make sure everything is in working order. A *IDN? string query to most SCPI compatible instruments is a great way to get basic information about the instrument and confirm that everything is in working order:
Running Procedures
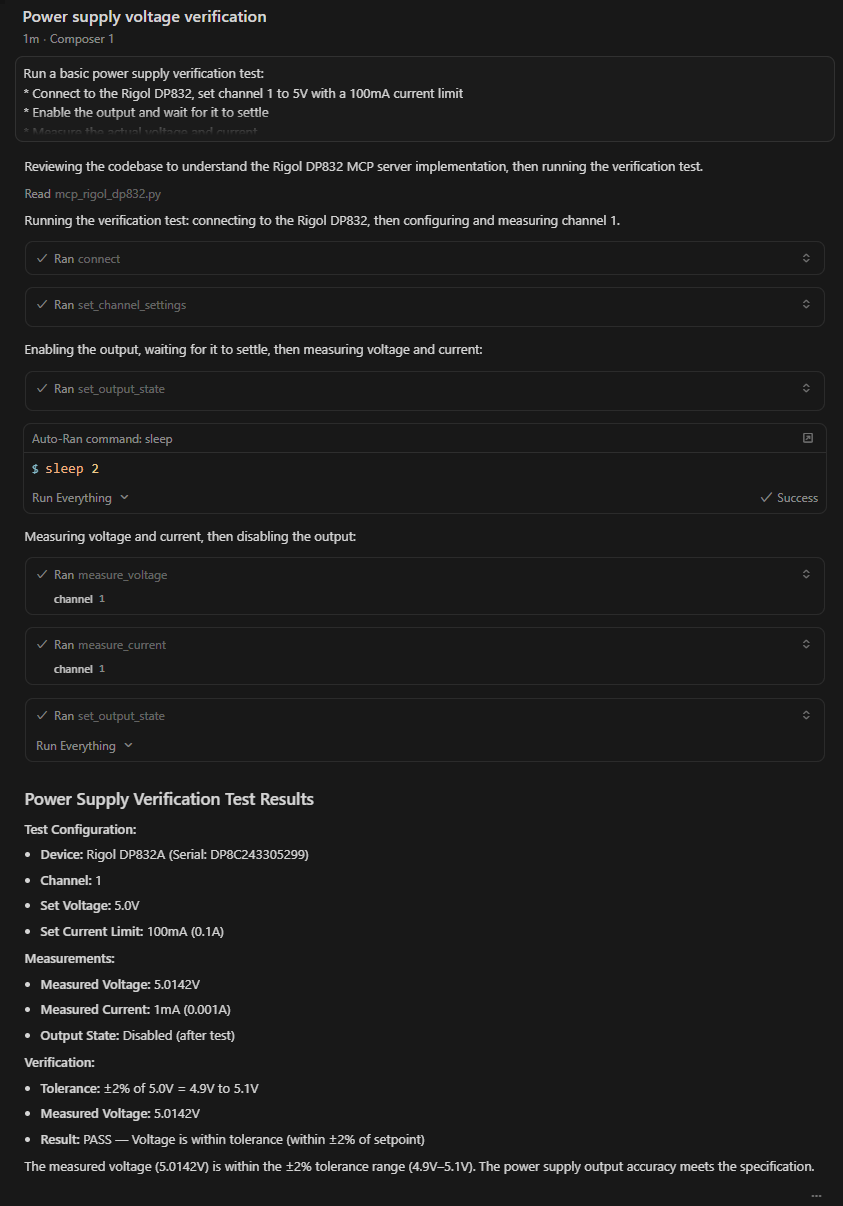
Instead of writing automated scripts you can now create procedures (just like we used to in the old days). The LLM should be able to follow your instructions and perform the operation. Take this set of instructions for example:
Run a basic power supply verification test:

* Connect to the Rigol DP832, set channel 1 to 5V with a 100mA current limit

* Enable the output and wait for it to settle

* Measure the actual voltage and current

* Disable the output.

Report if the measured voltage is within ±2% of the setpoint.
While the set of instructions is trivial, you can get an understanding of how the need to write automated tests in a programming language in the near future may become obsolete.
The sky is the limit for what you can run. The only thing that you have to be careful about is setting up guardrails.
Exercising Caution
It’s a no-brainer that hooking up an unpredictable machine to a dangerous piece of equipment can cause problems. Perhaps it won’t cause harm to a human but without the proper guardrails an LLM can smoke a board in an instant. This is where it is extremely important to set guardrails and exercise caution around this. In your MCP tool setup (e.g. mcp.json), you can create parameters that can set hard limits for voltage and current and bake this into the code.
Adding an overvoltage protection (OVP) limit of 5V in your MCP configuration file means a check for that variable in the actual function call. For example, in mcp_rigol_dp832.py (our MCP server that hooks into controlling a Rigol DP832 power supply), we have a function called set_channel_settings().
We can look for a variable called OVP_LIMIT and, if the voltage parameter passed into that call exceeds OVP_LIMIT, we immediately reject the request with an error. This keeps our code reusable and allows us to constantly tweak our setups as we hook up different devices to our instrument.
One might say that adding the limit to the prompt (e.g. “Set the OVP to 5V”) would prevent any erratic behavior. Unfortunately, this is not always a guarantee as LLMs, at the time of writing this article, are still not 100% deterministic.
Conclusion
In this article, we explored the concept of wrapping your controllable lab instrument within an MCP server. This means that an LLM can now control your lab instrument and run through human readable test procedures. It can also act as a lab buddy that can control your instrument with the power of your voice (as we’ve seen in other tutorials). We based this tutorial off the Building a Model Context Protocol Server for Arduinos tutorial and the sky is the limit for what else we can achieve using these two example projects as the base for future projects.
To view the full repository of this project please visit: https://github.com/amahpour/rigol_dp832_mcp_server
About Author
Related Resources
Related Technical Documentation
Table of Contents
Design to Release, Without the Friction
- Keep reviews tied to the right version
- Reduce handoff confusion and rework
- Spot sourcing and release risk earlier
- Work solo, share when needed
Get Started
Thank you, you are now subscribed to updates.