


Closing the gap between Electronics (ECAD) and Mechanics


Users of modern devices expect manufacturers to design new generations of products that exceed their demands and expectations—high-quality products which provide amazing user experiences.
With regard to product design that offers the best user experience, PCB design software is expected to provide engineers with specific features enabling the seamless collaboration between the electrical and mechanical engineers. To efficiently meet the above-mentioned everlasting consumer demands the gap between the electronics (ECAD) and mechanics (MCAD) must be covered. This is possible with Altium’s 2D and 3D Layout mode, which is the topic I will cover in this article.
Verification with polystyrene sheet method
I first started designing printed circuits as a student, and like many newbie electronics engineering students, my first individual project was the audio amplifier made with through-hole technology (THT). The amplifier was a 70W stereo amplifier with TDA1562Q driver and source selector at the input. Due to the limitations of ECAD software at the time (which had extremely poor 3D support), I had to find a different solution that would allow me the verification of the PCB’s mechanics in “3D view”.
I remember that drawing footprints for me as an up-and-coming young engineer with no previous experience was a demanding task mainly because I was not familiar with the mechanical parameters of through-hole components’ footprints.
To avoid the issues of incorrectly drawn footprints and their incorrect placement on the circuit board, I started incorporating the verification method of the components’ placement and their footprints with the use of polystyrene sheets. To get a rough idea of what the circuit board will look like when it's made, I printed the PCB placement proposal on A4 paper in 1:1 ratio and put the paper on a polystyrene sheet to then place all through-hole components into their designated footprints. If there were any mistakes in the design, they were easily seen with the described polystyrene sheets method thus enabling me the correction of the discovered mistakes.
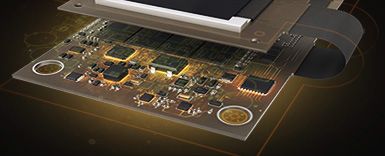
A 3D view of a PCB allows you to visualize component placement.
I was introduced to Altium Designer® in my second year of studies at the Faculty of Electrical Engineering in Slovenia, and from that point forward I have been using Altium Designer as a student and later as a hardware design engineer both for my professional projects as well as my hobby projects. One of my more heavily used Altium features is the 2D and 3D Layout mode which enables me to design products in such a way that the gap between ECAD and MCAD is mitigated, as will be explained below.
I replaced the ‘polystyrene sheets method’ with Altium’s 3D Layout mode, MCAD tools, and 3D printing technology. Despite finding a new way of working, I occasionally find myself going back to the polystyrene sheets method, especially in cases when the through-hole components have non-standard footprints and are poorly documented. Through-hole technology is, in comparison with Surface-mount technology (SMT), more robust and thus tolerates mechanical mistakes made when designing the board. With the help of the polystyrene sheets method, it is possible to achieve acceptable precision.
The side view of the previously shown PCB allows us to visualize pin lengths of through hole components.
Using 3D supported ECAD
When I started using Altium Designer as my new ECAD tool, it—in addition to good multilayer support—gave me better control over the layout and more realistic representation of the PCB in 3D view. Altium Designer has opened up a new dimension for PCB design, and it has become clear to hardware designers that we can meet the mechanical design engineers halfway, and that with it we can help mitigate errors related to PCB mechanics.
Consumer demand for more innovative products led to more complex mechanical designs and its integration with electronics. For an exquisite product it is necessary to perfect all aspects of the product: Hardware, Software, Mechanics, User Interface, Product Design, etc. It is often the case that, due to lack of available space, circuit boards are of unusual shapes, which poses a challenge for the layout designers to meet all electrical and mechanical requirements.
Using vector graphics in Altium Designer allows you to easily create custom board shapes. Let’s see what this vector shape will turn into.
Altium Designer’s capability to allow the import and manipulation of vector graphics can be helpful to easily determine the board shape, which helps to reduce time spent preparing the outline layer.
If the circuit boards also have to be mechanically efficient in the 3rd dimension, it is reasonable to consider mechanical requirements early when designing the component placement. Because SMD components are often small in size and large in number, their component placement and footprints verification using the polystyrene method alone is often time-consuming or even impossible. In such cases Altium Designer’s 3D support can be used. Component libraries must be equipped with associated 3D models, which in most cases can be obtained from the manufacturer's website.
Pro hint: If the manufacturer doesn’t offer the step model on his website, just send him an email. Manufacturers are generally willing to share their product's documentation and useful information on how to use their parts in your design.
An LED placed sideways on a PCB demonstrates the powerful capabilities of 3D support in Altium Designer.
From the point of view of ECAD/MCAD collaboration, it is mandatory to use 3D step models for all components which are in direct relation with the mechanical requirements regarding enclosure design. Due to Altium Designer’s realistic view in 3D Layout mode, the use of 3D step models for all components helps to better design the printed circuit board.
If your design supports different PCBA variants then the non-populated components will be hidden from board’s 3D view and these kinds of generated 3D models can be used as part of technical project documentation.
During the layout design phase it’s convenient to jump between 2D and 3D Layout modes especially during the placement optimization. Different from 2D view, which is optimized for electrical-related design tasks, the 3D Layout mode is visually pleasing and can be essential for flawless mechanical design process. With capabilities to move components and silkscreen, rotating the board, and zooming into the structure of the PCB, the layout design is better controlled and mistakes related to mechanics can be reduced.
The final PCB 2D view, 3D view, and final render.
Electrical and Mechanical Teams
Both electrical and mechanical teams are constantly challenged with time to market pressure and project complexity. As a hardware design engineer, I witnessed many issues on projects where there was no collaboration between electrical and mechanical teams. With that said it is important to establish good communication between these two teams and in order to close the gap that occurs when PCB engineers encounter mechanical tasks within their PCB design, use the features like 3D support from Altium Designer.
Step up to the unified environment of Altium Designer and leave behind the problems of trying to force different ECAD and MCAD tools to work together. Would you like to find out more about how Altium can help you with your next PCB design? Talk to an expert at Altium.
About Author
Related Resources
Table of Contents
Design to Release, Without the Friction
- Keep reviews tied to the right version
- Reduce handoff confusion and rework
- Spot sourcing and release risk earlier
- Work solo, share when needed
Get Started
Thank you, you are now subscribed to updates.

