


3D Printing For Electronic Lab Organization


3D printing technology offers electronic designers fantastic opportunities to improve their development processes, produce product mock-ups and even create custom parts for their production devices. However, the benefits of 3D printers don’t end there; they can have another equally important purpose in your design process, namely, helping you organize your electronics lab space so you can work smarter.
Lab Space Issues
The typical electronics lab space will be full of tools, half-completed projects, spare parts, random components, and lots of cables and wires. While everything is essential and needs to be there, often it’s a struggle to find places to put everything so you’ll find it again the next time you need it. What can appear to be an unruly mess to a casual observer is a highly organized chaos that has slowly evolved, adhering to the scientific principles of entropy.
The key to creating order from the chaos is having places to put everything, a storage solution that will work for your specific needs and that can evolve with your lab. Each new project you start will inevitably come with new components and sometimes new tools. As you kick off more projects, your storage and organization requirements will grow faster. The answer is a bespoke storage solution you can add whenever you need additional elements. The answer is to tap into the power of your 3D printer; you have the capability to solve your organizational problem already available, so why not use it to the full? This article will share some tips and resources to help you get started.
Using a 3D Printer for Storage Solutions
3D printers are now a common resource used for electronic development thanks to their versatility, practicality, and in recent years affordability. 3D printers are now relatively inexpensive to purchase, and equally as important, the raw materials they consume are readily available and reasonably priced. These advantages open their use to everyone, from hobbyists to small businesses and manufacturers.
If you haven’t yet purchased your first 3D printer, a few popular types are ideal for any electronics lab. The most common type is filament printers, essentially computer-controlled hot glue guns. These printers work by taking in a continuous spool of plastic filament, which melts at the print head, allowing precise placement to build up layers of material that solidify after deposition. The layers build up from the bottom upwards to form a 3D object. A key benefit of filament printers is the range of available materials that offer the user different mechanical properties and colors. This allows you to switch materials between jobs or even in the middle of a print to change color or produce objects with varying properties.
The second most common type of printer uses a liquid resin cured using ultraviolet (UV) light to solidify the printing material. These printer types can either have a UV laser beam for selectively curing resin at precise points or use a photo mask exposing only selected areas of the resin tank to broad area UV light.
Power-Based 3D Printers
Various powder-based printers that use binding agents applied using a separate print head or heat from a laser source to solidify the powder in the required areas are available. While these printer types have the greatest flexibility in material types to optimize mechanical and surface finish properties, these are at the higher end of the cost range, and you won’t generally find them in the smaller lab settings of hobbyists and small businesses.
Filament 3D Printers
Personal experience over the past 12 years has found that filament printers offer the best performance in a small lab setting. The use of a resin printer was hampered by issues around the printed object warping slightly during the post-curing process and the end product being too brittle. The filament printer produces a higher quality product with better mechanical properties to suit applications for components such as device controls and the bespoke storage equipment discussed here. However, recent advances in materials are making resin printers more attractive. They may become comparable or even overtake filament printers in their applicability for lab work in the near future. Watch this space for updates on the latest developments in 3D printer technology.
If using a filament printer for lab work, the recommended print material is polyethylene terephthalate glycol-modified, or PETG for short. PET is a commonly used thermoplastic polymer resin from the polyester family, widely used in manufacturing everything from clothing to food containers and water bottles. The PETG variant has a lower melting point, making it ideal for injection molding and sheet extrusion. These properties also make it great for filament extrusions to use in a 3D printer.

PETG filament comes in small rolls that are fed into the printer head.
The key reason why this material is excellent for lab printing is that it has a very low thermal expansion coefficient, meaning the dimensions of printed parts remain stable during the cooling process, maintaining the correct size. Additional benefits are that the material is relatively cheap and retains mechanical flexibility when solidifying, making it highly durable for applications where parts do not need to be intensely rigid. This durability is perfect for lab space organizations where materials can handle everyday handling as you take out tools and components and hopefully remember to put them back once finished.
Ideas for 3D-Printed Storage Parts
3D printers can produce any storage part you need; you just need the imagination to visualize what you need and the applications to turn these ideas into design files that your printer will understand. I use the following parts in my storage solution that I offer as suggestions to improve the organization of your lab space. All the design files for the 3D printed elements are available on both the Thingiverse and Printables resources, so you can use these as is or adapt them to your own needs. If you use the design files, don’t forget to let me know who you got on and any suggestions on how I can improve the designs.
Storage Drawers
The first suggestion is an improvement to the component drawers ideal for housing the parts you regularly use when prototyping projects. As electronics designers, you know there will always be more components than available drawers. Hence, a simple solution is adding 3D-printed drawer dividers with helpful labels to separate smaller pieces and maximize your storage space.

3D printed drawer dividers and toolbox dividers are available online, or you can build these yourself.
Cable and Instrument Organization
The next suggestion is a honeycomb-inspired cable organizer for the regularly used power supply cables, keeping them accessible when needed. This stackable cable organizer will fit nicely next to drawers or shelves, making cables easy to grab and, just as importantly, to put back out of the way.
The next suggestion is dedicated mounts for each channel of test instrumentation, including your benchtop multimeter and oscilloscope. I’ve designed these mounts to keep probes safe from accidental damage and allow easy access to test leads and cables by keeping them organized when not in use rather than having them lying across your workspace. This design is still a work in progress and needs refinement before its perfect, so I will be looking for your feedback on improving these.
Battery Organizer
The next suggestion is storage for rechargeable batteries with a modular battery holder rack so you can keep your charged batteries readily accessible and helping to prevent discharged batteries from getting mixed up with the ready-to-use ones. There’s nothing worse than finding all your batteries need recharging before you can carry on with your project because you lost track of which ones are ready to use and which are flat. Mounting batteries on end also make it easy to pick out the AAAs from the AAs, which is excellent for efficient working.
Tape Rack
The next suggestion is hangers for the most commonly used tape rolls to keep them out of the way but easy to get to when needed. This prevents the typical accumulation of tape rolls cluttering drawers and shelves or ordering new tape because you think you’ve run out but then finding lots is that type of tape hidden at the back of drawers or underneath other stuff cluttering your workspace.
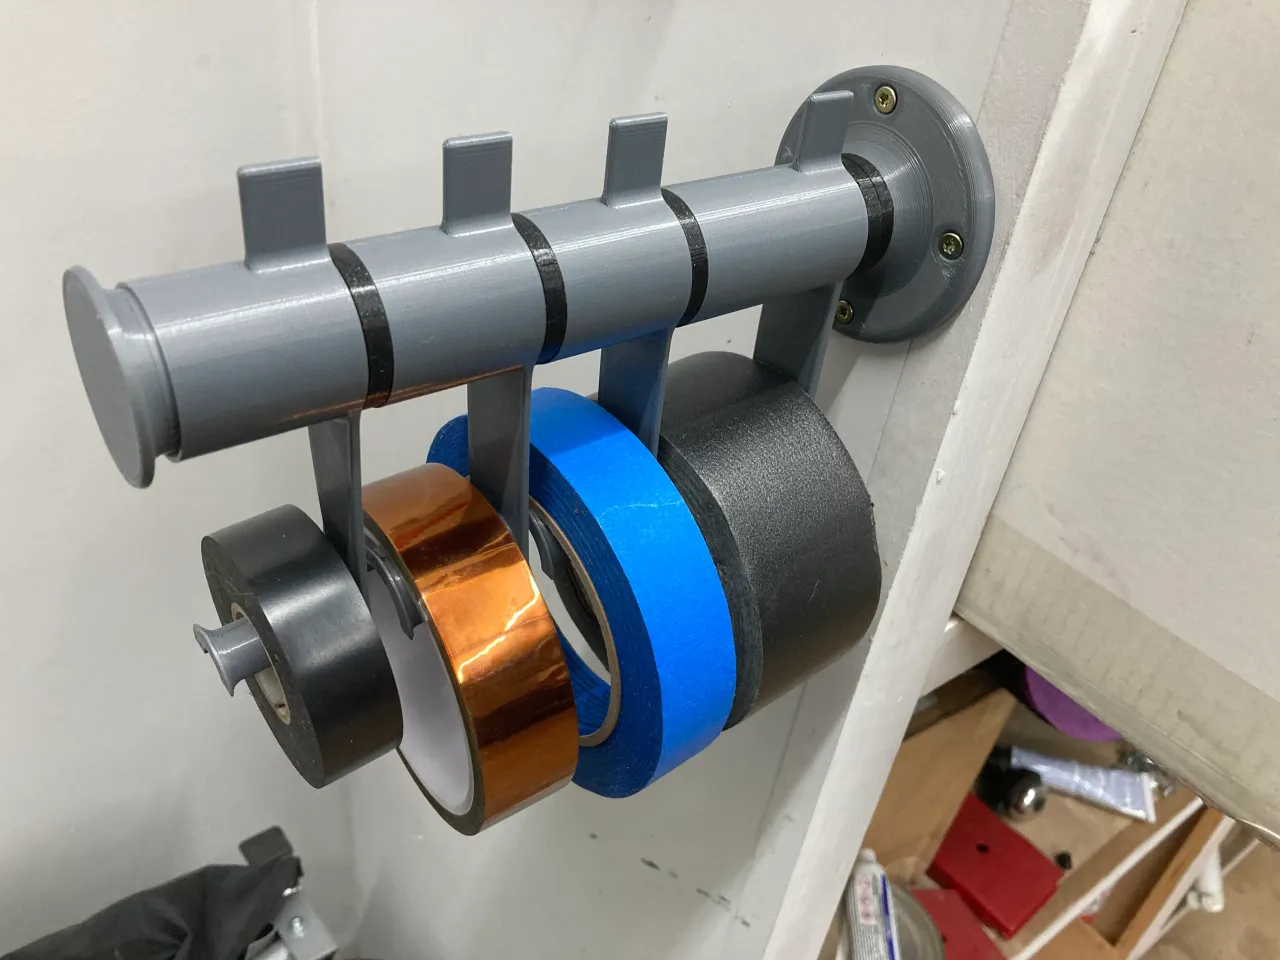
The design for this 3D printed tape holder can be found on Printables
Next is a great feature: handy tool holders that allow you to keep the tools you use most frequently, like drivers, wire strippers, and cutters, within easy reach. It also includes swing-out racks for Torx and Hex drivers that you can remove and carry around for working away from your lab work area if necessary. The design employs a tiered rack that ensures that it’s easy to see the size and type of each tool piece to make it easier when hunting for the right tool.
The final suggestion is storage for wires that keep the different colors and gauges separate and easy to find when you need a specific one. This 3D-printed wire spool rack option is easier to use than the cheap online marketplace spool packs and does not take up valuable bench or shelf space. Organizing wires and cables in the lab is half the battle to having an uncluttered workspace where everything is easy to find and doesn’t involve five minutes of untangling before use; plus, this design ensures the end of each wire is easy to grab.
Mounting Your 3D-Printed Storage Parts
The key to installing these 3D-printed storage components is using a 20mm aluminum extrusion I’ve designed to mount onto every part. This universal mounting makes everything easy to install. If you need to reorganize or move your workspace, you can move all the elements around once the aluminum extrusions are in place. Specially designed extrusion drilling guides make this installation straightforward and ensure everything fits together seamlessly. Experience has also shown that bolting extrusion together is far more robust than corner plates or brackets.
Conclusion
The article shows how using 3D printing can create custom storage solutions to help organize your lab space and ensure everything has a proper place so you can find what you need quickly without having to route through piles of tangled half-built wiring looms and knotted cables. It can also save the time and expense of ordering new parts when you forget you already have spares in the piles of components that accumulate in the lesser-used corners of your workspace. Overall, the benefits of getting organized clearly outweigh the urge to carry on with your usual chaotic work practices.
When you're ready to create your PCB layout, use the design and layout tools in Altium Designer®. To implement collaboration in today’s cross-disciplinary environment, innovative companies are using the Altium 365™ platform to easily share design data and put projects into manufacturing.
We have only scratched the surface of what’s possible with Altium Designer on Altium 365. Start your free trial of Altium Designer + Altium 365 today.
About Author
Related Resources
Related Technical Documentation
Table of Contents
Design to Release, Without the Friction
- Keep reviews tied to the right version
- Reduce handoff confusion and rework
- Spot sourcing and release risk earlier
- Work solo, share when needed
Get Started
Thank you, you are now subscribed to updates.


