






How to Generate Test Cases with AI in Requirements Portal

At a Glance
Learn how to generate test cases and a verification plan with AI in Requirements Portal.


Every requirement needs a way to be verified, and that is what a verification activity is: the planned work, with steps to run and expected results to compare your hardware against. Written out in full, it is a test case. Collect them in a verification plan early, and you'll see which requirements can't be checked while the design can still change.
In this article, you'll learn how to generate test cases and a verification plan with the help of the AI agent (Engineering Assistant) in Requirements Portal, and finish with a clear view of which activity verifies each requirement.
Key Takeaways
- Before the Engineering Assistant drafts the plan, verify that each requirement is verifiable.
- The Create Verification Plan AI Skill drafts the test cases and plan in stages, and you approve each one.
- Check the result in the verification matrix: every requirement needs an activity that covers it.
Workflow Overview
Five steps take you from your requirements file to a complete, working verification plan your team can run:
- Import Your Requirements. Bring your file into Requirements Portal so the Engineering Assistant can work with your requirements.
- Check Your Requirements. Identify any requirements that can’t be verified before the plan is built.
- Create a Verification Plan with AI. Start the Create Verification Plan AI Skill, which drafts the methods, the activities (your test cases), and the steps for you.
- Review & Approve the Proposals. Read each proposal and apply only what is right, so you stay in control of the plan.
- Check Your Verification Plan. See which activity verifies each requirement and close any remaining gaps.
Step 1: Import Your Requirements
1. Open Requirements Portal. On the Home page, click New, enter a Name and a Description for your project (both are required), click Create, then open the newly created project.
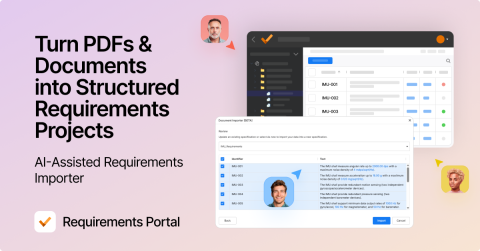
2. Your requirements are in a file. To turn them into structured requirements that the Engineering Assistant can work with, click Add > Import Requirements.
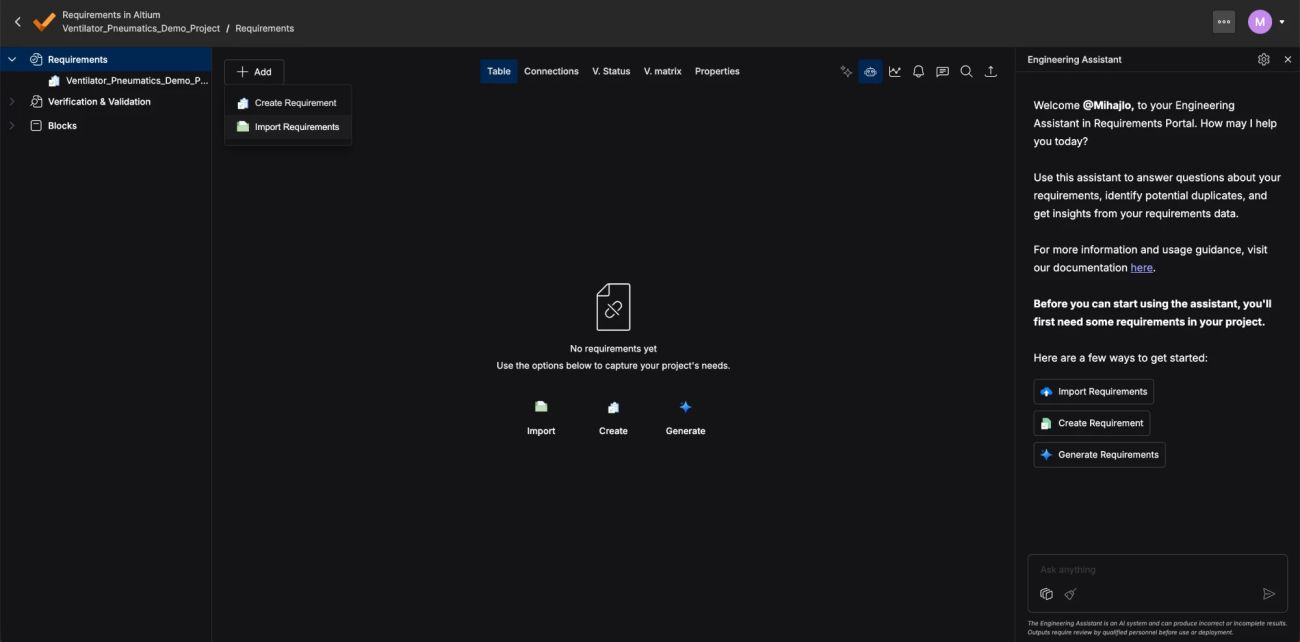
3. Drop your file (Excel, CSV, Word, or PDF) in or use the provided sample file. Leave Classic Import (Non-AI) off so the AI-Assisted Importer can read your file, then click Continue. Check that Identifier and Text are mapped, then click Import.

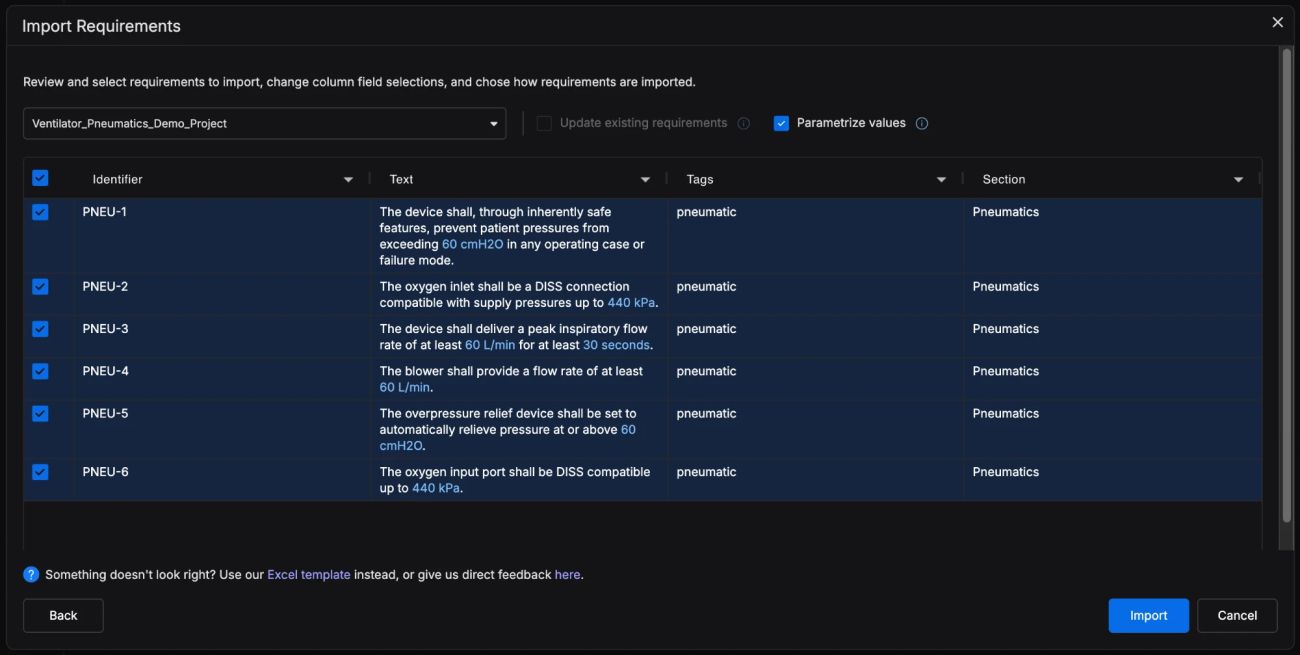
4. Your requirements are now in a specification named like the project, in a section taken from your file. Numbers with units turn blue and show two decimals, such as 60.00 cmH2O. Wait until they stop flashing before you open the Engineering Assistant. The importer is turning them into parameters, so Requirements Portal can work with those values.
Your requirements are now in one shared workspace, ready for the Engineering Assistant to act on them.
Step 2: Check Your Requirements
The Engineering Assistant drafts the verification plan from your requirements, so review them first. A verifiable requirement allows a clear pass-or-fail decision. Vague terms such as fast, robust, or adequate leave room for interpretation, so state values, units, and the condition instead.
1. You can check your requirements in two ways: with the Find Engineering Gaps AI Skill that is already in Requirements Portal, or with your own prompt.
Check each requirement for verifiability. If all are verifiable, say so and change nothing. If some are not, list them with a short reason and propose a rewording of only those in the Changes summary. |
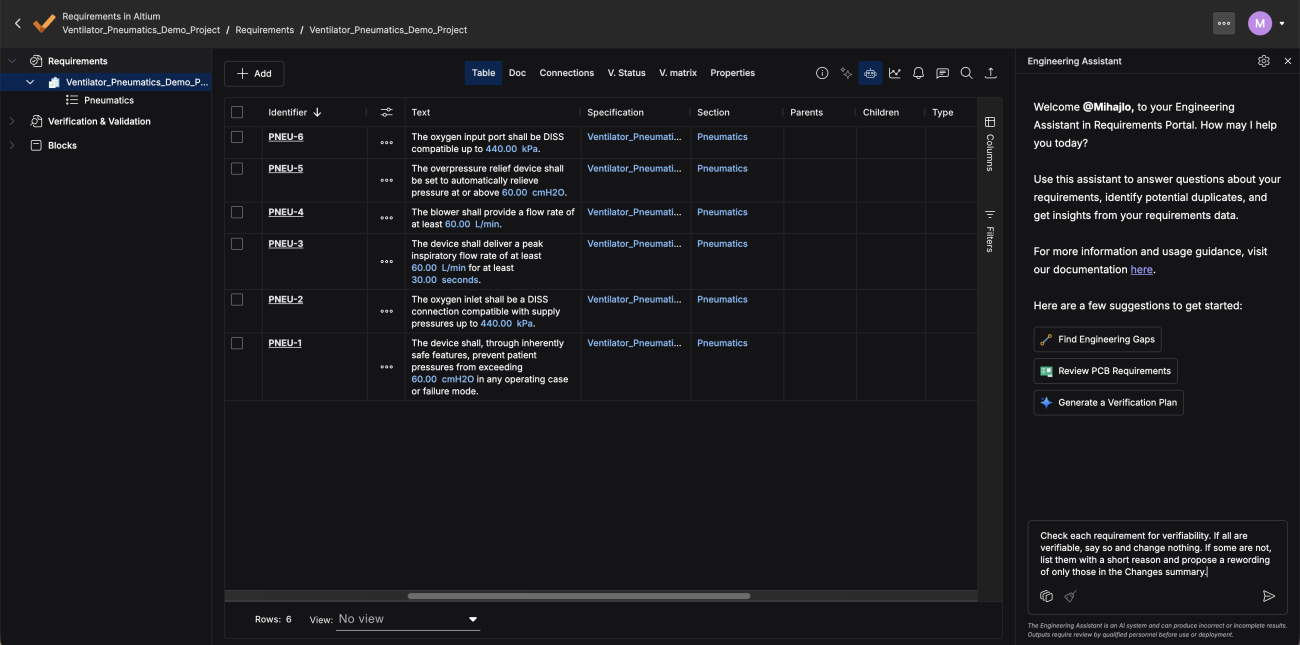
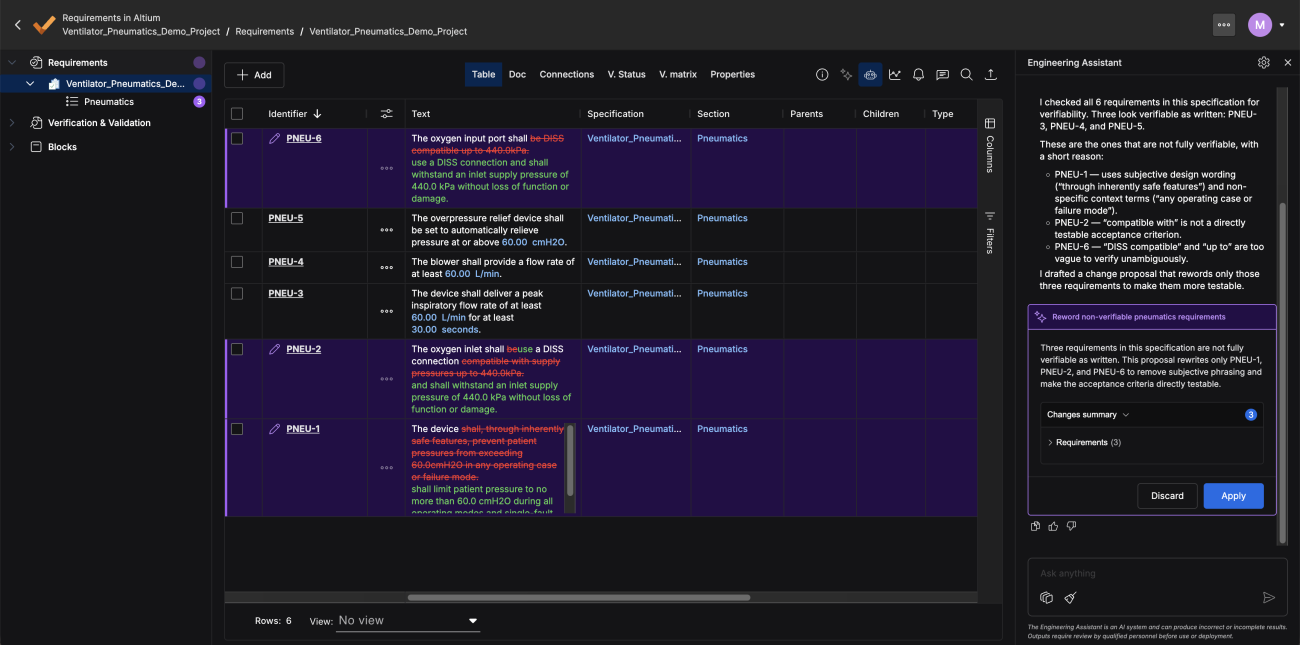
2. The Engineering Assistant lists the nonverifiable requirements, along with a brief reason for each. If all requirements are verifiable, it states this, makes no changes, and you can go straight to creating the verification plan.
When the Engineering Assistant proposes changes, expand the Changes summary. It shows each change as before and after: the old words are crossed out, and the new words appear next to them. Click Apply to accept the proposal or Discard to reject it.
3. The AI proposes, you approve. Nothing changes until you click Apply. Read the crossed-out words as closely as the new ones, because you know what each requirement must cover and the assistant doesn’t. If something is missing, ask it to restore that, then apply the new proposal.
Step 3: Create a Verification Plan with AI
Your requirements are now ready, so the Engineering Assistant can draft the verification plan. Work on one section at a time (5 to 10 requirements), and don’t mix sections in your first run.
The Create a Verification Plan AI Skill assigns a V&V method and a V&V activity to each requirement. It works in three stages: methods, then activities, then each activity's steps, all linked to your requirements. You review after each step, and nothing is applied until you approve.
As with the previous check, you have two ways to ask for it. Click the Generate a Verification Plan button in the Engineering Assistant panel, or paste your own prompt:
Create a verification plan for the requirements in this specification using the Create Verification Plan skill. Propose the changes in the Changes summary so I can review them before applying. |
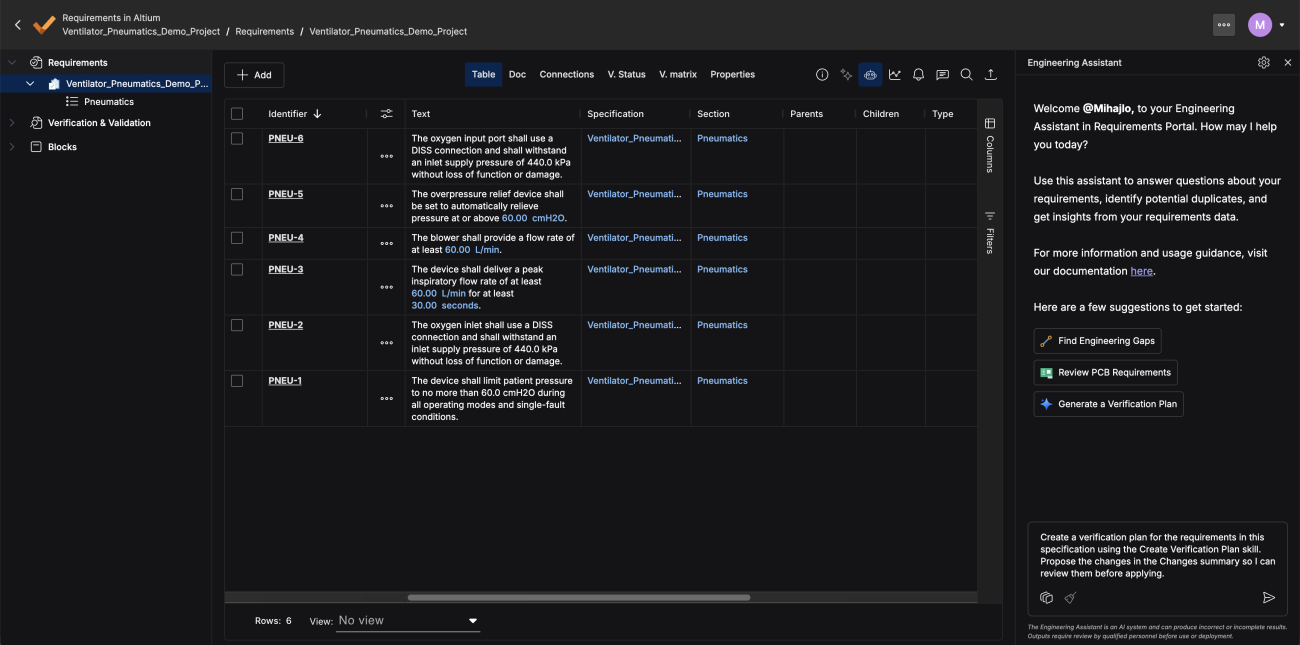
When you send the prompt, the Engineering Assistant starts the Create a Verification Plan AI Skill, which builds your verification plan from the requirements in your section.
Step 4: Review & Approve the Proposals
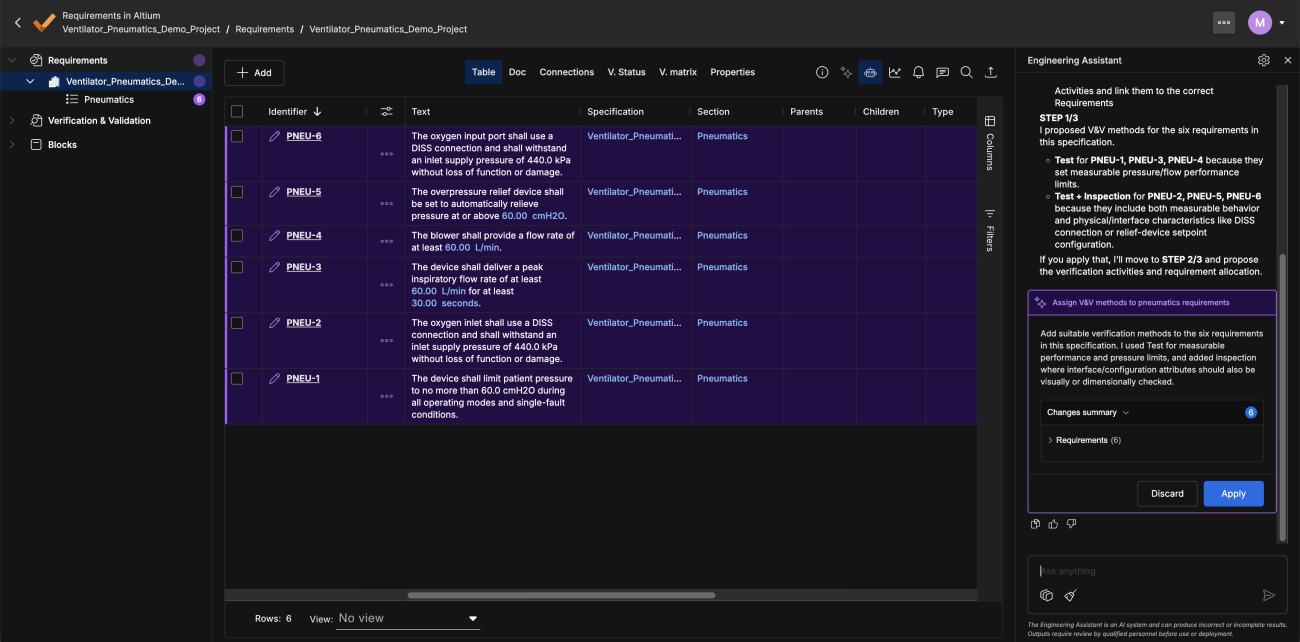
Verification planning starts with a method for each requirement. The Engineering Assistant first proposes the V&V methods and shows them in a Changes summary. Then it proposes the activities, and last, the steps. Review each of the three proposals, then click Apply to move on.
Step 4.1: V&V Methods
Each requirement gets one or more V&V methods, such as Test, Analysis, Inspection, Review, or Demonstration. Check for two things in this stage: Does this method prove this requirement? Does it have something to check? For example, Inspection needs a physical item or record to review.
Step 4.2 - V&V Activities
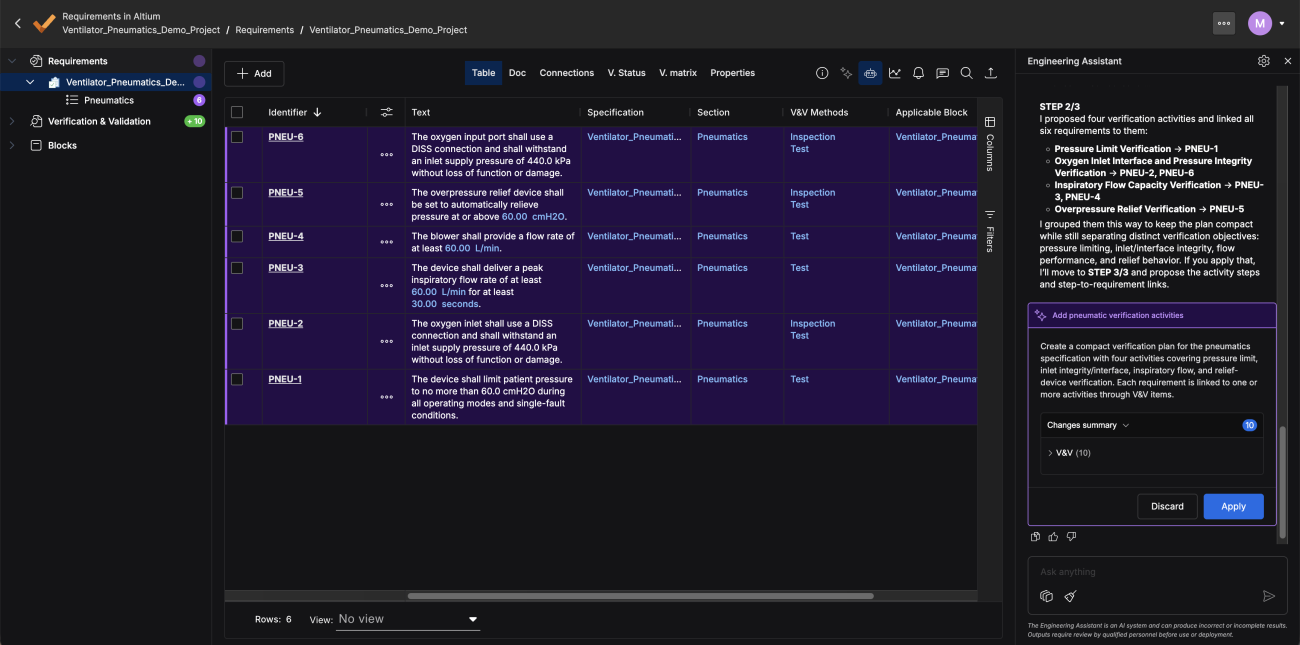
The Engineering Assistant groups your requirements into V&V activities. Before you apply, make sure every requirement is assigned to an activity for each method, and that the expected results match the numbers in your requirements.
Step 4.3 - V&V Procedure Steps
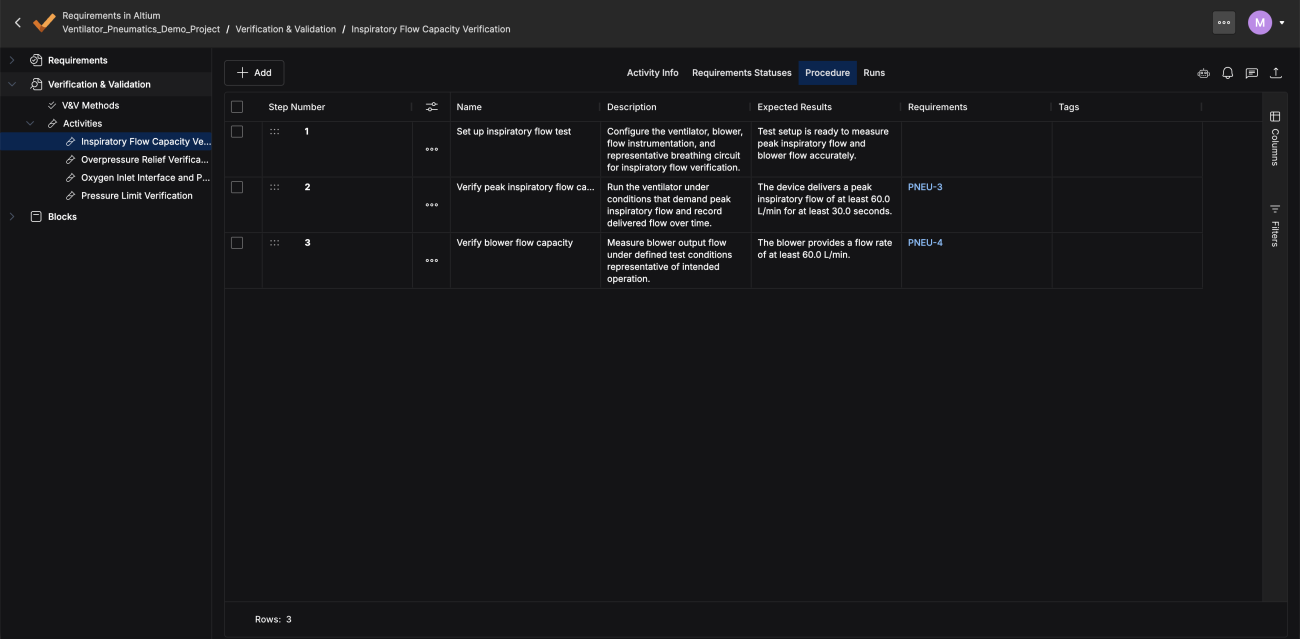
Each activity has steps, and each requirement is linked to the steps that verify it. Before you apply, make sure every verification step clearly states what is measured or observed, includes the numbers from your requirements, and that each requirement is linked to every step that verifies it, not just one.
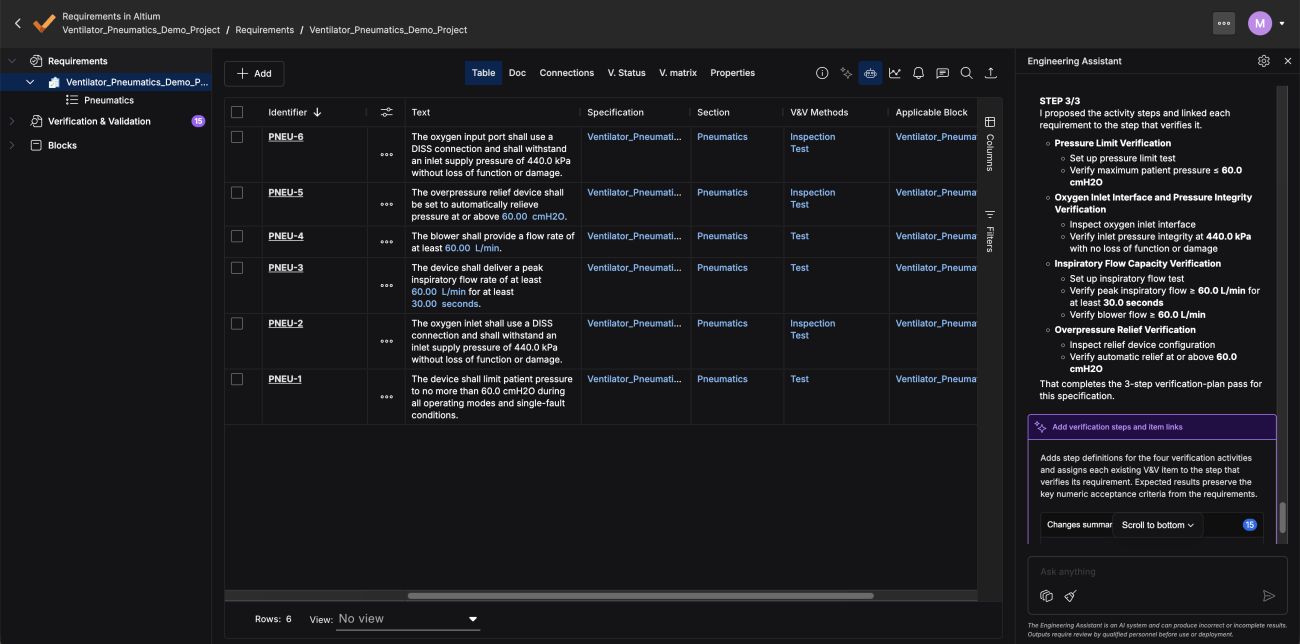
After this step, you have successfully created your verification plan. Now every requirement has a verification method, an activity, and a verification step, and you reviewed each change along the way. You know how each requirement will be proven before anyone builds a test.
Step 5: Check Your Verification Plan
The verification plan is now in Requirements Portal. Before you rely on it, look at it as a whole. These reviews show gaps and wrong links while they are still cheap to fix.
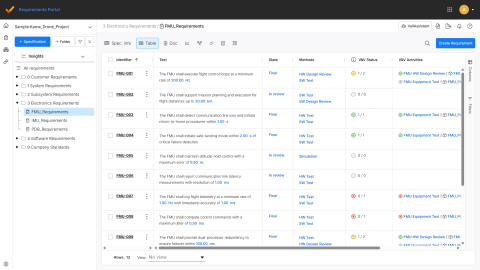
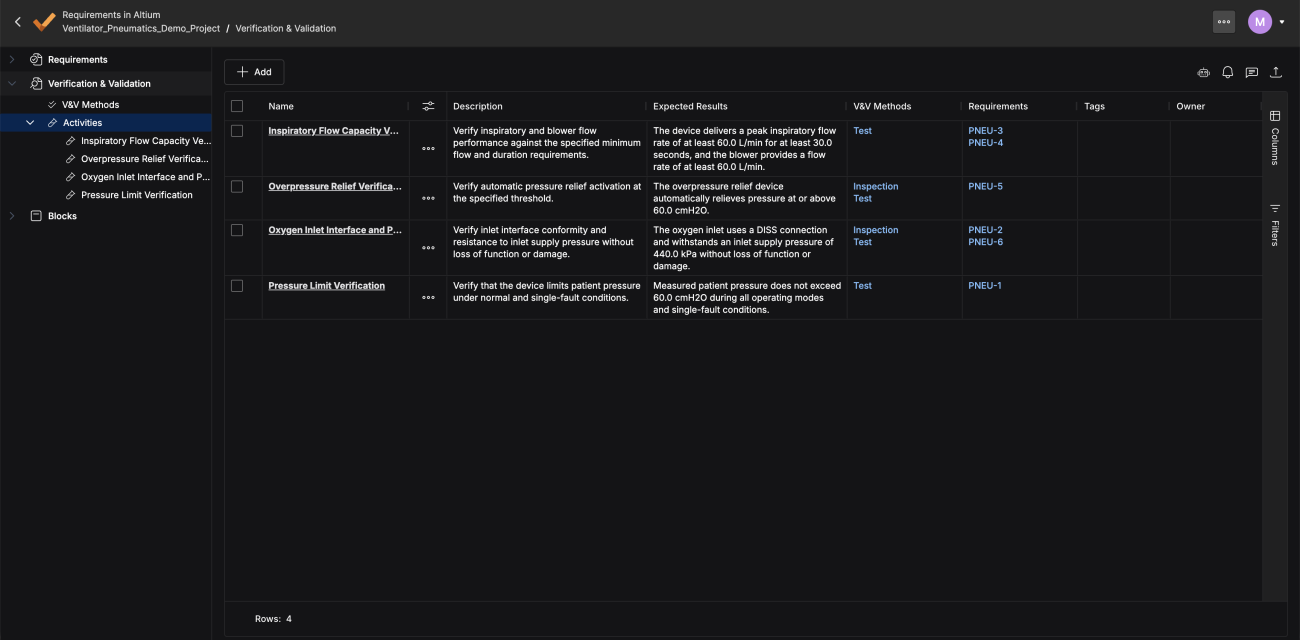
1. Open Verification & Validation > Activities. Each activity is listed with its method, expected results, and the requirements it covers. Confirm the list covers what you expect.
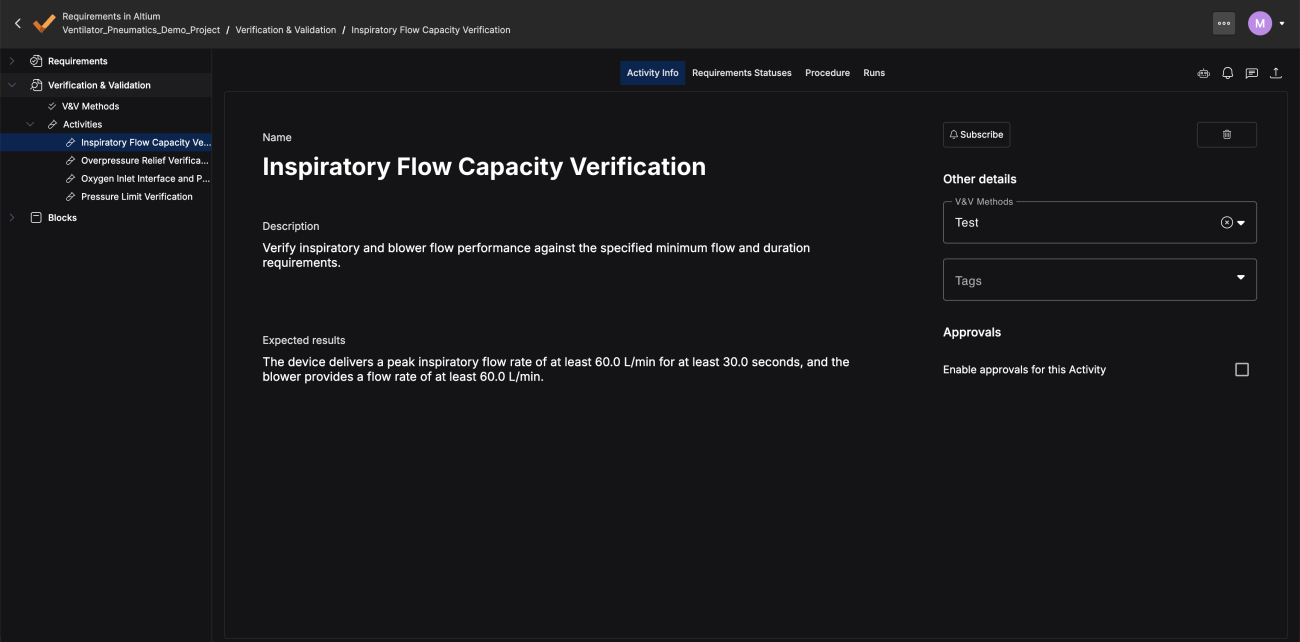
2. Open one activity. Activity Info shows its purpose, method and expected results. Read the expected results, because the test is judged against them.
3. Then check the Procedure tab. It lists the steps your team will run later. Each step should say what is measured or observed.
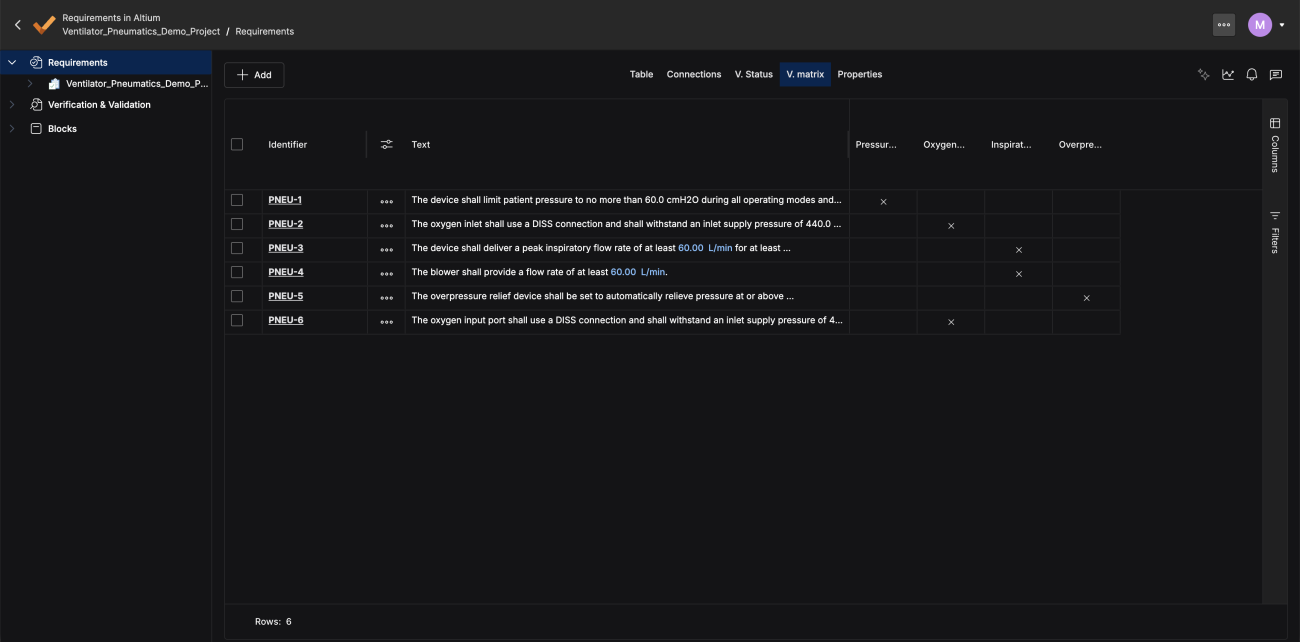
4. Back in the requirements, open the V. matrix tab. It has one row per requirement and one column per activity, with a cross where an activity verifies the requirement. Every row needs a cross, or that requirement is unverified.
5. Open V. Status. Before you run anything, it reads Not Verified, with the number of activities that cover each requirement. This is your starting point.
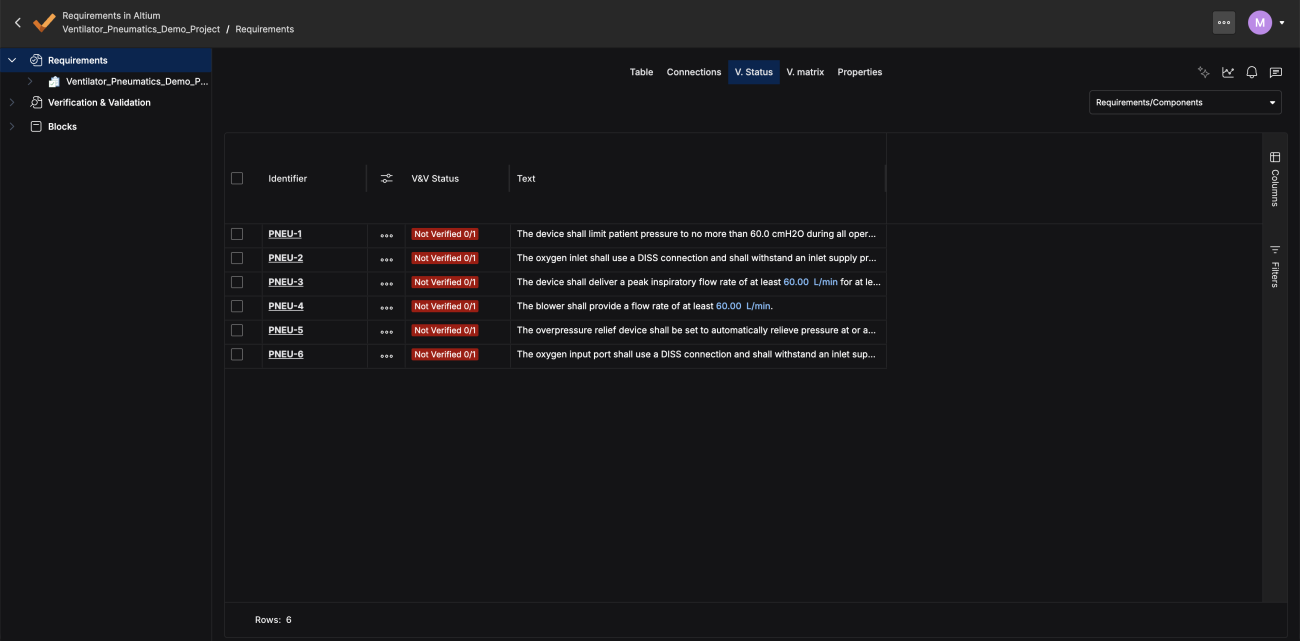
Your verification plan is created and reviewed, but nothing is verified yet. Verification begins when you run each activity, record the results, and attach the evidence. The status then moves from Not Verified to Verified, requirement by requirement.
Conclusion & Next Steps
You started with requirements stored in a file, disconnected from one another, and ended with a plan that shows how each will be proven. The Engineering Assistant helped you draft the plan, but every decision stayed with you: which requirements to reword and which proposals to apply.
When you start with a new set of requirements, this checklist keeps you on track:
- Import your requirements into Requirements Portal.
- Check that each requirement is verifiable.
- Start the Create Verification Plan AI Skill.
- Review and apply each proposal.
- Check the verification plan in the V. matrix.
If you are ready to put this into action, try Requirements Portal and generate test cases for your own requirements.

About Author
Related Resources
Related Technical Documentation
Table of Contents
Better Requirements
Less Busywork
Build better hardware with AI agents that live and act in your requirements tool.
Learn More
Thank you, you are now subscribed to updates.