





Mastering EMI Control in PCB Design: Component Placement for EMC


Mastering EMI Control in PCB Design Series
1
2
Component Placement for EMC
| October 2, 20243
4
5
6
In this second article of the Mastering EMI Control in PCB Design series, we will dive deeper into one of the key concepts for maintaining low levels of electromagnetic interference (EMI).
Board segregation, also known as board partitioning, is a method used to organize the different circuit parts of a Printed Circuit Board (PCB) to keep them separate. This improves the overall performance of the board, particularly in terms of EMI. This technique not only helps reduce electromagnetic interference but also enhances the signal integrity of the PCB design.
The principles behind these techniques include:
Containing the high-energy content of high-frequency digital signals.
Avoiding common-impedance coupling between different types of circuits within the board.
Reducing current loop areas to decrease emissions and improve immunity to external interference.
Part of Placement is Controlling Return Currents
Since current always seeks the path of least impedance, it’s important to understand that as the signal frequency increases, the return current closely follows the signal current to minimize the inductive loop. Conversely, at low signal frequencies, where the inductance becomes small, the resistive component of the impedance becomes predominant.
At this stage, the return current spreads throughout the conductor's surface to find the path of least resistance. The critical point for PCB designers is that the return current’s path back to the source depends on the signal frequency.

Figure 1 - Example of different return current path based on frequency in Altium Designer
Our job as PCB designers is to minimize interference between these return currents to avoid common-impedance coupling, which can lead to electromagnetic emissions. To achieve this, we can create specific zones or sections in the PCB, each dedicated to a particular type of circuitry. This also reduces current loops, leading to less radiation from differential-mode currents.
It might seem tempting to create a split in the Return Reference Plane (RRP) to further isolate the return current paths from different circuits. However, this approach does not follow best practices for EMC because it creates a voltage difference between two metal areas, forming an antenna-like structure that can cause electromagnetic emissions.

Figure 2 - Example of bad routing over a split plane layer
The solution is to implement a solid, low-impedance return reference plane that allows the return current to find the preferred path back to the source. This plane should have no cuts, splits, or large gaps that can act as sources of common-mode noise. Component placement should then be divided into distinct sections by distributing the components based on their type of circuitry and function.
One common way to implement control over return currents is to separate circuit types into different regions of the PCB, and then connect them together with their shared digital/analog interfaces. Essentially, thanks to the use of a shared reference (ground plane), the return currents that complete circuit connections between each block are confined to small regions where the exhibit very low EMI. Such a component separation might look like the separation shown in the example below.

Figure 3 - Example of component separation into different PCB regions in Altium Designer
For a mixed-signal board, the typical separation is to divide the board into:
The main digital section
a power section with the highest-power regulator
an analog section
an input/output (connector) section
a section for filtering the power and I/Os
In addition to maintaining tightly controlled return currents, this allows many of the common separation techniques used to inhibit interference (crosstalk) between different circuits. For example, it allows switching nodes and power rails in the largest power regulators to be set away from analog circuitry. This type of component placement is possible in modern designs because a ground plane is present to provide a clear reference for signal and power.
Does Connector Placement Still Matter?
Cables and connectors are one of the areas many designers least expect to be responsible for EMI failure, and yet they are a very common source/sink of emissions that cause failure in EMC testing. There is a guideline that states that connectors should all be placed along the same board edge in order to ensure EMC success. In reality, this is an outdated guideline that originated (as with many old guidelines) before the common usage of ground planes in PCBs.
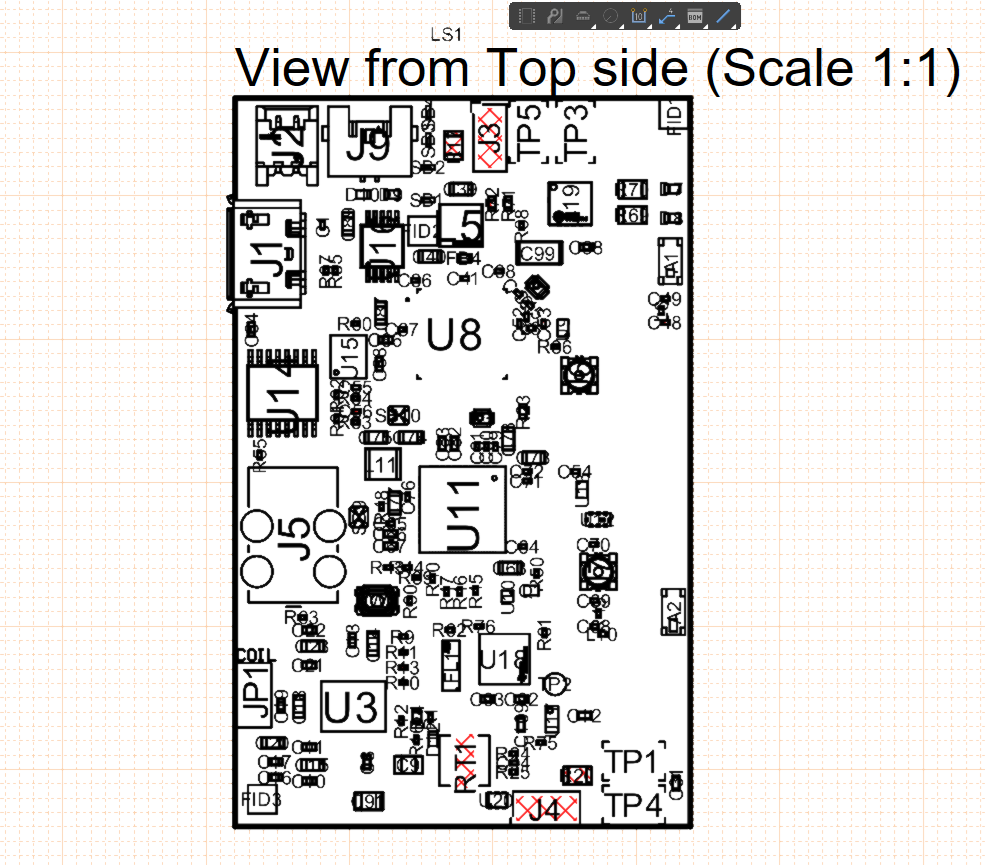
In reality, many designs require that connectors (input/output) be placed anywhere around a design. In other words, they may be placed at any board edge or within the interior of a board. The image below shows how an example IoT design (provided by Zachariah Peterson) with connectors distributed around the PCB, and which has been shown to pass radio emissions testing.
In order to do this correctly, the connector should follow some basic guidelines:
- If using a custom pinout, make sure some pins are allocated to GND
- When GND pins are included, interleave them around signals/power
- GND pins should connect to the system GND net on the PCB
- Shielding on cables is often not needed, but if included the GND-shielding connection should be tested
- Make the GND connection on pins to a plane, not to traces
- Place connectors with a chassis connection close to the chassis net on the PCB
- Ground unused pins, preferably to the chassis GND (if present) or the system GND net
- Place circuit protection (e.g., TVS diodes) close to the connector pins
If the intention of the connector is to connect to an optically/galvanically isolated region in the PCB, then the best practice is to make all of these connections in one area away from other connectors that are referenced to a separate GND net. This is a more complex type of design which is typically implemented for isolated power supplies or sensor interfaces.
Decoupling Capacitor Placement for EMI Control
Decoupling capacitors are a direct extension of the board partitioning strategy because they suppress PDN noise that would otherwise radiate from the board edge or couple into signal traces. The placement constraint is loop inductance: the parasitic inductance between the capacitor, the IC power pins, and the return plane determines how effectively the capacitor can source transient current and damp PDN resonances. For ICs with fast edge rates, decoupling capacitors should be placed and connected such that the loop inductance in the connection is as low as possible.
Generally, this means there are two ways to make these connections:
- In BGA packages, the capacitor connections are made through power/ground plane pairs rather than using traces. In this case, the decoupling capacitors do not need be placed extremely close to the power/ground pins.
- On leaded packages (QFP, SOIC, etc.), the capacitor is typically placed on the same surface layer adjacent to the power pins, with the shortest possible traces connecting directly to the pins, possibly with a via dropping into the ground plane.
This somewhat debunks the guidance that decoupling capacitor connections need to be as close as possible to the power/ground pins. In reality, power/ground plane pairs can provide the best connection thanks to their minimal path inductance (known as spreading inductance). This helps keep the PDN impedance low, which then minimizes voltage transients in power rails and minimizes their associated radiated emissions.
Conclusion
In systems involving digital signals, we need a ground plane for basic signal integrity and low radiated EMI. Additionally, using a solid ground helps maintain the return path between functional blocks without so that we have low crosstalk.
In the next article, we’ll explore how to select the optimal PCB stackup for improved EMI performance and reduced risk. Be sure to follow our pages and social media for more insights.
Achieving these high standards in PCB design requires a suite of tools that provide precise control over every aspect of your design. Altium Designer® offers a comprehensive set of PCB design, layout, and simulation features, ensuring your designs meet all requirements and simplifying the board partitioning process.
The integrated design rules engine and online simulation tools help verify conformance to your design specifications as you route your PCB, ensuring the highest design standards. Upon completion, you can seamlessly release files to your manufacturer using the Altium 365™ platform, simplifying collaboration and project sharing.
You can start your free trial of Altium Designer® + Altium 365™ today and bring your PCB designs to the next level.

About Author
Related Resources
Related Technical Documentation
Table of Contents
Solutions for Every Role and Team
- Discover and evaluate design options earlier
- Develop in one shared workspace
- Scale with control and compliance
- Connect every stage of hardware development
Learn More
Thank you, you are now subscribed to updates.