


Design for Additive Manufacturing with Your ECAD/MCAD 3D Printing Software

At a Glance
Optimize your ECAD/MCAD workflow for 3D-printed electronics. Learn key additive manufacturing design rules to ensure functionality, precision, efficiency.


Industry 4.0 is surely on the horizon, and with the rate at which technology advances, many advanced products will be 3D printed in part or in full. The industrial IoT paradigm is already transforming the way many manufacturers operate and is helping usher innovation in a number of advanced industrial and consumer products. The electronics industry is no stranger, and an array of new 3D printing systems and a broad range of materials now allow innovative electronics designers to print fully functional advanced electronics.
Any electronics design team that wants to produce functional electronics with advanced 3D printing systems must follow some important additive manufacturing guidelines. Some guidelines are particular to various systems, materials, and processes. However, there are some basic guidelines that are applicable to any available system and set of materials. Let’s take a look at some of the basic PCB additive manufacturing guidelines and how you can use existing ECAD and MCAD 3D printing tools to ensure your next device is fully functional.

Electrical Design for PCB Additive Manufacturing Guidelines
Just as is the case in traditional PCB manufacturing, you want to ensure your design is fully manufacturable at scale. Traditional DFM guidelines have come a long way in ensuring the manufacturability of planar PCBs, but these guidelines are considerably relaxed when you use a 3D printing system for PCB production. Here are some important design guidelines to consider when creating a PCB layout for use with an additive system:
Don’t Forget About Standards
The important design standards for 3D printed products are the ISO 17295:2023 and ISO/ASTM 52900:2021 standards. These standards include general design, quality, and testing requirements for additively manufactured products, but they are not specific to electronic devices, leaving you with plenty of electrical design options. Note that for advanced planar 3D printed PCBs, the design standards mentioned above still provide enough flexibility for you to take standard steps to ensure power and signal integrity.
Design to Your Printing Resolution
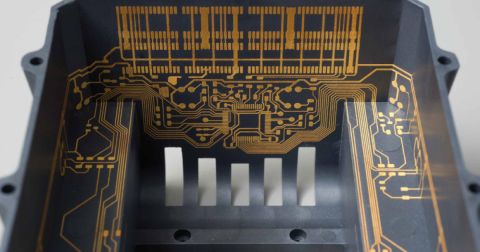
All 3D printers have a resolution limit, which defines the smallest feature that can be deposited during printing. This defines vertical and horizontal limits on the trace sizes and spacing that can be reliably printed. This also defines minimum via sizes or other layer transition structures, such as VeCS, ELIC, and unique microvia designs. The process, materials, and system you use for deposition will dictate the resolution you should consider in your design. Whenever you are using unique materials and unconventional interconnect architecture, you should verify your layout using any MCAD 3D printing tools you have available.
Take advantage of your MCAD 3D printing tools to design unique interconnects, component embedding, and your enclosure.
As your conductor feature sizes approach the resolution limit, conductors may become rougher at the surface for some processes, depending on how conductive elements are deposited and cured during printing. For example, the roughness of conductors deposited with aerosol jetting or inkjet printing is limited by the droplet size, viscosity of the deposition suspension, and size of the deposited droplets. Rough conductors will incur higher losses thanks to the skin effect, particularly at higher frequencies. It is a good idea to print a test coupon with your proposed interconnect design and thoroughly test it to ensure electrical functionality.
Understand Your Material Constraints
This point relates to resolution, but it is also an important determinant of electrical functionality. Some 3D printers are only rated for use with specific materials, which are usually sold by the manufacturer of the system. Other 3D printers are useful with a broader range of materials. If you are planning to experiment with advanced materials or you have developed a proprietary material or process, you’ll need to check the resulting feature size produced when using each material in your board. The result is that your interconnect dimensions may not match the design values, particularly in the case where there is significant thermal expansion during curing.
Electrical and Mechanical Design and Production
When you have access to a 3D printer for mechanical enclosures alongside a 3D printer for PCB production, you have access to a complete solution for in-house prototyping. You’ll be able to print your board and enclosure in parallel and test your new product immediately. This helps you close the loop on R&D cycles, which helps you get to market before your competition.
Advanced 3D printing systems for PCBs, such as those from Nano Dimension and Optomec, allow you to convert a design directly into 3D printing instructions from your Gerber files. Some 3D printers will include plugins that integrate with mechanical design tools like AutoCAD and SolidWorks, although you won’t be able to easily design your electrical layout as you won’t have access to the standard PCB routing tools. When you have access to an ECAD application that integrates with these mechanical design tools, you have a complete PCB additive manufacturing workflow with standard design applications.
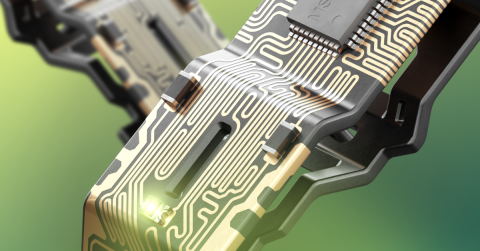
Enclosure design for a 3D-printed product
When your ECAD 3D tools integrate with your MCAD application, you can verify all mechanical functions alongside your PCB layout. You can also design your enclosure to fit your board precisely and quickly prepare layer-by-layer printing instructions for your new product.
The design tools in Altium Designer® can be easily adapted to accommodate the essential PCB additive manufacturing rules presented here. You’ll also have access to an important set of post-layout simulation tools for examining power and signal integrity in your board. When you take advantage of the the MCAD 3D integration features in Altium 365, you’ll have a complete electrical and mechanical design solution that is ideal for designing 3D-printed electronics.
Explore how Altium Designer supports additive electronics design!

About Author
Related Resources
Table of Contents
Design to Release, Without the Friction
- Keep reviews tied to the right version
- Reduce handoff confusion and rework
- Spot sourcing and release risk earlier
- Work solo, share when needed
Get Started
Thank you, you are now subscribed to updates.