






A PCB Layout Review Checklist Gets You to Manufacturing Quickly


PCB designers can ensure their own successful manufacturing run when they keep a PCB layout review checklist. Once the final design checks and sign-offs are complete, your design is ready to hit the fabrication line. However, you can get through manufacturing quicker and prevent any redesigns if you know what your manufacturer will check in your design.
The right time to locate the important DFM requirements and create design rules for your PCB layout is before any of the components are placed. If you did some homework before and during design, you’ve probably implemented the best DFM practices and provided plenty of documentation for your manufacturer. Let’s look at some of the common points you should examine in a PCB layout review so that your manufacturer does not derail your build schedule with technical questions.
A Complete DFM and Requirements Analysis
Your goal in a PCB layout review is to go a step beyond a DFM review; it is to ensure a comprehensive review against product requirements as well as manufacturability constraints. Manufacturability does not guarantee you conform to all product requirements, and similarly, complying with your product’s requirements list does not automatically align your design with manufacturing capabilities. The PCB layout is where these two groups of constraints meet and, sometimes, interfere with each other.
In addition to basic DFM and product requirements, some PCBs have their own unique DFM requirements that must be checked as part of a PCB layout review. These are particular to the design type in question and do not apply to all PCB layouts. Ideally, these should be defined as design rules early in the process to ensure conformance with all manufacturing requirements, but some of these requirements cannot actually be defined as a design rule in ECAD software.
DFM Review Points for All Designs
First, let’s look at the most common review points that are relevant for any PCB layout and should be part of a PCB layout review. These are listed below.
- Trace and space: The most basic constraint is copper feature sizes that can be etched into a PCB layout. These will differ on inner and outer layers.
- Component spacing: While typically limited by copper pad size, some component bodies extend outside the copper pad boundaries and can end up being placed too close together, causing problems for automated pick-and-place machines.
- Drill bit sizes: It’s best to consolidate to fewer drill bit sizes where possible, and those drill bits must obey the aspect ratio limitations imposed by the fabrication house.
- Drill clearances: Plated and non-plated holes require certain clearances from copper and other drills to account for positional and diametrical tolerances.
- Missing or thin solder mask between pads: This can result in bridging during reflow soldering, which can short two pads or pins on a component. This is one common mistake that can be spotted by simply turning on your solder mask layer during a final review.
- Thermal reliefs: Missing or unnecessary thermal reliefs might be present on some pads because there is a setting override in the PCB layout, or they were defined in the associated PCB library.
The above list would best be considered a “basic” surface-level review of the PCB layout, and it is certainly applicable to all designs. Before looking at specific types of designs, such as HDI or rigid-flex, there are some more advanced checks that can be seen as applicable to every design but may still be rubber-stamped in simpler boards. Some of these deeper aspects of PCB layout review arise in high-speed designs, bottom-terminated parts, dense via/pin fields, or multi-board designs.
Review Area | What to Check |
|---|---|
Annular rings | Check pad diameters around drilled holes and vias against the manufacturer’s minimum annular ring and registration capabilities. Small annular rings can leave little margin for drill and layer registration tolerances. |
Copper-to-board-edge clearance | Review copper pours, traces, pads, and exposed conductors near routed board edges. Manufacturers specify minimum copper-to-edge clearances that account for routing and registration tolerances. |
Board dimensions and thickness | Verify overall board dimensions, finished thickness, and any localized thickness requirements against available constructions and thickness tolerances. This becomes especially important for card-edge connectors and mechanically constrained assemblies. |
Copper weight | Confirm that trace widths, clearances, and dense copper features are compatible with the specified starting and finished copper weights. Heavier copper generally requires larger etched features than thin copper. |
Controlled impedance structures | Check impedance-controlled traces against the approved stackup and verify that the requested impedance and tolerance are within the fabricator’s capabilities. Make sure there is room for any required impedance coupons. |
Via filling and capping | Identify via-in-pad and filled-via locations and confirm that the required filling, planarization, and plating process is compatible with the selected via geometry. Filled and plated-over vias can also impose different minimum outer-layer feature sizes. |
Slots and routed features | Review plated slots, non-plated slots, internal cutouts, castellations, and other routed features for achievable dimensions and corner radii. These features can require different tooling than normal round drills. |
Precision hole tolerances | Identify holes used for press-fit pins, alignment hardware, or other precision mechanical interfaces. Their finished diameters and positional tolerances may need tighter controls than standard component holes. |
Layer registration | Review small pads, antipads, plane clearances, and other features that depend on accurate alignment between layers. Designs with small registration margins can become fabrication risks even when individual copper features satisfy minimum dimensions. |
Surface finish compatibility | Check fine-pitch pads, edge contacts, and other exposed copper features against the selected surface finish. Some finishes impose practical constraints on minimum pad dimensions or spacing that should be considered before release. |
Many of these items cannot be evaluated independently because changing one fabrication parameter can change several layout constraints at once. Copper weight can change allowable trace spacing, while stackup changes can affect impedance, hole structures, and finished thickness. The best PCB layout review therefore compares the complete design against an approved fabrication capability set rather than checking individual rules in isolation.

HDI-Specific PCB Layout Review Items
HDI designs carry additional constraints primarily related to the use of blind and buried vias. These could be mechanically drilled vias with a stackup built using sub-laminations, or these designs can use laser-drilled microvias, or both. The layout review must then incorporate the additional via and copper etch constraints as they relate to:
- Dielectric layer thickness
- Stacking microvias vs. staggering microvias
- Annular rings on laser-drilled microvias
- How clearances/feature sizes are impacted by copper weight
- How clearances differ for mechanical vias vs. laser-drilled vias
The constraint definition for these items in an HDI PCB is entirely driven by the stackup design. The stackup design needs to be approved by a fabricator and must align with capabilities before design rules can be developed to account for capability constraints. Once the stackup is approved, these fabrication limits can be translated into PCB design rules and used as the baseline for the final HDI layout review.
Rigid-Flex-Specific PCB Layout Review Items
Rigid-flex designs are also often PCB stackup driven, but for different reasons. The flex layers can have bending constraints imposed on them based on the design of the stackup, where rigid and flex regions will interface or border each other, and any additional mechanical fixation that may be used in these designs.
Review Area | What to Check |
Bend radius | Verify that each flex section can achieve the required installed or dynamic bend without exceeding the allowable bend radius for the flex construction. Bend capability depends on flex thickness, layer count, copper construction, and whether bending is static or dynamic. |
Trace routing through bend areas | Review trace direction, curvature, and spacing through each bend region. Traces should cross bend areas in a way that minimizes unequal mechanical strain and avoids sharp corners. |
Rigid-to-flex transitions | Inspect routing and copper geometry where flex layers enter rigid regions. Abrupt changes in geometry or crowded transition areas can create mechanical stress concentrations. |
Vias near flex regions | Check the distance between vias, plated holes, and flex transition or bend areas. Vias placed too close to these regions can experience additional mechanical stress during bending. |
Component placement | Verify that components and solder joints are kept out of bending regions and other areas where flexing could transfer stress into solder connections. |
Coverlay openings | Review coverlay openings around pads and exposed copper, including allowance for coverlay registration and adhesive flow during lamination. |
Stiffener locations | Check stiffener dimensions and placement beneath connectors, component areas, and other mechanically supported regions. The stiffener definition must match the intended mechanical function of the assembly. |
Flex layer construction | Confirm the number of flex layers, flex dielectric thickness, copper construction, and lamination sequence against the approved rigid-flex stackup and manufacturer capabilities. |
Copper between flex layers | Review overlapping traces, planes, and large copper areas on adjacent flex layers. Excessive overlapping copper can locally increase stiffness and change how the flex section bends. |
Impedance through flex regions | For controlled-impedance interfaces, review the transmission-line geometry as signals move from rigid to flex regions because the dielectric environment and stackup can change across the transition. |
Discrepancies Between Your BOM, Your Netlist, and Your Schematic
One of the most common errors seen during a PCB design review is a discrepancy between these three pieces of documentation. This is common when multiple designers collaborate on a new project, and frequent changes are made by multiple parties. Eventually, someone forgets to synchronize something or compile the project, an old BOM/netlist gets marked as the newest BOM/netlist, reference designators get changed without being synchronized to the BOM/netlist, or some other mistake occurs.
This is understandable, especially if your team is trying to get to the production line quickly. However, it is also preventable if you use the right design software. Sub-standard design tools force you to manually compile a BOM, or they force you to manually execute synchronization between your BOM, netlist, schematics, and PCB layout. Eventually, someone forgets to do this, and this can cause incorrect information to be sent to the fabricators.
The best design software for ensuring all your design, assembly, and component information remains synchronized, works in a unified design environment. In this type of environment, the underlying design engine automatically synchronizes your design data across your schematic, layout, BOM, Gerber files, and any other documentation required for production.

Non-DFM Requirements Definition and Review
Product-specific requirements often sit outside the normal DFM rule set. A PCB might need defined connector locations, restricted component heights, specific creepage distances, test-point access, thermal limits, isolation zones, or mechanical keepouts. These constraints can affect the PCB layout even though they do not originate from the fabrication process.
Requirements Portal provides a structured location for defining these requirements and linking them to the corresponding hardware project. Requirements can be organized, assigned, tracked, and connected to design information rather than remaining isolated in spreadsheets or specification documents.
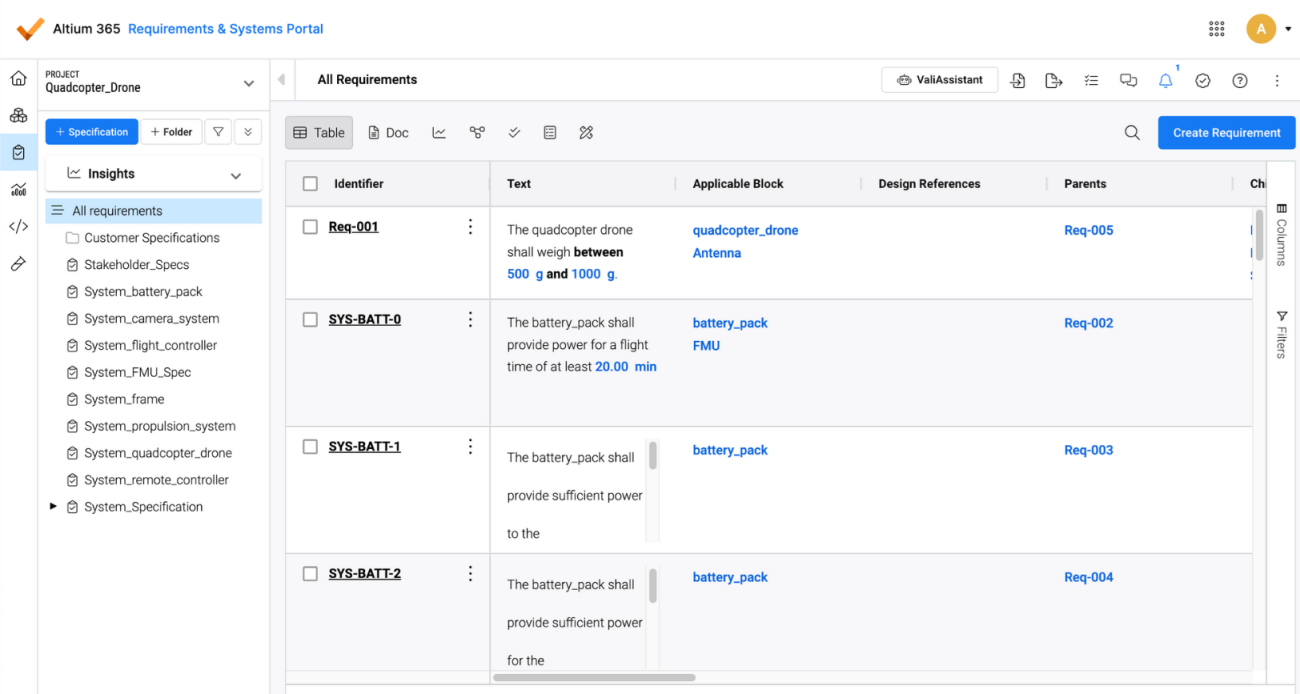
Once the project is connected, requirements can be accessed from the Requirements panel in Altium Designer and placed as active requirement instances on schematic or PCB documents. This gives the designer an in-context reference while implementing the layout and creates traceability between the original requirement and the design.
During PCB layout review, each applicable requirement can then be checked against the completed design and moved through its verification process. This creates a second review path alongside DRC and DFM checks, helping ensure that a manufacturable PCB also satisfies the product-specific constraints that drove the design.
The Verdict Comes From Your Manufacturer
After you send your design data over to your manufacturer, their engineers will go through your design with a fine-toothed comb, looking for anything that doesn’t comply with their constraints or that may result in scrapping fabricated boards. In prototype runs, yield analysis is typically not a factor in a manufacturer’s DFM review, but larger orders or sustained volume production will get a review for any factors that can impact yield.

Want to Save Time? Do a PCB Design Review in the Cloud
Today's PCB design software helps expedite many design tasks needed to create high-quality layouts and manufacturing documentation, but many designers still rely on email chains and chat programs like Skype to complete a PCB design review. There's a faster way to complete a PCB design review: use Altium Agile Teams cloud platform. Having access to an Altium Workspace allows you to store and share your design projects in a managed cloud environment.
Best of all, Altium Agile Teams enables you, your manufacturer, and your design team to open, inspect, modify, and release projects for fabrication without using an external PCB design review application. Here are some of the important tasks that Altium Agile Teams makes easy:
- Share your in-progress and finished projects with collaborators and your manufacturer
- Compare Gerber file revisions within Altium Designer or in your web browser
- Migrate your component libraries, quickly import components into new projects, and create new components from old symbols and footprint
- Inspect all design documents in your web browser or by opening shared projects in Altium Designer
- Control user access to all projects through a secure platform.
With the layout and schematic design tools in Altium Agile Teams, you can easily address all the standard items on your manufacturer’s PCB design review checklist. Any important DFM requirements can be defined as design rules. These design rules are then checked automatically as you create your board, rather than being checked at the end of your design. You can quickly identify DFM violations and correct them early. Once you're ready, share your projects with collaborators and prepare for manufacturing.

About Author
Related Resources
Related Technical Documentation
Table of Contents
- A Complete DFM and Requirements Analysis
- DFM Review Points for All Designs
- HDI-Specific PCB Layout Review Items
- Rigid-Flex-Specific PCB Layout Review Items
- Discrepancies Between Your BOM, Your Netlist, and Your Schematic
- Non-DFM Requirements Definition and Review
- The Verdict Comes From Your Manufacturer
- Want to Save Time? Do a PCB Design Review in the Cloud
Solutions for Every Role and Team
- Discover and evaluate design options earlier
- Develop in one shared workspace
- Scale with control and compliance
- Connect every stage of hardware development
Learn More
Thank you, you are now subscribed to updates.