The Need To Control Routing Impedance

The design approach of controlled impedance routing is a key ingredient of high speed PCB design, in which effective methods and tools must be adopted to ensure the intended high speed performance for your PCBs. So unless you carefully design your routes within your PCB, the impedance would be uncontrolled, and its value would vary from point to point throughout the trace. And because your PCB traces don’t act like simple connections at high frequencies, ensuring the impedance is controlled will preserve the integrity of the signals and also reduce the potential of electromagnetic radiation.
What Determines Controlled Impedance?
A PCB’s impedance is determined by its resistance, conductance, inductive and capacitive reactance. However, these factors are a function of the board structure, the properties of the conductive and dielectric materials, the structure and dimensions of the conductors and their separation from signal return planes, as well as the signal properties.
At a basic level, the trace impedance value is determined from the PCB structure and generated by these factors:
- Thickness of the dielectric material (core/prepreg)
- Dielectric constant of the material (core/prepreg, soldermask or air)
- Trace width and copper weight
When we get more advanced and look at higher frequencies, the impedance is also determined by the roughness of the copper (which determines the increase in skin effect) and loss tangent (losses in the dielectric). Even if you use the smoothest copper in your design, there is a roughening process used in PCB fabrication to ensure a rough surface for bonding copper-clad laminates and prepregs. No matter what, there will always be some copper roughness!
Typical Configurations
First, let's look at the typical configurations. There are a few broad classes of trace configurations:
- Single-ended: an isolated trace that just carries a digital signal or RF signal
- Differential traces: two traces that are driven together with equal and opposite polarity
- Non-coplanar: a trace configuration where there is no additional copper on the same layer as the trace being routed
- Coplanar: a trace configuration where grounded copper pour is included on the same layer as the trace
When considering a multilayer PCB, designers need to remember that their trace controlled impedances are shielded by planes (references), and therefore only the dielectric thicknesses between the planes on either side of the trace are ought to be considered. Here are some examples of the most common configurations:
Er = Dielectric constant of the material
H = the height of the dielectric material
T = Trace thickness
W1,W2 = Trace width(s) on the bottom and top surfaces of the trace
Etch Factor = T / [(W1 - W2) / 2]
S = Diff pair spacing
C = Coating Thickness
CEr = Coating Dielectric constant
Non-coplanar Configurations
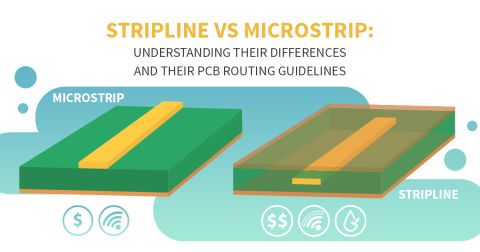
Surface Microstrip: contains a trace on the surface exposed to air with a dielectric and a plane on one side only.
Coated Microstrip: contains a trace on the surface coated with solder mask, and with a dielectric and a plane on one side only.
Offset Stripeline: contains a sandwichedtrace within the PCB with a plane on both sides of the dielectrics (core/prepreg).
Edge-Coupled Surface Microstrip: is a differential configuration with two controlled impedance traces on the surface exposed to air, and a plane on the other side of the dielectric.
Edge-Coupled Coated Microstrip: is a differential configuration with two controlled impedance traces on the surface coated with solder mask, and a plane on the other side of the dielectric.
Edge-Coupled Offset Stripline: is a differential configuration with two controlled impedance traces within the PCB sandwiched between two planes on both sides of the dielectrics (core/prepreg).
Coplanar Configurations
Note that both single-ended and differential traces could be coplanar. Coplanar traces require one additional parameter: the lateral distance or clearance between the trace edge and the edge of the ground on the same layer. This will also determine the impedance of the trace because the ground region creates additional parasitic capacitance around the microstrip. The same idea applies to striplines. The important parameters for a microstrip are shown below.
If you plan to use a coplanar microstrip, take note of how to calculate the required clearance needed to ensure the width of a regular microstrip will have the same width as a coplanar microstrip. In most cases, a value of S = 3W will be sufficient and it is okay to use this ratio to size the trace if you are unsure of how to calculate the right spacing. Depending on whether the thinner layer (smaller H), then you could have S < 3W in microstrip or stripline configuration, including with a solder mask applied.
What Impedance Target Should I Consider?
In general, what is important is not the value, but rather that the impedance is controlled along the entire length of the trace. Most designs will have some sort of specification constraints that would determine the impedance that you need to work with (e.g. 90 Ohms for the differential pairs on a USB interface). For most designs that are built following the trace configurations shown above, the PCB trace impedance could end up being anywhere from 40 and 120 Ohms if you are not designing to hit a specific impedance.
What Tolerance Target Should I Consider?
This is determined in two possible ways:
- Based on the specification in the signaling standard you use
- Based on a calculation of allowed return loss
It's important to note that the fabrication house can only guarantee certain impedance. It’s common for the finished trace impedance to be around +/-10% of the target value based on etching tolerances, angle of the PCB panel, variation in the dielectric constant, and the frequency at which Dk is evaluated. This gives the manufacturer some room to achieve an acceptable yield. So the tolerance should not be used by designers to approximate the nominal impedance value!
As a designer, your job is to specify the allowable range of impedance you can accept in the manufactured board, and the fabrication house needs to determine whether they can hit your specification. For example, you have a finished trace with an impedance target of 50 Ohms +/-10%, then a manufactured trace with 55 Ohms is within tolerance, however it doesn’t leave much room for your manufacturer to move, and this could lower the yield.
Fast Ways to Calculate Impedance
With more boards carrying high speeds signals that are part of a standardized interface, more traces will be requiring impedance control. This control needs to be accurate and calculated with a solver that precisely represents the properties of your actual layer stack, including accurate materials properties.
To help you design to the required impedance value, Altium Designer® includes an impedance calculator served by Simbeor's integrated field solver. This highly accurate modeling tool helps users quickly determine impedance for standardized interfaces and then apply the results as a design rule for use in your routing tools. Learn more about the Layer Stack Manager in the Altium Documentation.

