


PCB Design Rules for Chip-on-Board Layout

At a Glance
There is one simple type of packaging that is not really packaging in the conventional sense: chip-on-board.


The packaging revolution continues to charge ahead and PCB designers are uniquely positioned to benefit from this revolution. There is one type of packaging that will be much more familiar to PCB designers and that does not require any special packaging software to implement. This packaging technique is chip-on-board, where a semiconductor die is attached directly to a circuit board.
Like any unique design approach, there are some rules to follow when beginning a chip-on-board design. These rules span the layout and placement, as well as interconnect design and fanout rules for more advanced chips.
Chip-on-Board in a PCB Layout
In the chip-on-board approach, a semiconductor die with exposed contacts is being soldered directly to the PCB. In other words, there is no lead frame (for wire bonding), no ceramic/epoxy packaging, and no interposer/substrate. Once attached, the chip can be packaged directly on the PCB using an epoxy encapsulant, which will protect the chip and any wire bonded pads from damage.
There are two common methods for placing and mounting chip-on-board in a standard PCB:
- Wire bonding directly from the PCB to the die
- Flip-chip assembly, where the chip attaches similar to a substrate for a BGA package
After attachment and assembly, the chip is typically encapsulated in an epoxy material or conformal coating, each of which could be thermally or UV cured. In the PCB layout, the most important design point is the footprint that will enable attachment of the die to the PCB.
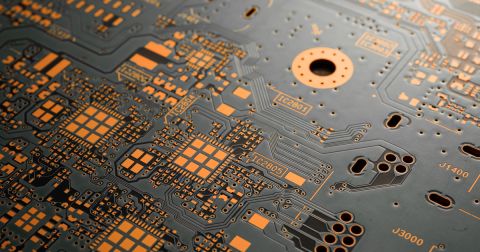
Flip-Chip Example
An example with a flip-chip (sometimes called flip-chip on board (FCOB)) is shown in the image below. This shows an un-encapsulated chip that has been soldered directly to a PCB, similar to what would be done with a BGA fanout. An important material here is the underfill, which encapsulates the solder joints and protects them from excess mechanical stress. The PCB laminate could be a standard FR4-grade material or some more specialized material (flex, PTFE, etc.).

In this approach, the footprint needs to be designed similar to a BGA footprint, but the assembly process will be different. In FCOB, the solder will be fluxed directly onto the PCB, it is not attached to the die. The chip will then be placed just like any other SMD component, and it will be reflowed along with other components. Therefore, some DFA in terms of the footprint is needed to ensure reliable assembly.
I would recommend following similar guidelines for BGA pad sizing, but based on the bump size instead of ball size. The solder mask and paste mask then need to be used to set the exposed pad size to be within the range that would normally be used in a BGA. If the bump pitch is large enough to leave large solder mask slivers, then use the solder mask to act as a dam (SMD pad). Otherwise, use an NSMD pad to prevent solder mask sliver flaking between bumps.
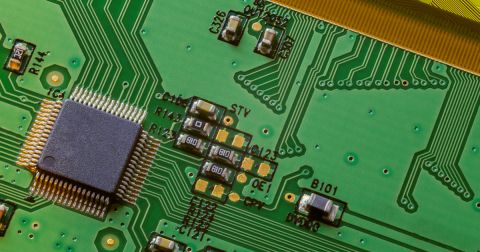
Wire Bonding Example
The image below shows a wire bonding example. In this example, a die-attached pad is soldered directly onto the PCB, and wire bonds are attached between land pads around the chip and contacts on the die. In this design, it is highly advisable to encapsulate with an epoxy in order to protect the wire bonds and die from environmental exposure. This will primarily prevent corrosion, as well as protecting the wires from mechanical damage.

When creating the footprint for the wire bonding pads in the PCB, the pads are typically oversized, which can be clearly seen in the above image. The parameters to be considered for the footprint include:
- Contact pad size
- Contact pad pitch
- Contact pad shape
Square pads are acceptable, although rectangular pads may replicate the pad size used in the component once the die is packaged (such as in a QFN or LQFP package). The contact balls used to connect a wire to the PCB will be very thin, reaching 20 to 30 microns in width. The corresponding contact pad width could be 50 to 150 microns, with the same value being used for pad pitch. Using the pad pitch and sizing numbers, you can then lay out an array of pads in the PCB footprint for the wire bonds.
To learn more about defining and using wirebonding in Altium Designer for chip-on-board design, watch the following video.
More Advanced Chip-on-Board
More advanced chip-on-board will use bump contacts on the bottom of the die (e.g., the flip-chip example shown above).
The idea behind chip-on-board design becoming more advanced relates to two areas: the pitch between contacts or bumps on the bottom of the die, and the speed at which these systems must operate. Just like very fine pitch BGAs, where the pad pitch can require via-in-pad and blind/buried vias, chip-on-board packaging could require the same. In addition, the speed at which these dies and their interfaces are operating precludes any standardization, except for computing interfaces like USB, PCIe, etc.
Why would we use these more advanced dies in a chip-on-board approach instead of designing a substrate or interposer? There are several reasons for this, and it is difficult to generalize to every situation. Test vehicle boards, experimenting with interconnects between chips, and simple lack of access to substrate/interposer production capacity are all reasons to use chip-on-board packaging.
To make sure you can hit performance targets with more advanced chip-on-board designs, take advantage of these resources:
- Use a via impedance calculator for any via fanouts from the die
- Make sure you know the impedance and use an impedance calculator based on Wadell’s equations
- Consult your fabricator and determine the via sizing limits or need for laser drilling
- To eliminate the need for finer surface layer features, use a low-Dk laminate to support the die
- Make sure to apply an appropriate surface plating that accommodates wire bonding

If you’re dipping your toes into chip-on-board packaging design and PCB layout, make sure you use the complete set of product design tools in Altium Designer®. When you’ve finished your design, and you want to release files to your manufacturer, the Altium 365™ platform makes it easy to collaborate and share your projects. Come see the monthly feature updates in Altium Designer.
We have only scratched the surface of what’s possible with Altium Designer on Altium 365. Start your free trial of Altium Designer + Altium 365 today.

About Author
Related Resources
Related Technical Documentation
Table of Contents
Design to Release, Without the Friction
- Keep reviews tied to the right version
- Reduce handoff confusion and rework
- Spot sourcing and release risk earlier
- Work solo, share when needed
Get Started
Thank you, you are now subscribed to updates.


