Can We All Stop Quoting the Critical Length Rule?

At a Glance
Let’s all agree to stop using the PCB critical length rule in high-speed PCB design.


There is one high-speed PCB design rule that has been over-communicated and misunderstood ever since its inception: the transmission line critical length rule. This rule is also known as the 25% rise time rule. The rule basically states conditions under which you don’t need to calculate trace impedance by stating: if the length of a trace is less than 25% of the distance traveled by a digital signal, then the trace impedance does not matter.
|
|
This rule is quoted so often by new designers that you will see many proclaim themselves as experts just for reciting it. The main problem here is the massive lack of context. I’ve seen designers quote that the critical length is 1/2, 1/3, 1/4, 1/5, 1/6, 1/8, 1/10, 1/12, and 1/20 the distance traveled during the rise time. Unfortunately, one must realize the following:
All of the above values are contradictory, and the rule should only be used in a specific situation.
If a design rule has 9 different possible values that someone might follow, then it’s probably a useless design rule. If you are using this rule, you are just guessing. Therefore, I’m comfortable declaring that this concept should never be used as a design rule, and I’ll outline why below.
Why Designers Use the Critical Length Rule
The most common reason a designer will quote this design rule is because they want an excuse to avoid calculating impedance for a bus that has an impedance specification. At this point in the history of technology, where there are hundreds of free online calculators, and with PCB design software including impedance calculators, this approach is just lazy. It has never been easier to calculate impedance, so any designer that wants to be a pro should have no excuse to avoid this.
The reason one has the ability to define a critical length has to do with the input impedance looking into a transmission line. When a digital component sources a signal, the signal sees an input impedance as it enters the transmission line, and the input impedance depends on the following factors:
- The distance between source and load
- The percentage difference between Z0 and the load impedance
We can see where the input impedance arises at the source side of an interconnect in the following diagram.

It is the input impedance value that needs to be understood if you want to use a critical length rule. This is because the unmatched transmission line will appear to have an impedance that is equal to the input impedance as a function of frequency.
How to Correctly Calculate a Critical Length
Because everyone continues to quote this design rule as gospel, I’m going to show how to actually determine a correct critical length. In order to determine a critical length, we first have to realize why we might define a critical length.
The reason we can define a critical length is because the input impedance may not be equal to the load impedance when the transmission line connecting them is made longer. Generally, you would like the input impedance to be equal to the channel’s target impedance specification.
So before we begin this calculation, we need the following inputs:
- The interface’s target impedance (usually 50 Ohms)
- The load’s input impedance
- The transmission lines current characteristic impedance
- An acceptable deviation between the line and target impedance
- Some bandwidth limit on the digital signal
- The propagation constant on the transmission line.
Note that the rise time is not needed at all in this list. Rise time plays no role in determining the critical length. The fact that people can quantify the critical length in terms of a fraction of the rise time is a mere coincidence. The example below shows why.
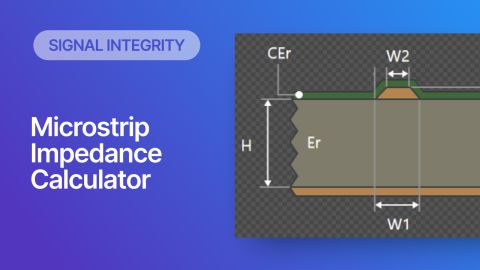
Example With Microstrips
Now let’s look at a simple simulation to demonstrate these points. Suppose we have a microstrip (5 mil layer, Dk = 4, Df = 0.02, ignore conductor loss) that connects a source and load with a 50 Ohm impedance specification. Just for simplicity, suppose the load is terminated to 50 Ohms with enough load capacitance such that we expect a 10%-90% rise time of 1 ns at the load and a channel bandwidth of 350 MHz; that "usable signal bandwidth" is only based on the -3 dB channel bandwidth approximation, although please note that this approximation is only accurate in vey specific instances and is only used here to facilitate a demonstration of the concept.
First, let’s suppose that we have placed a line with characteristic impedance of 80 Ohms, and we are ignoring losses for simplicity. The graph below shows the input impedance for this line based on our 350 MHz channel bandwidth limit. How long can we make this line before we see too much deviation in the input impedance?
The graph below shows the results for microstrips with 80, 70, and 60 Ohm characteristic impedance. The x-axis shows the line length as a fraction of the length traveled during the rise time (I’ve named this the rise time length). The y-axis shows the percentage deviation between the input impedance and the target impedance of 50 Ohms. The dashed lines show the x-axis ratio at an impedance deviation limit of 20%.

How do we interpret this?
Suppose we are designing a channel to hit the 20% impedance deviation limit I marked above, meaning our interface has an impedance tolerance of no more than ±20%. The critical length for the 80 Ohm line would be 23% of the rise time length, while the critical length for the 60 Ohm line is 40% of the rise time length. If the line’s characteristic impedance approaches 50 Ohms, then the critical length approaches infinity.
Now suppose we require a bandwidth of 500 MHz with a much more realistic impedance deviation of 10%. What happens to the critical length for these three microstrips? The graph below shows how the critical length becomes much smaller. The 80 Ohm line has a critical length of ~11%, while the 60 Ohm line has a critical length of 18%.

In the above example, I've arbitrarily set bandwidth to 500 MHz just for simplicity. But just remember, knee frequency should not be used in most practical cases as there many other bitstreams that have no explicit relation between rise time and bandwidth. Any PAM-modulated channel has this property, which includes Ethernet, ultra-fast SerDes, and specialty logic interfaces (e.g., generated with an FPGA). For something like an FM signal or QAM signal in a wireless system, there is no "rise time" at all despite the fact that the channel is transporting digital data; how would you define a critical length in that case? (Hint: it would involve the carrier wavelength)
Important Results
It is very clear that the critical length depends on the line’s characteristic impedance as we would expect. What should not be surprising is the fact that modest impedance differences and modest bandwidth changes produce large changes in critical length. But more importantly, the results above shows something very important about the critical length:
|
|
I'm going to repeat myself again: the critical length has absolutely no explicit dependence on the rise time, what matters is the required channel bandwidth. The 2nd important result is as follows:
|
|
Remember in the above calculation, I made a very liberal assumption regarding the load impedance, the channel bandwidth that it sets, and the resulting rise time at the load. In reality, these numbers could be very different, thus our equivalent “rise time length” will be very different. This brings up another point to underscore:
|
|
In a much more realistic line, where we include all losses and account for load capacitance/package inductance/intentionally placed terminations, the bandwidth vs. rise time relation is very complex. If you were dealing with a basic square wave binary signal, this requires solving a transcendental equation in order to determine the -3 dB bandwidth. This is just another reason to avoid the idea of a knee frequency as you get into longer channels with losses and parasitics.
Is There Any Time to Use the Critical Length Rule?
If your high-speed interface has an impedance specification, then no, you should never use the critical length rule. Just calculate the impedance, the math involved is simple. You can also find free impedance calculators that will give you accurate estimates.
In my work with clients, I have never used the critical length rule in a professional project except in one case: push-pull buses with very fast rise time but without an impedance specification. The only example that really matters here is SPI or fast GPIOs; there is no SPI trace impedance specification, but the rise time on some SoCs can be as small as a few ns with realistic load capacitances. The same can happen with GPIOs on some advanced components.
The image below shows two tables in the datasheet for an AWR2243 transceiver, which I have used in many client projects for radar modules. You can see that the SPI lines and GPIOs can operate with very short rise times.

An SPI bus and some GPIO lines can also end up being very long in practice, in which case these may need some series resistor to match the driver output impedance. The series resistor also slows down the output signal, which is helpful for EMI.
This is the type of case where a critical length rule should be used, but it still requires determination of a bandwidth (possibly based on sampling rate or rise time). In this instance, the only reason you are actually using the rule is to determine whether to place terminating series resistors on the bus. However, the important point here is that you are not comparing with any target impedance! Remember, in this case you get to choose the impedance for these lines because you get to choose the trace width.
Summary
As we saw above, the correct use of the critical length design rule requires at least 3 impedance calculations with 6 input values. We haven’t even touched the bandwidth portion, which requires solving a transcendental equation with the transmission line to get correct. Therefore, it’s quite ironic that someone would use the critical length concept as an excuse to avoid calculating impedance, especially when an impedance calculation is needed in order to implement this correctly.
I think this underscores my main point:
|
|
Although the concept should not be used as a design rule, it is still useful as an explanatory tool for understanding why you might see something like high return loss in an S11 plot. I think this is very useful because S11 basically tells you input impedance, and at specific frequencies you might find the input impedance is very different from your target impedance. A “critical length analysis” with an input impedance calculation could be used to identify very specific features that create large return loss, similar to what would be done by looking at a TDR measurement.
Because the full mathematics of this problem becomes very complex and involves manipulations of transmission line transfer functions, I’ll save this for another article or an external journal article.
If you want to avoid this mess with critical lengths, use the impedance calculator in the Layer Stack Manager in Altium Designer®. When you’ve finished your design, and you want to release files to your manufacturer, the Altium 365™ platform makes it easy to collaborate and share your projects.
We have only scratched the surface of what’s possible with Altium Designer on Altium 365. Start your free trial of Altium Designer + Altium 365 today.

About Author
Related Resources


Related Technical Documentation

Table of Contents
Get the Full Signal Analyzer Experience
- Turn SI analysis into fast, coordinated decisions.
- Your Agile Teams evaluation includes full access to Signal Analyzer.
Contact Us
Thank you, you are now subscribed to updates.

